Topic
Paper Bag Prototyping
Forum Posting
A Membership is required to post in the forums. Login or become a member to post in the member forums!
Home › Forums › Gear Forums › Make Your Own Gear › Paper Bag Prototyping
- This topic is empty.
-
AuthorPosts
-
Feb 6, 2012 at 7:44 pm #1285297
I bought a yard of bright green cuben on gear swap a year ago with the intention of following John Roan’s MYOG backpack guide, and still haven’t done it. I haven’t made a backpack before and didn’t want my first one to be unusable and waste expensive fabric. I also cringed at the thought of spending tons of time on a cheap fabric model only to find out that the dimensions don’t work for me.
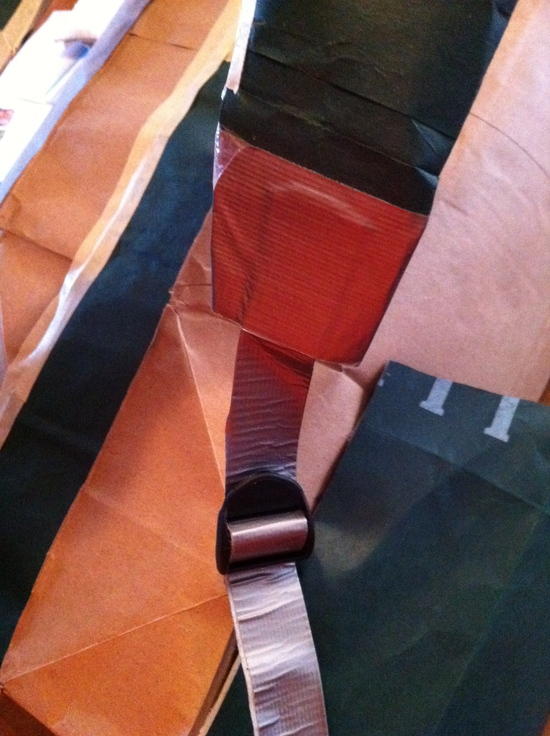
So I bring you…Paper Bag Prototyping: making a full mockup out of taped-together paper grocery bags. Originally I was just going to use them as a flat pattern, but I found they are a great modeling item. Tough enough to roll, stuff with sleeping pad, etc without tearing. I could mark where I wanted the straps and pockets to go and then untape the bag and have a pattern I can use for marking and cutting the fabric. It gives me a good sense of the bag-to-be’s capacity. I also discovered that duct tape folded over on itself holds well enough as webbing in ladderlock buckles.
Other high points:
• Fast: 3 hours start to finish.
• Cost: Free (all materials were found)
• Taped seams! (waterproofness is suspect)
• Multiuse (firestarter, 3D canvas for my daughter’s crayons)
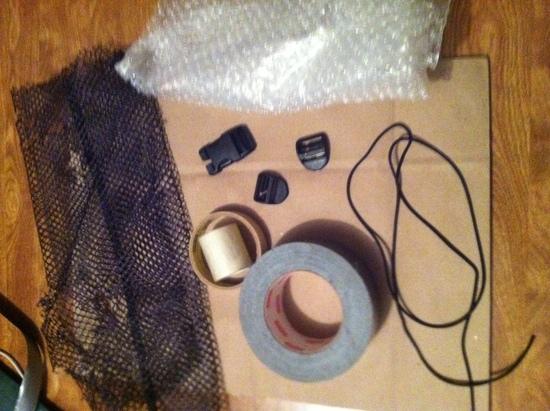
• And most importantly: 15.2 oz (I expect it to be half that in cuben)Taping the bags together:

Materials used: quick-replace buckle and ladderlocks from repair kit, several different tapes, old mesh cut off a discarded baby stroller, bubblewrap, shockcord. Mesh dish-dunking bag not shown, used for front pocket.

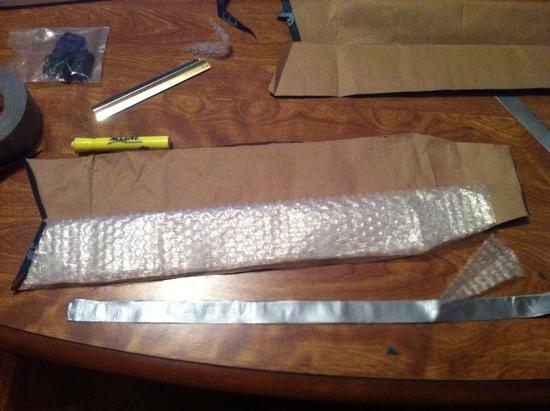
Constructing the shoulder straps:
Strap attachment:
Pack front:
Pack back:
Pack on:
I found out that if I want to go with the rolltop (John’s original design is drawstring), I’m going to either have to add an extension collar of a foot of cuben to the top, or pare down the width of my sleeping pad by several inches.I’ll still make a silnylon version before tackling the cuben, but I feel like I’m going into it with a much better sense of the final product.
I’m wondering if the rolltop could replace a haul loop? Thoughts?
Thanks to John for a great pattern and for making cuben backpacks accessible to the masses!
Feb 7, 2012 at 12:43 pm #1835853That's is freakin' funny- but also very clever. Makes a lot of sense to go that route for a rapid prototype, that's for sure…
I dare you to wear it on a popular hiking trail to freak out the passers by…
BM
Feb 7, 2012 at 2:22 pm #1835899"I’m wondering if the rolltop could replace a haul loop? Thoughts? "
I made a pack with a roll top and use that as a haul loop all the time. I've never had more than 6-7 lbs in it though. I'm sure the buckle would hold up to heavier weights, but I've never tested. *edit* I take that back… I've used roll tops to hold up food backs with dumb weights on there Maybe 15 lbs or more. So I'm sure just picking up the pack on the roll top would be just fine.
Also: it looks great. I love using paper to prototype things out and get an idea of what I'm doing before I mess with anything. Be sure to share your progress with us!
Feb 7, 2012 at 4:52 pm #1835981Nice Greg! Redefining the term paper bagging it ;)
I hadn't thought to use paper bags for prototyping but it's a good idea. I'll have to give that a try.
Feb 7, 2012 at 5:04 pm #1835984Really terrific idea and ridicously obvious! I wanted to do the sameish thing to make a quick mock up of my pack before cutting but this never occurred to me. I ended up with no prototype and only wishes that things would work lol.
But I'm the type who only learns by making large expensive mistakes lol.
I will be doing this on every pack from here on out though.
Feb 7, 2012 at 5:06 pm #1835986You said you'll make a silnylon version before you make a cuban version. May I suggest another idea? I hate sewing silnylon with a passion because its so slippery and packs are complicated. I'd suggest going to a fabric store like Joan's Fabric and buying their 2 oz (roughly) generic nylon. Its going to be a lot easier to work with and its pretty cheap, I think $6 a liner yard. One or two yards should be all you need.
Feb 9, 2012 at 10:21 am #1836878I like this way :-)
can test cheaper and faster.Feb 9, 2012 at 10:50 am #1836885http://www.diygearsupply.com/cgi-bin/isle.cgi?type=all
I'd suggest going here instead of Joann's. It is much cheaper and you can get fabric that you can use in later projects. I found that generic nylon to be pretty unusable.
Feb 9, 2012 at 11:45 am #1836901Greg, I'm new to sewing and going through the same prototyping process as you. Reading this thread, I decided to go straight to prototyping my pack in Joann's Nylon. I debated whether this was worth it, since it is much slower than the paper design and I am literally sewing an entire pack that will get thrown away. However, I'm in the high excitement stage and learning the sewing specific lessons. Notably.
o My machine struggles to get enough tension on the top thread using Gutermann Heavy duty thread. I am going to have the local dealer increase the internal spring tension to resolve.
o Last night I prototyped shoulder straps by sewing the perimeter, turning inside out and sliding in CCF from a pad. The CCF felt good on my shoulders. The stitching was weak and pulled the 3/8" edge from the fabric in one place. The lesson is that I need to roll these seams similar to a hem when stitching. Alternatively, I might skip the inside out part and edge with Grosgrain. Any idea which is stronger or more comfortable?
o From the strap, I also learned I can make a more complicated curved strap that looks good. I need greater seam allowance per above. I have a reusable pattern and foam for the final product.
o Finally, I'm prototyping with white thread on black fabric and a 6mm stitch length. This makes it easy to see the stitches and simplifies any seam ripping. The combination of being a prototype and confidence I can easily seam rip really speeds up putting the project to machine and going.
Similar to you, I'm using John's design as one reference. I want my pack (cuben) to be waterproof, so I will use a roll top with dry bag type closure. My starting point is a height of 36" on the fabric. Do you think this will be tall enough? My reference is a GoLite JAM that is 33" from bottom to top.
Feb 9, 2012 at 12:39 pm #1836918Hey John,
John Roan has more detailed instructions on his website, http://www.mountainultralight.com. There he shows coating the strap pads with baby powder to slide them in, and sewing a line of grosgrain down the front of each strap, sewing through the fabric and foam at once. Those stitches not only make useful attachment loops but should help anchor the foam to the strap fabric and make them less likely to pull away. I prefer this to grosgrain edging but that is just me.I think there are two considerations for the height of the pack: what you’re going to put in the bag for a frame and the seam allowances. My closed-cell foam torso pad, which is from the 1980s, is 23.25” wide. This may be a little wider than most—I think a lot of standard foam pads are 20” wide. I roll this up and use it as the structure of the pack.
The seam allowance is the big thing to take into account. You will probably lose an inch at the bottom (1/2 inch hem rolled twice to encapsulate raw edge) plus height lost from the squaring off of the bottom, and an inch on the top, especially if you’re stiffening the top closure with a plastic placemat strip or ½ inch webbing. I understand you have to roll the top at least three times before buckling to get a true waterproof seal.
With my combination of CCF pad and the seam allowances, I can just barely roll the top three times and I haven’t left a seam allowance on the top edge of the prototype, so I’m at least an inch short.
Possible solutions:
1. John’s model shows the pack body being 36” x 38,” so one solution may be to make the 38” side the vertical (it’s currently the horizontal on my prototype).
2. Purchase one additional foot of cuben to have some more wiggle room and make an extension collar with it. Unfortunately for my pack no one seems to have the bright leaf green cuben anymore!
3. Cut down width of torso pad.
4. Instead of a drybag loop closure, attach clips to either side of the pack and clip the top down (like BPLer Clint Hewitt’s lime green MYOG pack @ http://www.backpackinglight.com/cgi-bin/backpackinglight/forums/thread_display.html?forum_thread_id=53665). This takes a little less fabric to do.
5. Instead of making a whole pack out of paper bags, just do a quick paper mock up of the body (no straps, webbing, pockets, etc). It will probably take you a half hour or so. Run a strip of duct tape along the top of the bag to simulate the stiffener and attach the buckle(s) to loops of it on either side. Then you can stuff your pad in and try to close it and see if those dimensions work for you.Best of luck! I’d love to see how you did the curved shoulder straps.
Feb 9, 2012 at 3:51 pm #1836985Thanks for the note regarding John's website. I did use these instructions and the baby powder trick worked well. My seam issue was due to poor sewing technique.
For height, I have the advantage of a current GoLite JAM. At 33" finished it seams big enough for a roll top, but I need to test it with a bear canister vertically. I don't own a can to experiment with.
I do need to make a choice of how fat versus tall I make the new pack. I hike in the Sierras and many areas require canisters. A Bearikade Weekender is 12" x 9" (others are similar, but a tad smaller). Historically, I have carried the can horizontally inside my pack on top of my sleeping bag, but this leads to a 42" pack perimeter, which seams huge for this pack. The rest of my kit is ~8lbs and compact.
You have me thinking to pack the can vertically. This leads to a minimum pack perimeter of 28". I could make the pack taller and 12" wide by 5 or 6" deep. I will look into your recommendations, especially the Clint Hewitt closure.
FYI, I use a Neoair pad, so my height doesn't depend on the pad. To get structure and hip transfer when carrying a full canister 20lb+ load, I plan to put a lightweight external carbon fiber frame on this pack.
Feb 9, 2012 at 7:02 pm #1837107Thanks for the replies everyone! Your encouragement has led me to stop at the prototyping stage and just use the paper bag as my main backpack. I remember Jamie Shortt writing that his family called his UL down jacket his "paper coat." I think that's the next thing for me. Fill it with shredded paper for insulation. And didn't John Muir boil his water in a paper bag? I bet that even beats the weight of a Heine can!
I plan to be the first UL hiker with an all paper-bag kit. Sponsorships and book deals welcome.Feb 10, 2012 at 7:41 am #1837309… I can offer a paper tent
…but apparently not by inserting an image. Here's a link instead
…struggles further
 Feb 12, 2012 at 2:35 pm #1838492
This doesn't look very waterproof or durable.
-
AuthorPosts


- You must be logged in to reply to this topic.
Forum Posting
A Membership is required to post in the forums. Login or become a member to post in the member forums!
Our Community Posts are Moderated
Backpacking Light community posts are moderated and here to foster helpful and positive discussions about lightweight backpacking. Please be mindful of our values and boundaries and review our Community Guidelines prior to posting.
Get the Newsletter
Gear Research & Discovery Tools
- Browse our curated Gear Shop
- See the latest Gear Deals and Sales
- Our Recommendations
- Search for Gear on Sale with the Gear Finder
- Used Gear Swap
- Member Gear Reviews and BPL Gear Review Articles
- Browse by Gear Type or Brand.
