Topic
Wind Stress on Cuben
Forum Posting
A Membership is required to post in the forums. Login or become a member to post in the member forums!
Home › Forums › Gear Forums › Gear (General) › Wind Stress on Cuben
- This topic is empty.
-
AuthorPosts
-
Jan 14, 2012 at 9:07 pm #1824905
Another vote for testing the cuben LightHeart offerings. Though I think, by design, the regular Solo cuben will hold up to wind a lot better than the SoLong (which has much larger unsupported surfaces and greater incidence angles).
But yes, Judy has described her very thorough bonding process on these forums before and I think expressed quite a bit of annoyance at the amount of effort and time it takes to do it right. I guess this is why other manufacturers don't usually do both.Jan 14, 2012 at 9:22 pm #1824907I don't think that Lightheartgear's Cuben tents are the absolute lightest ones out there, but the are very well constructed. Judy takes the time to sew, bond, and reinforce any and all seams and stress points, and I'd be curious to see how they compare to some of the other tent manufacturers that might be concerned more with the lightest weight tent.
Jan 14, 2012 at 9:43 pm #1824911And I was going to say, someone should just call North Sails. They have a few years putting cuben under some really high loads.
Jan 15, 2012 at 4:00 am #1824938Nick, This sounds real good.
I am not all that familiar with sewing or bonding, so for me, and others here, I was wondering if you could give us any specifics. This might easily fall under a "trade secret" type ethic, though. Please do not violate that.
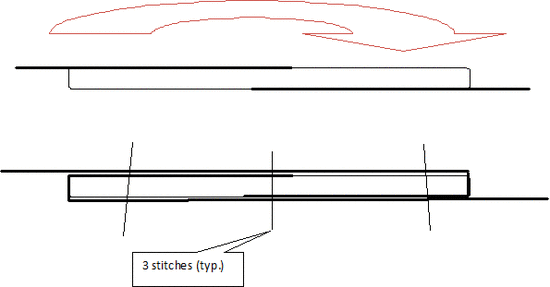
A triple step stitch? Not really following that term. I am more of a carpenter, cabinetmaker. Though in early years I did a lot of everything and anything to make money. I assume that you refer to the boxes caused by the reinforcment gridding in the fabric. Hard to know exactly what you mean, soo, refering to the grid on the fabric:
Triple step stitch:
1)needle, open box, needle (3 boxes forming one stitch?)
2)needle, 2 open boxes, needle (3 boxes forming the period of each stitch?)
3)needle, 3 open boxes, needle (3 boxes between each thread attachment?)
I know, I know…my total inexperience with seaming is showing…carpenters, sheeish!"The seems contain both 3m (9485) double sided tape and sewing." I am assuming there is nothing special about the glue tape, cuben fiber, stitching setup. Example: A half lap and roll might give better resilts, or something different? A rough sketch:
 Jan 15, 2012 at 9:32 am #1824979
I love BPL forum we have so many different people with different technical training in their every day job or self taught like me.WE HAVE A SAIL MAKER IN THE FOURM!!! and he works for one of the best sail company North Sails.
So Nick I really enjoyed reading the history of cuben used in sails and how the Americas3 team secretly manufactured and made the cuben sails about 20 miles inland from my house in Ranch Bernardo,Ca with out of work surfers from the area on the North Sails web site. It reminds me of the stories of how top secret new military hardware and airplanes are made. So the workers don't know what their making.
I posted the link in a few post back in this thread.So If North Sails would allow you to give us just a small tutorial clinic with pictures or video on how you make recreational Cuben sails so North Sails don't give away racing sail technology. So we could make Tarps and packs and repairing them out of cuben with out seam failure or tearing. You would be doing us great service in the MYOG crowd like me { I have avoided cuben fiber fabric till construction techniques are perfected} and the Ultra light backpacking cottage industries. It sure would save us a lot of trial and error time.
Thank you very much,
TerryJan 15, 2012 at 2:51 pm #1825064The three step stitch is a standard stitch used by sailmakers. It is a zigzag stitch where each zig and zag consists of 3 stitches, This distributes the load over many fibres rather than just one and provides a bit more stretch in the seam. See the discussion on this thread http://www.backpackinglight.com/cgi-bin/backpackinglight/forums/thread_display.html?forum_thread_id=31037
Jan 15, 2012 at 4:12 pm #1825093Thanks, Mark!
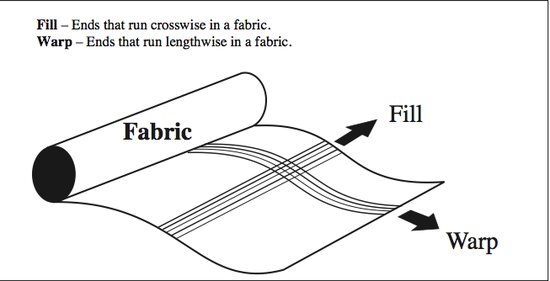
Jan 16, 2012 at 12:18 am #1825218Here is a photo of triple step used on a laminate spinnaker at work. Note the 12mm seems join the panels and run with the warp of the cloth. The larger seem joins the section (of panels), it runs against the fill and needs to be larger.

Cuben has a fill and warp. So it is stronger in one direction (warp).

Most/all tarp shelter manufactures don't use cuben properly as say sailmakers who design spinnakers around the load put on the warp direction of the cloth. Most tarp are constructed with the least amount of seems to save weight and cost in manufacturing (ie :less cloth and build time). They usually run the ridge line along the warp of the cloth and simply join 2 pieces together.
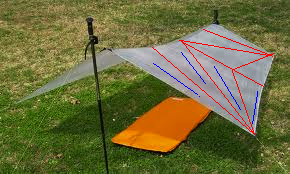
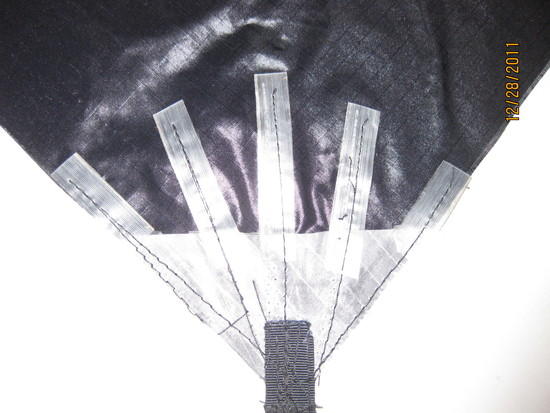
Below is how you could build a tarp using a radial pattern with the warp (load) coming out of the corners. The red lines are the seems and the blue lines would be the direction of the warp. There is load in the ridge line but a flat felled seem would take care of that.

But in fairness, we are talking about comparing how industrial/commercial construction techniques differ from say home building. Some techniques can be used and some can not. Clearly loads are not that great that in tarps that require techniques taken from sailmaking.
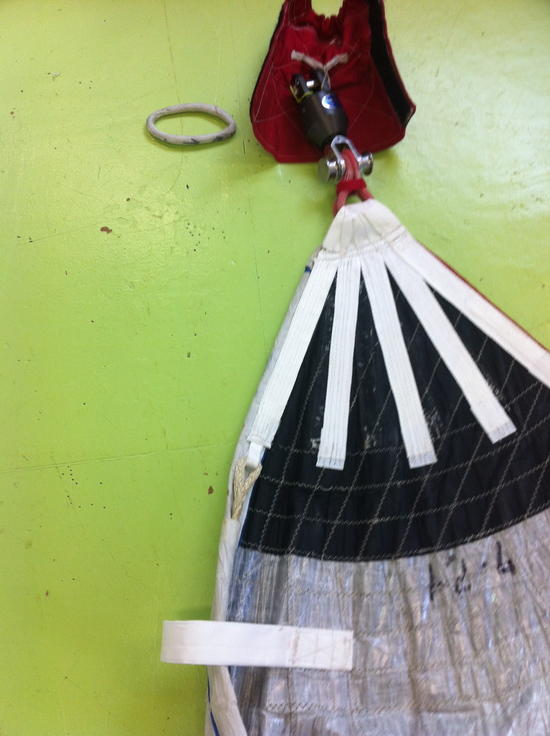
Here is a corner of a 800 square meter spinnaker. Here you can see how large the patches in the corner are that radiate out from the corner. There are also many layers to taper off the further you go out from the corner. The same could be used in tarps/tents.
 Jan 16, 2012 at 12:21 am #1825219
Here is the head of that spinnaker. Note the 38mm spectra webs!
Thats real corner reinforcement
Jan 16, 2012 at 5:23 am #1825238Nick,
Thank you for the hughly detailed explanation of the fabric and stitching used. The stress layout of the tarp is probably way overkill as you suggest. But it clearly shows the need for various cottage people to manufacture tarps & shelters with proper warp orientation.Also, the simple inreinforced loop attachments would likely cause some problems. Which direction should such reinforcement run in? Along the strength of the fadric reinforcement, the strength of the body fabric, or the direction of the stress? I would assume you would want it in the direction of the stress, but in the case of a simple tarp with three guy lines (one each corner and the center side,) a case could be made for strenghtening the fabric along the fill (weft?) rather than simply along warp. I would guess a diagonal grain, oriented along the warp to the corner. The side piece would be a right angle, orienting warp to weft? I ask because I anticipate most cottage manufacturor simply taking two 42" pieces and sewing them together for the main panels along the length of the tarp, along the warp direction. If they should instead put the main seam across the body, right angles to normal practice, this orientation could change…follow?
Again, the goal is minimal fabric for maximal reinforcment, assuming stitching AND gluing to be about 100% of material strength. Or, a felled seam, stiched and glued.
Jan 16, 2012 at 5:50 am #1825243What a great explanation, thanks. And as noted, Spectra orientation is probably not as critical on a tent or tarp as it is in the sailing world.
Jan 16, 2012 at 7:56 am #1825280Nick,
Thank you very much for the mini photo tutorial about Cuben sewing techniques. I did not know about warp and fill direction of fabric how it could even be applied to working with Xpac,Grid x dyneema and other light weight outdoor fabric for making backpacks,shelters other thing to make a stronger build of outdoor equipment.
I think I am ready to come down off my wall to sew some cuben equipment see how I like working with cuben.
Thanks again,
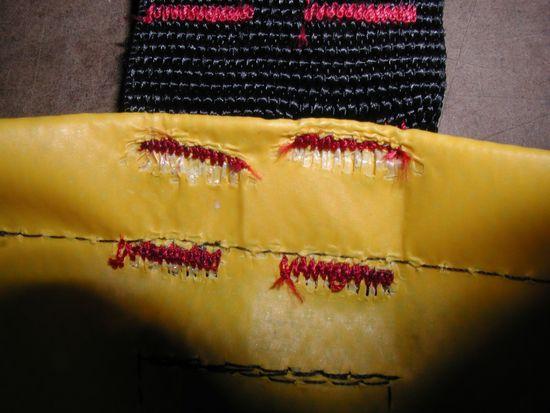
TerryJan 16, 2012 at 9:36 am #1825310Some more photos of Cuben Fiber stitched to silnylon or Cordura Nylon and loaded to
failure. Will be adding more throughout the morning.See how the un-reinforced tie outs were NOT the failure points.
Jan 16, 2012 at 9:38 am #1825311Nick,
Thanks for taking the time to post this info.
Interesting and helpful.
We've been collectively discussing/brainstorming these issues here for some time, off and on. One the the recent iterations looks a bit like one of the photos you just posted.

Daryl
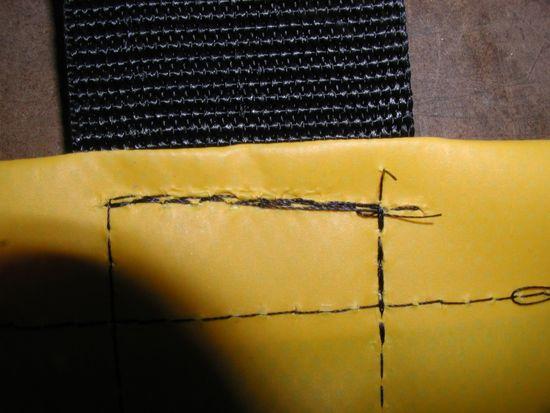
Jan 16, 2012 at 9:47 am #1825318Long Haul Reinforced Truck Vinyl. Notice the bar tack needle holes enlarged like Ryan's
cuben fiber zigzag stitch. Stitch pattern is important. Bar Tacks and imitation bar
tacks made with a zigzag stitch are not the best
for sewing on laminates made with a wide scrim no matter how heavy. See how the
rough sewn line tack held with less needle hole enlargement?
Jan 16, 2012 at 9:52 am #1825319Daryl-
Have you pulled on that one yet to see where the failure occurs? I am guessing it will
be at the far end of the middle finger where the stitching ends.Jan 16, 2012 at 11:28 am #1825358Circling back to Ryan's main question in the OP:
" I'm wondering if any of you have any Field Experience that has resulted in stitching failure on tie-outs of Cuben tarps/shelters resulting from the stitching cutting the Cuben and ripping out in response to wind stress?"
It looks like almost no one has a direct Yes answer. -Not sure that that means…OK- maybe I do-
The one pic Ryan posted looked like a particularly poor design – Just a web loop lightly zig zag stitched to a unreinforced panel with an over size needle- a poor design you would expect to fail. But- I guess you do see it done that way sometimes. – I'm sure he picked that shot as only an example – but maybe there are more folks building cuben shelters that way than I know…I hope not…
I think what would be interesting is to see any Yes answers and then to note the construction design that failed and the conditions.
As a design note – the main things that would affect the strength of a side or middle panel tie-out are:
1: Amount of area reinforcement
2: The stitch techniqueUsing a few layers of bonded on reinforcements that are large enough – and at least one on each side- and then sew the web loop on with a bar tack, tight zigzag or even a simple box stitch pattern and it would probably be OK. – Reinforcement is the Key.
One note on any light weight shelter side panel tie-out:
They are there as an additional supplementary tie-out point. The main tie-outs ( corners, edges, etc) of the shelters should take the majority of the wind force first. Do not over tighten the side panels to change the shape of the shelter in an effort to add more internal room. If you do that then that one single point will get super-loaded in gusts and even a well designed and constructed tie-out can weaken. Using a short loop of bungee at those type points is also a good idea.If your trip need is for each and every side panel tie-out to withstand certain and huge wind forces ( winter arctic expedition, etc) , you may need a custom shelter that is built from the 1.4oz or heavier style cuben material.
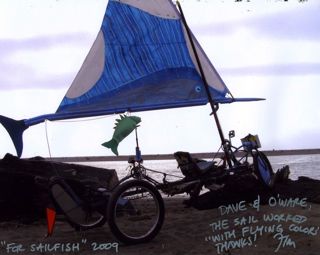
Jan 16, 2012 at 12:01 pm #1825370Sailfish in the Kinetic Grand Championship.
Note the complex curves needed to reinforce the absurd and whimsical
 .Jan 18, 2012 at 4:48 pm #1826401
I have another goodie, I think I'll just bury it in this thread for now :)
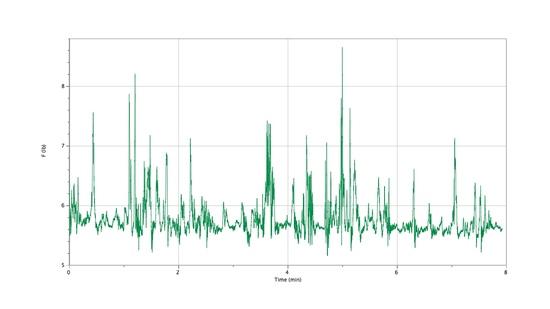
How about knowing the tension forces at shelter stake out points in response to wind loading? Here's a graph of wind loads in a guyline in response to a 1-2 mph breeze for a guyline that was preloaded to 5.6 lb or so.
The x-axis is time from 0 to 8 minutes and the y-axis is guyline tension (lbf) from 5 at the bottom to 8.75 at the top.

Of course we don't care a lot about breezes, or these low forces. We care about real wind, and real tent stress. The graphs get pretty exciting even at 15mph winds on some of these tents.
When we combine this data with video, wind speed and direction, and real-time monitoring (data transfer from the sensors to a laptop), we get a really, really cool holistic picture of what's going on in a shelter in response to winds. Stay tuned for more – a lot more – in 2012 about this.
We're also using these sensors (combination load cell = force + accelerometer data) to evaluate load stability in backpacks and the real effects of trekking poles on reducing impact forces while walking. Gonna be a fun year :)
Jan 18, 2012 at 4:57 pm #1826405This is why I will be renewing my membership. Was thinking that I probably wouldn't, but if you guys are willing to get involved with stuff like this, then I want to know all about it!
-
AuthorPosts


 .
.
- You must be logged in to reply to this topic.
Forum Posting
A Membership is required to post in the forums. Login or become a member to post in the member forums!
Our Community Posts are Moderated
Backpacking Light community posts are moderated and here to foster helpful and positive discussions about lightweight backpacking. Please be mindful of our values and boundaries and review our Community Guidelines prior to posting.
Get the Newsletter
Gear Research & Discovery Tools
- Browse our curated Gear Shop
- See the latest Gear Deals and Sales
- Our Recommendations
- Search for Gear on Sale with the Gear Finder
- Used Gear Swap
- Member Gear Reviews and BPL Gear Review Articles
- Browse by Gear Type or Brand.
