Topic
Fins on a Rockstar can
Forum Posting
A Membership is required to post in the forums. Login or become a member to post in the member forums!
Home › Forums › Gear Forums › Make Your Own Gear › Fins on a Rockstar can
- This topic is empty.
-
AuthorPosts
-
Jan 11, 2012 at 9:55 am #1823196
Nicely done HX , David.
Having folded a lot of Al for the SqueezeBox stove, I'd suggest running something along the short folded section if you want to flatten it; if the foil is soft and thin enough, you'll probably be able to flatten pretty well. I used a block of hardwood, my thumbnail, or a metal rod, depending on what came to hand at the time…
I wonder how well Nick's flue tape HX fins work, since the foil is very thin, and likely to have relatively high thermal resistance (despite the high conductivity of Al). Would be very nice to get some comparison figures. It could be that the fins are simply slowing the hot gases, thus encouraging heat transfer, rather than actually conducting heat to the pan.
I dug out a couple of HX-related threads that I remembered reading/posting to; they may have some tips on bonding, etc. and hypertext allows us to keep connected things connected…
I questioned why the MSR HX had such a wide retaining strip in that thread, which goes against my immediate thoughts that arose on this thread, of surrounding the HX fins with a cylindrical 'container'*. Admittedly, this could be thin foil like the rest; the idea being to retain the hot gases within the HX. The same concept really of extending the HX below the base of the pan to act as a windshield, a random thought posted of a thread about wood stoves… Thread drift, and all that…
* This container could extend to the ground to provide pot support and windshield. To avoid controversy, let's keep it cyclindrical…
Jan 11, 2012 at 10:30 am #1823223"I wonder how well Nick's flue tape HX fins work, since the foil is very thin, and likely to have relatively high thermal resistance (despite the high conductivity of Al). Would be very nice to get some comparison figures. It could be that the fins are simply slowing the hot gases, thus encouraging heat transfer, rather than actually conducting heat to the pan."
Kevin: I was wondering that, too, since I didn't see enough aluminum thickness to move much heat to the pot. But he reports it made a measureable difference. You're probably right that reducing excess ambient air flow coming up between the windscreen and pot maybe have helped by keeping that annulular air space hotter. In which case, probably better to just reduce the windscreen diameter a bit. But what if his fins are acting like little vortex generators? That would easily explain better HX and some of them are pointing in non-vertical directions as you'd want VGs to do. I was going to do some tests on soup cans with and without VGs, and now Nick has given me a GREAT way to quickly apply VGs to a pot. A way that packs nicely because they fold out of the way.
Jan 11, 2012 at 10:32 am #1823228"I questioned why the MSR HX had such a wide retaining strip in that thread, which goes against my immediate thoughts that arose on this thread, of surrounding the HX fins with a cylindrical 'container'*. Admittedly, this could be thin foil like the rest; the idea being to retain the hot gases within the HX."
Also, the retaining strip around the outside, would provide better thermal contact between the fins and the pot, if you tightened the retaining strip.
You could make this lighter by just using a piece of wire.
Jan 11, 2012 at 11:17 am #1823260Jerry; yeah, the wide strip strapped the HX to the pan, but it seemed way OTT for that function. I think you replied on one of the linked threads, with your wire suggestion; same idea as a thin strap…
Jan 11, 2012 at 11:20 am #1823263When the JetBoil came out, I scribbled a few alternative HX ideas. One of which was spiral fins around the outside of the pan….
Jan 11, 2012 at 1:12 pm #1823369Hi David
> I'm keeping your annealing tricks in my back pocket for other projects. With all the
> bends in it, this corrugated flashing wrapped pretty easily around the can.In my experience, flashing is sold fully annealed.
Cheers
Jan 11, 2012 at 2:17 pm #1823407David,
Flashing sold at Home Depot is a 5182 series, H18 (full hard). You can tell becasue when you anneal it, it is pretty wimpy. Best regards – Jon
Jan 11, 2012 at 2:28 pm #1823414OK, mine is from Australia, so there are obviously differences. Fascinating.
Cheers
Jan 11, 2012 at 3:04 pm #1823435<"mine is from Australia, so there are obviously differences"
Rpger: Well, yeah. What you call roof flashing, we call a shower pan. And vis-a-versa.
Jan 11, 2012 at 3:16 pm #1823440>"Flashing sold at Home Depot is a 5182 series, H18 (full hard). You can tell because when you anneal it, it is pretty wimpy. Best regards"
Jon: Thanks.
Some basic questions: So it is NOT annealed off the shelf and therefore is more brittle and less easily worked? But if something IS annealed, it is generally more workable?
Are soda cans not annealed?
Tempering chocolate, I know. Annealing aluminum, not so much. Can you give me a "recipe" (metalurgy, chemical engineering and cooking are all about a certain temperature for a certain time) to anneal aluminum? And if I want it hard again, do I have to work-harden it?
Jan 11, 2012 at 3:31 pm #1823450David,
The most common aluminum materials are 1000, 3000 & 5000 series. These aluminums are not heat treated. With these series, the hardness is due to mechanical stress (strain hardening). You can anneal them in an oven and it is usually a time / temperature chart (google it). You can soften section of them by applying local heat. For your folds, using a soldering iron to heat the bend section may work fine (easy to try anyway). One hint is if the aluminum changes color to a brown shade (that’s the protective finish burning). Once you soften the aluminum, you can only harden them again by straining them. BTW, I find the full hard aluminum much easier to work with than soft aluminum. It is easyier to cut, file and punch. Dead soft aluminum is worse than wet paper.
In general practice, windscreens made from roof flashing will all end up being dead soft. The reason is that most windscreens get pretty hot and over time, the time / temperature curves mentioned above kick in. If you tweak your current fins, I am willing to bet that they are softer than when you first started.
Cans are a similar story. I believe that they are a highly strained aluminum. Cat food cans are incredibly stiff. Then again, you heat them up and they get soft as well.
The only exception is if you use 6000 or 7000 series aluminum. These alumni can be heat treated. It’s a long process and probably too expensive to pursue. Best regards – Jon
Jan 11, 2012 at 4:01 pm #1823474Thank you, Jon. That's very helpful in knowing what I can do, can't, and what to expect over time.
Jan 11, 2012 at 5:51 pm #1823528Yeah, there are specific formuli for various metals, alloys, hardnesses, ductility, etc. I think the model people also do the same by putting several flat sheets from cans in an oven and simply run a clean cycle. This will take the work hardening (from forming the can) out of it and return it to very soft maliable heavy duty foil. As was mentioned, the same will happen once it is on the pot, anyway. It is MUCH easier to work with, folding, bending, even stretching, than leaving any work hardened tensions in the metal.
The same thing happens when I make the bottoms on the ExPots. I anneal them, then retool the bottom with a half dozen deeper ripples. Well worth the 15% increase in performance and it can be used on ANY stove, not just a caldera cone. The bottom again becomes harder due to the tooling work applied, it does not stay soft.
This is also why bending something till it breaks usually works. The compression/tension of bending causes the metal to become brittle. After three or more back and forth, it breaks, but the actual edge will be quite hard. Copper can be pounded till it achieves a good metalic density. It makes a fair to good knife, actually. But, like any tooled metal, heating it will reset the molecules, softening it again. I think the Egytians used copper stone cutting tools for statuary made by working raw copper. I believe forming sheets, as they did to make old tin or copper ceilings also causes the stretched metal to be stronger than unworked metal. Drawing metal works because the finer wire, after pulling, is stronger than the origonal. Heat again, is used to anneal it, or reset the molecules. Anyway, there are a LOT of examples. (I made a few celing tile forms for a restoration project when I was in my 20's and spent some time looking stuff up, BW: before web. We used copper sheets and painted them.)
For just a couple pieces of roof flashing, rolling is the same as drawing only limited to a couple dimensions, I would run them over a stove burner till they start browning. Once they have reached that heat, they should be quite wimpy. You can go further, but you risk melting it. Try a couple scraps. It only takes a couple minutes, likely less, over a methane or propane blow torch flame. MAP gas will be too hot, more than likely.
Jan 12, 2012 at 9:49 am #1823781> Are soda cans not annealed?
Wooh, no! Most of the stuff you buy that's finished product won't be annealed; it will be work hardened as per the last machining step. Unless it specifically needs some heat treatment/annealing for the final application (the cap may be treated to allow the opening to tear as designed).
Soda cans are produced by a pretty fascinating 'drawing and ironing' process. Some nice seminar slides on Aluminium here. Hmmm… that doesn't look right; I have a saved version called 'aluminium_cans.ppt'. But here's a nice Scientific American article about cans.
If you play about with can sidewall and stoves long enough, you soon find out how soft it is when it's annealed. For instance, if you make something like this out of Al cans:

the side walls soften so much that the thing collapses… It practically turns to putty.
Jan 12, 2012 at 9:56 am #1823786> For just a couple pieces of roof flashing, rolling is the same as drawing only limited to a couple dimensions, I would run them over a stove burner till they start browning.
I agree with Jon & James; get some scraps and play about with your stove, and you'll soon get the hang of how to achieve the 'Goldilocks' softness…
Of course, the other issue for a foil HX is that you may anneal them in the burner flame… It's a question of how hot they get, which in turn will depend on burner power (strictly, the 'waste' heat passing through the HX), length & thickness of the fins (i.e. the thermal resistance which will determine the temperature gradient from tip to pot).
You may end up with floppy fins…
Jan 12, 2012 at 10:05 am #1823788> You're probably right that reducing excess ambient air flow coming up between the windscreen and pot maybe have helped by keeping that annulular air space hotter. In which case, probably better to just reduce the windscreen diameter a bit.
Missed this last night.
I think that reducing the windshield diameter might have the opposite effect to the one you're trying to achieve; it may simply increase the air velocity due to the chimney effect, thus sweeping the hot gas out of the stove before it's given up its heat to the pan.
My thought on the vanes is that they might slow the air flow by fluid dynamics effects; getting in the way of the 'sticky' air.
Jan 13, 2012 at 2:13 am #1824154Well it looks like David has a little more time to put into this than I do, but if I don't see any updates from him, I'll try to do an experiment.
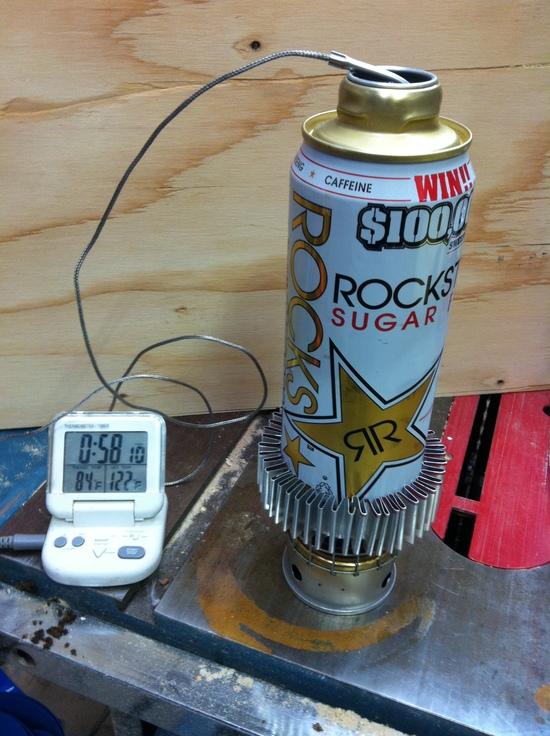
Plain fosters can, fosters can with fins, black painted bottom fosters can, and fins + paint. I'll use a thermometer to check start temp, and time them all to 212*F. I'll do several runs and take the average, then post the results.Of course, that's IF I can find some time to play around with this.
Jan 13, 2012 at 2:46 am #1824156Nick,
If you take the temp readings to 200F you avoid the the majority of the vaporizion changes that occur just before the boiling point. Lids become quite important for testing. I live at low altitide, ~1000feet, so, 212, is out anyway. Water boils at 211.4 or something depending on the weather. 200F is safe enough for sterilizing any water, anyway. It also makes any test repeatable across the vast majority of the USofA. Jerry Gollier (backbackgeartest.org) does the same. So, it is easy to compare results, with others. Besides, 200F is a nice number to remember. As always, your choice.Jan 13, 2012 at 8:30 am #1824222Nick: I aim to repeat with the can bottom painted black as well, but maybe not this weekend as we're taking the kids skiing (X-C on Saturday, Alpine on Sunday). I also want to play with the metalic tape on the side as VGs.
Regarding air velocity: In general, don't think of it as "time to transfer the heat". Think of turbulance as good for heat transfer. Like wind chill on your skin – higher air speed makes for more heat transfer.
Jan 13, 2012 at 5:53 pm #1824477Sure, I guess I could go to 200. I'm more or less doing this to see if the fins or paint get us to that temp faster than just a plain pot, so i don't think it will matter what temp I go to. As long as my results show a significant decrease in time or not. If my tests show that you save a minute or more with the fins, it will show that they are worth using regardless of what temp you go to.
Jan 15, 2012 at 11:28 pm #1825210OK, now that is cool. The big barrier to HX pots is the weight of the HX. Typically the weight of the exchanger is greater than the weight of the fuel saved by the exchanger, except on extended trips. Reduce the weight of the exchanger, and suddenly you've removed the barrier to using HX pots, and you can have real efficiency gains. NICE.
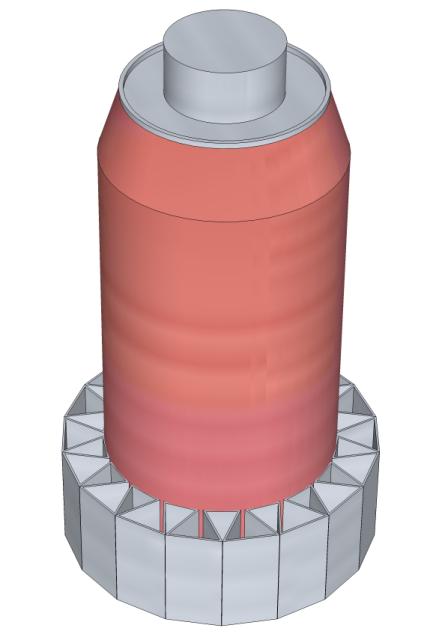
Jan 16, 2012 at 10:23 am #1825333Here's another possible vane configuration, which provides a 'windshield' to the heat exchanger 'tunnels'. It's from one of the 'JetBoil scribbles' I mentioned earlier. I've just drawn a pretty SketchUp version of it applied to a Rexam King Can (1000ml).

The idea is that the foil is folded back in itself to create triangular chimneys. By designing the inner and outer fold lengths correctly, we can form a continuous wall outside the chimney, thus enclosing the hot gases entirely. The number of vanes shown here is purely to make the SketchUp drawing easy (20 degrees per segment).
ps. I have no idea if this might be beneficial; it's just an idea… The outer segments may be dead weight, since they're so far from the can, and unlikely to drag heat back to the can; more likely to radiate it away…
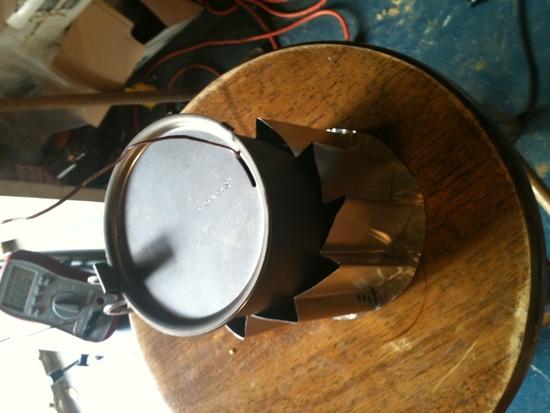
Jan 16, 2012 at 11:30 am #1825360So here is an idea that I was tinkering with a while ago (BTW, I thought about this design after seeing the Squeeze Box concept – great idea). The idea was that channeling the air close to the can may be as beneficial as adding fins. That way, you would place the design burden on the windscreen and use a generic pot. This is a windscreen that was designed to wrap around the mug. The idea was to channel the exhaust gasses close to the mug surfaces. The shape also rolled up and fit inside the mug. The profile is not symmetrical as I was experimenting with creating inlet ports that would enter tangentially to the stove with the hopes keeping the flame steady.
The CAD Layout

The prototype using a Snow Peak 700 mug

The windscreen is made if flashing (full hard) and was not too difficult to make. You could shape it such that you would have a pretty snug fit between the mug and the windscreen. I think that the tangential inlet ports were working pretty well. The system worked pretty well, but I think that I needed a better center burn stove to work with this design. My stove had too high of an output and the flame fronts occasionally moves up to the exhaust ports. Bet regards – Jon
Jan 16, 2012 at 1:26 pm #1825408Kevin: I like the larger contact area with the pot walls a lot. I realize it is a conceptual drawing. My guess is that a slightly finer spacing – 10 to 15 degrees per triangle – would add more delta heat gain than it cost delta in weight.
I see the main benefit of the outer segments as containing the hot air closer to the pot and the radial fins. Also, if by their extenstion below the pot or their outer diameter, they may also serve as a windscreen to the pot / fins. They do add weight, but the assembly is also "smoother" than mine – not so many corners to snag when packing. If you were to not epoxy it but remove it between uses, you'd something connecting all the fins and the outer segments serve that purpose very well.
How would you envision forming it?
And/or is there any commercial product from which one would scavange something similar?
Jan 16, 2012 at 1:39 pm #1825413>"The idea was that channeling the air close to the can may be as beneficial as adding fins."
Jon,
Yes, keeping the hot air close to the pot absolutely helps heat exchange. As does the small "pipe" size (thinking of the triangular sections as pipes carrying air). Flow in smaller pipes is more turbulant and that greatly helps heat exchange.
I like how you can fit a generic pot in there and I assume the windscreen wraps to fit within the pot for storage? That's a big plus.
Is it possible to get it snug enough that it adds stability to the pot? I'm thinking that the outer point on the windscreen gives a considerably larger footprint than the stove base on the ground or the pot base on the stove.
What kind of an air gap or air holes do you have at the bottom to allow for combustion air?
You've got me thinking that maybe there is an overlap in the two ideas: HX fins and pleated windscreen. Is there a tighter spacing than yours but much, much larger than mine that would handle ALL the exhaust gases but also be in firm, thermal contact with the pot?
An advantage of your approach is that you can use very thin (light) material. My heat fins are pipes carrying heat so they need some thickness to do that.
-
AuthorPosts


- You must be logged in to reply to this topic.
Forum Posting
A Membership is required to post in the forums. Login or become a member to post in the member forums!
Our Community Posts are Moderated
Backpacking Light community posts are moderated and here to foster helpful and positive discussions about lightweight backpacking. Please be mindful of our values and boundaries and review our Community Guidelines prior to posting.
Get the Newsletter
Gear Research & Discovery Tools
- Browse our curated Gear Shop
- See the latest Gear Deals and Sales
- Our Recommendations
- Search for Gear on Sale with the Gear Finder
- Used Gear Swap
- Member Gear Reviews and BPL Gear Review Articles
- Browse by Gear Type or Brand.
