Topic
Fins on a Rockstar can
Forum Posting
A Membership is required to post in the forums. Login or become a member to post in the member forums!
Home › Forums › Gear Forums › Make Your Own Gear › Fins on a Rockstar can
- This topic is empty.
-
AuthorPosts
-
Jan 10, 2012 at 2:11 pm #1283960
So one of you put me on to Rockstar cans (please chime in and get credit). I really like the multi-purposing as a water bottle and coupled with a Alky stove, it could be a very light cookset.
But. . . .I can never leave well enough alone. And I've done lots of tests decades years ago on MSR's clamp-on heat exchanger and more recently have gone exclusively to Jetboil's 1-liter and 2-liter pots with their "flux ring capacitor" for family BPing trips for the fuel savings but more so for the time savings (wife doesn't like iodine/chlorine so I boil water to purify and melt snow for half our trips).
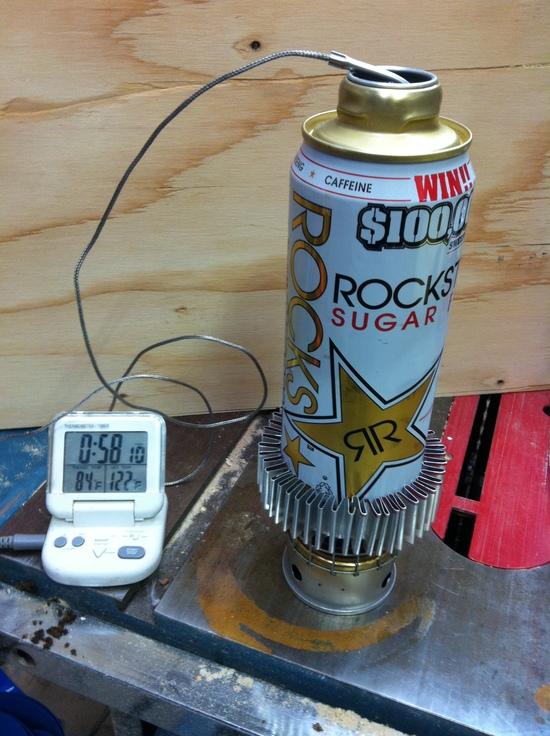
So I made a little jig out of plywood so I could bend 1" strips of aluminum flashing into corrugated HX fins.
I got some baseline boil and fuel consumption numbers and then affixed the fins with JB Weld. I envision putting a 2" integral windscreen around the fins to contain ALL the hot air and force it through the HX fins. I also plan to lay in a little more JB Weld right at the fin-can junction as Jim had pointed out to increase heat flow at that point.
I also need to pick up another unmodified Rockstar can for side-by-side testing. Anyway, here's the work in progress:

Editted to rotate image.
Jan 10, 2012 at 2:26 pm #1822816I don't have enough data to post 2 significant figures yet, but from my initial tests it cut almost 2 minutes off the boil time for 500 grams of water and saved 20% of the fuel.
Before: 25 g can with lid, almost 9:50 boil time for 500 g, 15 grams alcohol.
After: 62 g can with fins and lid. 8:04 boil time, 12 grams alcohol.
The added weight is a big percentage, because I went with aluminum much thicker than the can. (HX fins are pipes to carry heat, big pipes carry heat better.) And I realized it makes it harder to pack the can, but maybe if you also brought a Ti cup?
There's no good flat surface onto which to affix fins on the bottom of the can, because that would be more packable.
Anyway, I'll later attach an integral shroud around the fins to funnel more of the hot air past them and repeat the tests.
Mostly I wanted to check the sort of percentage savings could be acheived, work out a way to make nice fins, and test JB Weld in this appication. That all proved out.
Jan 10, 2012 at 3:00 pm #1822829David, this is awesome! Alchy jetboil/water bottle. I would want the heat shield removable if i was using the can as a water bottle. Maybe the heat fins could fit into the stove?
Jan 10, 2012 at 3:08 pm #1822834Well executed. A thought: If you extended the fins down below the bottom of the pot, would they act as a windscreen and simply funnel all the flames along the pot? If so, could you avoid carrying a separate windscreen? Or do you think that might choke out the flame?
Jan 10, 2012 at 3:15 pm #1822836Looks like a really fun concept and has my brain working. Any idea how well JB Weld conducts heat? Web site says it doesn't conduct electricity but is silent regarding heat.
A little internet research tells me that JB Weld is not very thermally conductive. There are apparently adhesives out there that are marketed as being thermally conductive. Results may be even better with those adhesives.Jan 10, 2012 at 3:37 pm #1822848jb weld is fairly dense. It probably does not conduct heat all that well, being basically a plastic product, but better than a simple contact like on the MSR. Sort'a wonder if maybe a happy medium might be in order for low temp applications, like boiling water. Probably anything that would hold up to say 350-400F would be better. Hence David's, choice. Great idea!
Jan 10, 2012 at 3:47 pm #1822850What's stopping you from welding the fins to some kind of windscreen? If you kept the ring tight enough that you had good contact with the Rockstar can, would it have better thermal conductivity without the interference of JB Weld? Also, this might protect your fins better when packing.
Jan 10, 2012 at 3:48 pm #1822851I'd also be interested to see what your jig looks like. This could be a fun project.
Jan 10, 2012 at 4:25 pm #1822864James: Thank you. Since I've JB Welded the fins on, I've got a slightly spiky water bottle now (I did keep all cut edges turned in, though). I was thinking that adding a shroud would make it a little smoother to pack and access as a water bottle.
Ben: Re: Extending fins below pot to capture all the hot air. I thought about that, but there's so much length/mass in the fins, I'm thinking a shroud of the current outside diameter is less weight than making all those fins taller. The windscreen I envision is JB Welded onto the outside of the heat fins. But maybe it could be beer-can thickness instead of flashing thickness.
Ben: Re: JB Weld's thermal conductivity – imperfect compared to lead solder or that Arctic epoxy with silver and aluminum. But I smooshed the fins right to the Rockstar can to achieve contact and the JBW fillets around that contact. I'm sure the JBW is better than air. And I can get it in my little northern town. I also liked the safety margin between 600F rating and 212F boiling. But, yeah, there's probably better stuff. Certainly JBW's chemistry but with silver instead of steel would be better.
Clayton: "What's stopping you from welding the fins to some kind of windscreen? If you kept the ring tight enough that you had good contact with the Rockstar can," I'm not sure if this is what you mean, but your post has me thinking: if I welded the fins ONLY to an outer windscreen and NOT to the Rockstar can, then I could separate them, pack them each more tightly (a la MSR's version), and retain the water-bottle function of the Rockstar can.
Clayton: Re: the jig. I'll get some pics of that in action and post it. I started bending the flashing by hand and it wasn't straight or consistent enough at all. I wanted all those inner turns to touch the can so I need a pretty consistent procedure. A hunk of scrap plywood, some wood glue and a few air-gun brads and I had a jig. Pics coming. I'm now trying to imagine a jig for the Jet-boil style of HX.
And you know what? When I finish these experiments? I might end up with a better BPing pot. Or I might stick with the Jet-boil pots. But I'm sure:
1) I've already learned a lot.
2) I've fun doing it. and
3) I'm going to have the fastest, most efficient pasta pot in town when I convert it with bottom and side HXs and a shroud. Cause in a good year, I BP 20-30 nights. That leaves 300+ nights of cooking dinner at home.
Jan 10, 2012 at 5:26 pm #1822884Clayton,
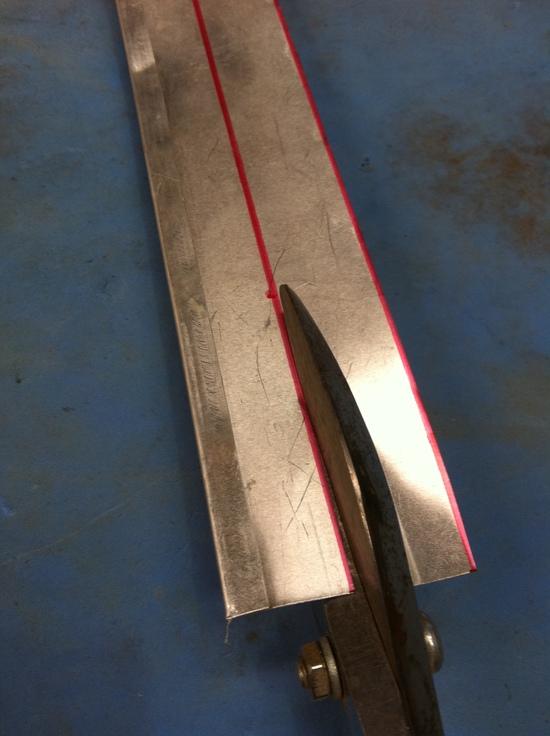
First I measured aluminum flashing a little over one inch in width:
Then I cut along the lines with tin snips. Although heavy duty scissors work, and aluminum is soft, the scissor get dull from the much harder aluminum oxide surface layer.
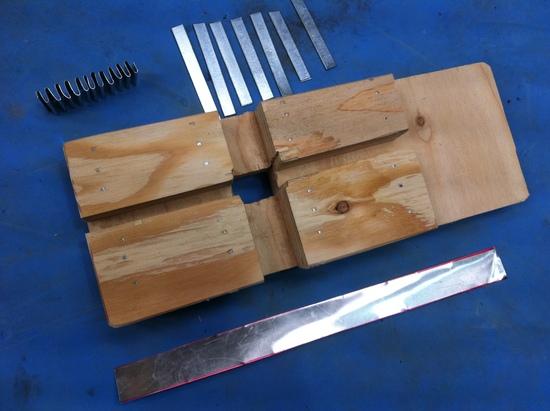
Here's the jig I used. I had some 1-1/8 subfloor plywood and cut some blocks out of it. The vertical channel is a bit larger than the width of flashing. The horizontal channel is a tight fit for small steel spacer bars I drop in (they are sections of the flat rod that supports suspension files in a file cabinet). The hole in the bottom is so the finished fins can be positioned below the working jig after every 8 or so folds.

in the photo above, the aluminum strip is below the jig, the steel spacer bars are above the jig. And a finished corrugated section of fins is up to the left.
Here is the jig with the aluminum strip bent over two spacer bars:
and here I am folding the aluminum strip up. I found I got more consistent bends if I pushed the spacer bar down with the tips of a pair of needle-nose pliers:
Jan 10, 2012 at 5:37 pm #1822887Due to my Celtic ancestors, can I claim this is an Irish jig?
Anyway, any day I get off the computer and actually work in three dimensions is a good day.
Jan 10, 2012 at 5:39 pm #1822889Interesting, very interesting!
Tell me, when you have made the folded stack, do you flatten the bends on one side to get a better contact with the pot?
You know … if you put a loop of wire of exactly the right length around the outside with a bit of spring in it, you could probably slide the combination on and off the base of the pot, which would allow you to pack it away inside the pot. It would then look a bit like the MSR beast, but sufficiently different to cause no IP problems. Yes, highly tuned to ONE pot size, but so what?
Cheers
Jan 10, 2012 at 5:41 pm #1822891Clayton: "What's stopping you from welding the fins to some kind of windscreen? If you kept the ring tight enough that you had good contact with the Rockstar can," I'm not sure if this is what you mean, but your post has me thinking: if I welded the fins ONLY to an outer windscreen and NOT to the Rockstar can, then I could separate them, pack them each more tightly (a la MSR's version), and retain the water-bottle function of the Rockstar can.
That's exactly what I had in mind. If you try it, I'd be interested to see how it works out. This looks to be another efficient, no hassle cooking system.
Now you've got me wondering if you couldn't combing the HX somehow with a frustumic windshield…
Jan 10, 2012 at 5:48 pm #1822894Another thing you could do is to take something around the outside, like even as simple as a wire, and clamp down the fins so they make better contact with the pot.
Great idea by the way, very innovative, 20% less fuel use? not bad
Jan 10, 2012 at 6:07 pm #1822906Roger: "do you flatten the bends on one side to get a better contact with the pot?" I see that as a definite improvement. It occurred to me, but I'd need to dial up my jig-making skills or maybe just hammer on my fins for a while to flatten one side. I agree that it would be better, but hard to do on a small scale. It's an advantage of the MSR set-up.
"slide the combination on and off the base of the pot" That's another big improvement – to increase the packability of it. Maybe notching the outside of the fins to nestle the wire into. Anyone have a sense of the temperature of "Somebody's Name" Point at which a spring loses its springiness? for common steel springs?
"but sufficiently different to cause no IP problems" My smell test: Anything I think of in 20 minutes shouldn't have been granted a patent due to the non-obvious clause. That doesn't necessarily keep me out of court, but it lets me sleep at night. When a uber-geek friend explained CDs to me for the first time (decades ago) my first reaction was, "And, since it's digital, they code Artist, Title, Genre, and recommended equalizer settings at the beginning of every track, right?" And he said, "No, someone got a patent on that a few years later." His domain name is obviously.com because he agrees that we're too lenient in rewarding minor acts of creativity.
Jan 10, 2012 at 6:38 pm #1822920In the second jig photo, is that a fold or a flange on the left side of the metal?
–B.G.–
Jan 10, 2012 at 6:48 pm #1822923Bob: That aluminum sheet metal is doubled up on the left edge. It was left over from another project. -David
Jan 10, 2012 at 8:51 pm #1822989You can get alumiweld at Harbor Freight. Fromt eh YouTube video, you can do some amazing things with it. I have no skills at brazing or soldering so I haven't tried it. Best regards – Jon
Jan 10, 2012 at 10:26 pm #1823026That Alumiweld looks like fun, but I'm not sure if those cans could take 730 dF.
Silver epoxy is great but pretty expensive IME. Plus the working time is only about 15 minutes.
Jan 11, 2012 at 5:27 am #1823090Thank you so much for the jig idea! I had done this previously to my Heineken pot and I remember gaining a significant improvement, however the details escape me. It was enough though to justify the weight gain in my mind.
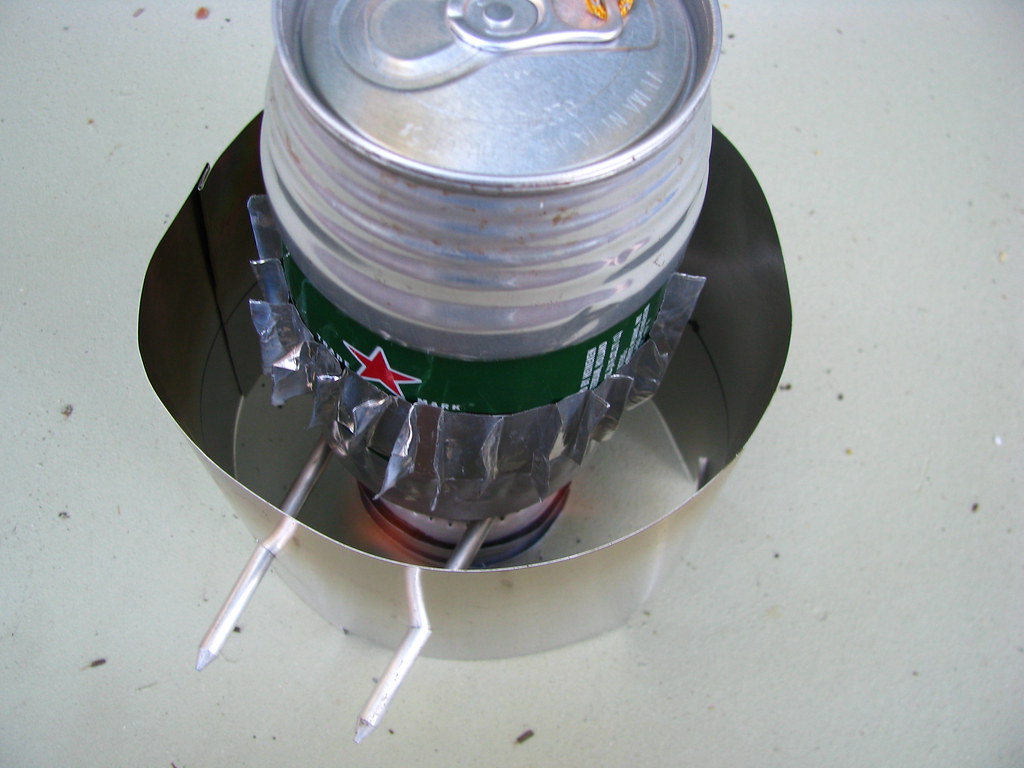
I might make a suggestion though. I used a foil tape on mine, that seems would be much light, plus it's integrated adhesive, which survives the flames surprisingly well. I have also been able to fold the fins against the pot for packing, then deploy for cooking, and they have survived so far. Although, I do only have a handful of trips with it.
Here is the tape:
http://www.homedepot.com/buy/paint/adhesives-tape/322-aluminum-foil-tape-189-in-x-50-yd-54217.htmlAnd here are a few pictures of my fin job. As you can see, I will benefit greatly from your jig :)
http://farm5.staticflickr.com/4133/4965718802_999aaf3674_z.jpg
http://farm5.staticflickr.com/4085/4965719704_eca6b196c8_b.jpg
I also like the idea of the shroud. I may try this with a fosters can, fins, and a shroud that doubles as a pot stand…
Jan 11, 2012 at 5:48 am #1823100I want to fiddle with this when I have time too. I was thinking you could hang a windscreen off those fins.
Jan 11, 2012 at 6:14 am #1823106Roger: "do you flatten the bends on one side to get a better contact with the pot?" I see that as a definite improvement. It occurred to me, but I'd need to dial up my jig-making skills or maybe just hammer on my fins for a while to flatten one side. I agree that it would be better, but hard to do on a small scale. It's an advantage of the MSR set-up.
Why don't you insert 2 of your file folder pieces each time you make the inner fold that would touch the can? It would make this fold a bit wider and give you more surface area. If it's not quite square-ish enough you could maybe flatten with needlenose pliers.
Jan 11, 2012 at 7:31 am #1823127David,
It occured to me that annealing the aluminum before trying to make the HX part would help with the folding and effort. The jig could be improved by simply feeding it through some old gears if you have some laying around.They make a corrogated aluminum, used in may furnaces, that would work equally well, I think. Note that attaching an outer shield should be done with a low thermally conductive glue, anyway.
A cheaper corugation maker is available here: http://www2.fiskars.com/Products/Crafting/Embossing/Embossing-and-Texturing-Tools/Paper-Crimper
This can be used with heavy foil to produced 5" height HX sheets. Not as deep as yours of course. But it would save a LOT of bulk. Carfully rolling on thined JB weld should give you an adequate bond considering the surface area and application. Likely much better suited to smaller 300ml cup/pots, though.Jan 11, 2012 at 8:33 am #1823156David,
One of the factors effecting performance of your system may be your stove design. Looking at your original post, you were able to lower the fuel usage from 15 to 12 grams. 12 grams of fuel is 15 ml which would make the system on par with the a good stove. I suspect that the wattage that you are delivering may be too high for the diamter of the can.
It looks like you have a chimney style stove. Changing the outlet diamter may also increase your fuel efficiency. My 2 cents – Jon
Jan 11, 2012 at 8:52 am #1823163Nick: Your Heineken can fins with foil tape has several advantages to mine: Lighter, quicker to make and more packable. I'll give it a try – I also keep foil tape around.
Shroud + Potstand. If your can + fins are close to a 3" or 4" outside diameter, you could use a piece of 3" or 4" aluminum duct work with little tab to support the pot at the desired height above your stuff. That ductwork is cheap, light, and can be clipped together and unclipped.
Eric: Yeah, a bigger spacer would give me more contact on the pot which is good. I'm debating about making some trapazoidal spacers from ash or oak so that my flat sides would mostly be formed as I work it through the jig.
James: I'm keeping your annealing tricks in my back pocket for other projects. With all the bends in it, this corrugated flashing wrapped pretty easily around the can. I thought about gears, offset with a little more spacing, but didn't have anything of the right size that was strong enough. That Fiskar crimper is a cool idea. Benefit per weight, I should be using thinner aluminum – something between flashing and heavy-duty aluminum foil – maybe beer can thickness. That would add very little weight although I wonder how it takes a crimp – it seems less ductile than flashing.
Thanks everyone for the thoughts and encouragement. I have to be on top of my game before my wife will let me convert the pasta pot, but it's going to happen. With before & after boil times documented.
Editted to respond to Jon: Thanks for the benchmark. I wondered about that as I am new to alcohol stoves. I realize which stove I use is a HUGE variable but it's not one I want to get into just now. That was one I got for $4 on eBay – it has fiberglass inside as a wick. It's my only alcohol stove and for a super-light weekend or even a picnic, I might use it. But for a week or for snow camping, I'm going with my canister stoves. Partly, I wanted to test the JB Weld in a lower temp, lower heat-rate application first. Then I may start converting the old BPing pots to something more like Jet-boil's pots. And then when I think I know something, buy and modify a Ti pot with whatever combo of bottom fins, side fins, and shroud have emerged as most promising.
Stovetop tests I've done in the kitchen keep coming in around 30% efficient for fuel heat value getting into the water in pots without fins or tight windscreens. I think with the right combination of ideas, I could double that efficiency without adding much weight at all – consider how little weight the Jet-boil fins add to their pot. You save that much fuel before boiling your first liter of water suggesting to me that the sweet spot is actually thicker or longer fins, two banks of fins, and/or an integrated shroud to maximize fin effectiveness.
-
AuthorPosts


- You must be logged in to reply to this topic.
Forum Posting
A Membership is required to post in the forums. Login or become a member to post in the member forums!
Our Community Posts are Moderated
Backpacking Light community posts are moderated and here to foster helpful and positive discussions about lightweight backpacking. Please be mindful of our values and boundaries and review our Community Guidelines prior to posting.
Get the Newsletter
Gear Research & Discovery Tools
- Browse our curated Gear Shop
- See the latest Gear Deals and Sales
- Our Recommendations
- Search for Gear on Sale with the Gear Finder
- Used Gear Swap
- Member Gear Reviews and BPL Gear Review Articles
- Browse by Gear Type or Brand.
