Topic
Caldera Cones – My Adventures in Improving the ULC system
Forum Posting
A Membership is required to post in the forums. Login or become a member to post in the member forums!
Home › Forums › Gear Forums › Make Your Own Gear › Caldera Cones – My Adventures in Improving the ULC system
- This topic has 114 replies, 35 voices, and was last updated 4 years, 7 months ago by
 DAN-Y/FANCEE FEEST.
-
AuthorPosts
-
Jan 5, 2012 at 12:26 pm #1283742
OBJECTIVE
I like the ULC style Caldera Cone. I prefer it over the Sidewinder (consumes more space inside the pot) and the regular Caldera Cone (cumbersome to store, heavier). The fuel efficiency and pot stability are excellent. However there are still some significant areas for improvement. The areas I've identified are:1) I would like it simpler than 4 pieces (cone, 2 stakes, stove)
2) The 12-10 stove doesn't light that great in deep winter (ie. 15 F)
3) Could be lighter
4) Could pack even betterPHASE 1 – REPLACING THE 12-10 STOVE
A while ago I discovered Zelph's Starlyte stove and I was blown away. The Starlyte uses a wicking material inside the stove which makes it spill proof, but more importantly for me, it lights easily even on really cold winter days using fuel far below freezing temperature. Check out the Starlyte at -24 F here: http://www.youtube.com/watch?v=6kcyj_nYS1AIt's small size, extremely low height (just 1.8" from the ground to the pot) and light weight (14g) also really impressed me. When combined with a MYOG Ti windscreen that fits inside your pot, it's nearly the perfect system except for one big flaw. It's not very stable.

I set out to see if I could remedy the stability issue by using the Starlyte inside a ULC Cone for my 0.9L Evernew Deep Pot. I did a quite a few careful tests to see how well the Starlyte would fair inside the cone. Using the cone and the stakes to hold my pot at the normal cone position 3" off the ground, I averaged fuel economy 8% WORSE than using the 12-10 stove. However, the Starlyte is designed to have the pot on it's integrated (but unstable) pot support 1.8" inches of the ground, not 3". I removed the stakes and did more tests with the pot at the lower 1.8" height. Fuel efficiency increased nicely to 4.9% BETTER than the 12-10 stove with slightly slower (ie. +5%) boil times.

I knew I was onto something here, but I wasn't sure how to modify my cone to get the pot 1.8" off the ground. I could either cut 1.2" off the bottom of the cone, or I could just create new holes for the stakes 1.2' lower than the original bottom row of holes. I opted for the former since it would result in a lighter cone, even though I was nervous about cutting the cone and about the need that would arise to punch new air holes along the bottom as the original ones would be cut off.
I wiggled the pot support off the Starlyte stove, cut 1.2" off the bottom of the cone to lower the pot and then used a hole punched to create holes every 5/8" around the base perimeter of the cone. After a bunch of tests, I averaged 0.6% worse fuel economy than the 12-10….so virtually the same excellent fuel economy. I had succeeding in replacing the 12-10 stove with the Starlyte while preserving the fuel efficiency. I had also dropped the weight of my ULC cone from 29.9g to 20.1g – a one third reduction in weight. I also reduced the weight of the Starlyte stove by removing the pot stand to 12.1g (from 14.0g and vs. 14.5g for the 12-10).
As an added bonus, the whole thing now packs quite a bit smaller with the shorter cone and the smaller stove. The cone no longer protrudes up into the frying pan lid area, so I can now leave the fry pan lid (40g) at home and replace it with a MYOG one or ideally a carbon fiber one around 10g.
SUMMARY OF BENEFITS/CHANGES
1) Windscreen + Stove weight down to 32.2g from 44.4g
2) No significant loss in fuel efficiency
3) Lights much easier in cold winter
4) Easier lighting action since you can light the Starlyte from the side with a lighter (you could do this with a 12-10 too, but you'd have to spill/waste a bit of fuel on the outside and light that).
5) Consumes even less space inside your pot.
6) Lower, and thus even more stable than the original cone
7) Option to replace the frying pad lid and save a lot of weightSUMMARY OF DRAWBACKS
1) Can't snuff and recover fuel from the Starlyte
2) Boil times average 0:20 longerPHASE 2 – MODIFYING THE STAKES
In phase 1 I had improved 3 of the 4 areas I had set out to improve. Those areas were winter lighting ease, packability and weight. However, I hadn't significantly improved the simplicity of the system. I'm being a bit anal here, but I don't like using stakes in my cone. For me, they aren't multi-use because I often cook with both breakfast and dinner with my shelter setup and I only carry the minimum number of stakes I need to setup my shelter. Furthermore, the stakes are quite a bit beefier than you'd ever need to support a pot.Trail Designs has changed the stakes they include over the years from the straight stake shown above left, to more of a traditional shepards hook shape like the one with the orange tip (not actual TD stake, but close). One small downside with these newer stakes, is that if you insert them too far, the one end of the stake droops down as the hook of the stake enters the cone wall. This gives you an off-balance pot, so it's just one more thing to watch. The original Trail Designs stakes didn't work quite as well as tent stakes, but they did work better when used with the cone, which what I (and likely a lot of people) only use them for.
I wanted to shave some weight, eliminate the drooping possibility and make the stakes more packable, so I bent my T.D. stakes as shown so it's impossible to insert them too far. I then snipped off the remaining head of the stake. Previously, the stakes wouldn't even fit in my 0.9L Evernew Deep Pot. Now they not only fit inside, they don't even enter the fry pan lid area so you don't even need to use the fry pan lid. The weight per stake dropped from 8.1g to 5.9g, for a combined savings of 4.4g.
SUMMARY OF BENEFITS/CHANGES
1) Stakes are 26% lighter
2) Stakes now store INSIDE pot
3) No risk of un-level stake surface for potSUMMARY OF DOWNSIDES
1) Less useable as tent stakesPHASE 3 – MOVING BEYOND THE STAKES
I was happy with the changes made to the stakes, but I still hadn't met my original goal of reducing the complexity of the system. I would love to figure out a way to eliminate the stakes while retaining the stability of the cone, but the best I could come up with was reducing the number of pieces by 1.This stage is still a work in progress, but I used a coat hanger to create this 'tuning fork' shape:
I punched two small holes in the cone 1" apart to use this. The 'tuning fork' needs to be squeezed while you insert it, which is a really good thing because once it's in, it can't move forward or backward. It's rock solid. You can throw the cone around, roll it down a hill – and the tuning fork will stay solidly in place and maintain the shape of the cone.
Unfortunately, coat hanger wire does not work well for this application because it's not very springy. When you squeeze this fork to insert it, it bends so you have to bend it back outwards again to fit into the far holes. What I have done is ordered a bit of 2mm titanium rod ($14 on eBay) which should be a lot more springy and capable of handling these demands without bending as it's squeezed. I should know in another week or two once it's arrived.
This coat hanger 'tuning fork' is 10.2 (vs. 11.8g for the two modified stakes). Titanium is about 45% lighter than steel, so hopefully V2 of the tuning fork will be around 6g, which is down well over half from the original 2 stake weight of 16.2g. If the springy-ness/insertion ease doesn't work out with the V2 tuning fork, then I'll have to widen the holes on the insertion side and narrow them on the opposite so that a wider fork is used that doesn't require bending to insert. I'll update this as I go.
Jan 5, 2012 at 12:36 pm #1820241One more thing that I'm working on it finding a cap for the Starlyte stove. If I can find a plastic cap (think Pringles style) that perfectly wiggles onto the Starlyte stove then I'll be able to overfill the stove with fuel and then when I'm done cooking I can just snuff the stove with my fry pan lid (or whatever) and slip the lid on to prevent the fuel from evaporating until I want to use the stove again. This would truly be stove Nirvana :)
Jan 5, 2012 at 12:47 pm #1820253I really like your tuning fork idea. It think it'll work great for a pot stand / windscreen combo I use for my beer can pot cook set. It's current biggest weakness is the "L" shaped 3/32" stainless steel rods I currently use. If you wiggle it too much, they will fall out causing a great deal of frustration. You know, once your stove is lit, and you are wasting fuel fiddling with your pot supports when you could be heating water…
BM
Jan 5, 2012 at 1:34 pm #1820293Nice post Dan,
It makes me smile when I see 26% lighter (4.4 grams savings).
While you're waiting for the titanium wire, you might try bicycle spokes instead. I've been using them as pot supports with good results for quite some time.
Jan 5, 2012 at 1:53 pm #1820305I'd love to experiment with bike spokes, I just figured they were maybe a bit too short. An MTB wheel is 26" and I figure the hub is maybe 2-3" diameter, so the spokes would be about 11.5-12" long, but likely a bit less with the nipple etc on the one end.
My v1 tuning fork is about 12" long. Maybe spokes are this long though…
I bought one of these….it's 2mm x 400mm (~16") for $14. If they're long enough then a bike spoke would be a cheaper/faster way to experiment though. I'd probably want Ti spokes though so see if the characteristics of the metal are going to work.
http://www.ebay.com/itm/2MM-TITANIUM-ROD-BAR-SHAFT-400MM-MODEL-MAKER-GRADE-5-/280671321562?pt=UK_BOI_Metalworking_Milling_Welding_Metalworking_Supplies_ET&hash=item4159507dda#ht_1182wt_922Jan 5, 2012 at 2:23 pm #1820330Dan,
You can emove the flattened area and simply fold the spoke. I think that will work OK.Jan 5, 2012 at 3:46 pm #1820380I've tried spokes in the past, only to have them get red hot, soft, and then bend under the weight of a pot of water. Maybe my spokes were too thin. I have also tried 1/16" diameter ti wire, and it did the same thing. I'm now planning to order 6' of 1/8" grade 5 ti rod from McMaster ($25) and use the remainder to make some ti stakes. If I only get 8 stakes, that's still over $3/stake so I'm not really saving anything over a purchased stake, but I've got some ideas brewing. I'm not a big fan of shepard hook stakes anyway.
BM
Jan 5, 2012 at 4:41 pm #1820407Its possible the bike spokes could come out a bit lighter than your 2mm Ti rod. There are some pretty light spokes on the market. The lightest ones are generally butted (have varying thicknesses). Some 15/16 or 15/17 gauge double butted spokes would be 1.8mm at the ends, varying down to 1.6mm or 1.5mm (resp.) in the middle. Having less metal means mean that stainless comes out a similar weight. There are also aero bladed spokes out there, which are often stronger and lighter, such as the Sapim CX-Rays. You could use them with the blade running vertically.
There's these babies in titanium, the superlight ones I think are bladed. 2.6g for a 260mm spoke is crazy light, but I'm not sure exactly where you can buy them or the cost; that might be the prohibiting factor. For bikes, titanium spokes might not be a great idea, but for you use they would be fine:
http://www.biketaiwan.com/database/adshow.asp?t=tbs2011&p=0641
The lightest stainless spokes on the market, I'm pretty certain, are made by Sapim.
Sapim CX-Rays in 260mm are 4.34g each. Sapim Laser (very thin gauge round butted spokes, not as strong but might be easier to work with, and they are cheaper) are about the same weight as the CX-Rays. Sapim CX-Rays are available up to 304mm in length, Sapim Lasers to 303mm, you can buy them here:
http://www.wheelbuilder.com/store/sapim-cx-ray-spoke.html
http://www.wheelbuilder.com/store/sapim-laser-double-butted-spoke.htmlMy personal pick would be to buy a couple each of the Lasers and CX-Rays in the longest lengths, see what you can get to work, then buy a few more of that. They might not last as long as your Ti 2mm rod (fatigue), but at $1.10 a pop for Lasers, you can make up quite a few as spares and replace them periodically before they fail.
Hope this helps.
I love you work Dan! If I was a rich man I'd get you to build such a set-up for me :-)
Edit: I can see Ultra's point on the heating and then bending of bike spokes. It might depend a bit on exactly where the spokes are-if they are running right through the middle of the hottest part of the burn they could start to bend. On the other hand, if they are out of the direct flame and more to the side of your pot, then they might be ok…you can only give it a shot
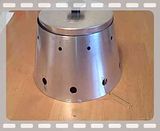
Jan 5, 2012 at 7:37 pm #1820510Nice project Dan. Nice reduction in weight.
Here is how I used a modified version of the StarLyte. The pot is held up by the stove. Windscreen is held in close proximity of the pot preventing the pot from moving side to side, tipping over etc. The StarLyte is fine tuned just like the burner used in the Caldera.
<center>

</center>Jan 5, 2012 at 8:21 pm #1820534Thanks for chiming in Dan. Does that modified Starlyte burn slower for better fuel economy/performance in a low oxygen environment? Is that the idea with the metal ring on top?
In my cone with the Starlyte, I typically burn a pint of cold water (ie. the coldest you can get out of the tap) in 9 min using 16g of fuel (2/3 oz) but that's using methanol (aka methyl hydrate) which is about 30% less efficient than ethanol/denatured spirits because you can't get ethanol in Canada.
I found some 2g Terra Nova stakes just now. I thought they would be too short, but they are actually a nice length and they support a full 0.9L pot of water with no significant flex. I didn't test it with the stove on, but I imagine Ti fairs quite a bit better than steel when it's hot, so I presume they'll work well. I'm still going to try the tuning fork idea with the 2mm Ti rod, but it's not going to be lighter than this. These stakes are 2.3mm in diameter and you can get them here individually for cheap. Anyone who doesn't use their cone stakes as tent stakes and who has a fairly small diameter cone should get these:
http://www.moontrail.com/terra-nova-ti-2g-skewer.phpWith the 2g stakes, modified cone and modified Starlyte stove, I'm at 37.5g total compared to 61g for the original ULC cone/12-10 stove/8g stakes setup, and I think this one suits my needs much better too. It's way more compact and burns better in the winter.
Jan 6, 2012 at 4:00 am #1820640Problem solved, good find.
I know you mentioned that you don't use the stakes for your shelter, but having stakes rather than a piece of Ti rod/tuning fork does give you some backup in case of losing/bending one of your shelter stakes. I'm stating the obvious of course.
Noice :-)
Jan 7, 2012 at 4:30 pm #1821440Yes, the modification prevents it from "running away"
It took me a long time to find the right combination. I used a windscreen with a rectangle hole cut out and covered it with a sheet of "mica" so I could view the flame pattern while testing. I have it all documented on my blog. I should have all of you come over and we can pull up a seat and talk stoves. heh heh.HikinJim style.Just kidding.
I have a few samples of the modified burner only that I can send you to see how they work in your new arrangement. Give me some info in a message and I'll get them on the way to you.
Jan 9, 2012 at 7:51 am #1822073I sent along a plastic cap for the StarLyte burners so you are one step closer to your goals. Wait a while before you put the cap on. The cap perfectly wiggles onto the burners. You should be able to fill with 1 ounce of fuel for your initial use. Have fun testing.
Jan 9, 2012 at 10:36 am #1822170Dan —
Great modifications! Maybe you mentioned it earlier, but wonder if that ULC that you're modifying is titanium or aluminum?
A suggestion: If not too weak, using 1g Terra Nova stakes instead of the 2g version would cut your total stake weight in half (4g down to 2g). Specs provided on-line state that the 1g and 2g versions are both 12cm in length.
Moontrail shows "out of stock" for single Terra Nova 1g stakes, but here's Altrec listing a set of 6 for $19.95 (as does Amazon):
http://www.altrec.com/terra-nova-equipment/titanium-1g-skewer-pegs-set-of-6
That'd be about $10/gram to get the two stakes needed for your modified ULC.
But the 4 stakes left-over from the set might do duty elsewhere, maybe on pair would serve as shish-ka-bob skewers stuck through holes at the top of the Caldera Cone to roast chunks of fish or bake a string of dough into bread ;>)
Plus, one pair of the 1g Terra Novas might help secure the ULC in windy conditions by shoving the stakes through opposing holes at the bottom of the ULC and into the ground (if that's possible).
Jan 9, 2012 at 11:31 pm #1822489"I sent along a plastic cap for the StarLyte…The cap perfectly wiggles onto the burners."
Amazing. I'm so excited about this. I spent several hours this week in a few different grocery stores looking for such a cap with no success. I'm really excited to try out the stoves you've mailed and the cap. The cap is going to be a nice fuel saver.
"If not too weak, using 1g Terra Nova stakes instead of the 2g version would cut your total stake weight in half (4g down to 2g)."
Hmm…yes it would cut my stake weight in half if they're not too soft, but the 2g ones seem to have an appropriate amount of strength for the weight of the pot. The 1g ones would likely work, but with a fair amount of flex. I'm also not sure the value is there since I'm in Canada and shipping is $17, so that's $37 to save 2 grams. Good suggestions on other uses for the remaining 4 stakes. If I'm placing an order anyways at a website that sells the 1g stakes I'd like to try them out sometime, but with the shipping costs to Canada, it's not worth placing an order just for these.
These 2g stakes are actually quite nice for non-essential shelter application if you're hiking in areas with decent soil. I've used these quite a bit to set up my dogs tent, and for non-essential stake outs like vestibules or extra fly guy lines.
"is that ULC that you're modifying is titanium or aluminum?"
Titanium. Do they make aluminum ULC's?Jan 10, 2012 at 12:35 am #1822508Dan, re your question, "Do they make aluminum ULC's?"
Trail Designs used to make aluminum ULCs but stopped doing so because there were reports that ULC aluminum cones couldn't handle the heat.
Rand described the issue with aluminum ULCs in an earlier thread as follows:
"The Aluminum ULC did go away…..sorry. The issue was that the exhaust gasses didn't cool off enough before they escaped through the top vents, and caused a few cases in the field where the vents "disfigured" due to the heat. Titanium stands up to the heat much better."
I have one of those aluminum ULC cones (for Snow Peak Mini-Solo) that I purchased before the above issue ended production. Haven't experienced a problem with my aluminum ULC, but I haven't used it much either since I later purchased a titanium ULC for a similar pot (Snow Peak 700).
Enjoy reading about your ULC refinements. Look forward to next chapter!
Jan 10, 2012 at 10:16 am #1822660Anyone got any suggestions for what I could do for a pot lid?
My fry pan lid weighs 40 grams and I'm almost never going to use it as a fry pan. I only bought this pot because the fry pan lid was necessary to store the previously taller ULC cone. Now that the cone stores inside the main pot I really have no use for this lid so it's just adding weight and taking up space. There's easily an ounce to be saved here.
It's a pity I didn't know about the MLD 850 ml pot before I bought this setup, because Ruta Locura makes a 7 gram carbon fibre lid for that pot. That CF lid is too small for my pot though and they're not going to make other sizes (I asked). An MLD 850ml pot + CF lid + ULC cone modified in the manner described in this thread is my dream setup.
For the lid, I don't really want a aluminum foil lid, as I want something robust enough to handle life in my pack. Maybe I could cut a circle out of some thin titanium sheet (TiGoat or Suluk46), but how to attach a handle to get it off? Maybe a triangle out of some space 2mm Ti rod that I have coming?
This pot is 4.3" in diameter. I haven't been able to find any other Ti pots that are close enough to steal a lid from…and even then I'd have to buy the whole pot, so I'd end up just using the whole pot and selling the 0.9L Evernew.
Jan 10, 2012 at 10:35 am #1822671Wood and Ti seem such a mix of old and new, but wood is nice for a little handle because you can grab without a potholder / glove / dirty sock.
You can JB Weld wood to Ti if you rough up the Ti first with some fine grit sandpaper. Not even a wooden drawer pull from Home Depot. Just a wooden bead from a craft shop. Or a curved branch, 1/4" diameter and 1 to 1.5" long epoxied to the lid at each end of the little branch.
Or maybe a binder clip, cut in bits, would let you have the lid handle lay flat for packing but click into place for use. Just tried it – it definitely would lie flat very nicely. And there a little indent causing the handle bit to stay vertical as well.
Jan 10, 2012 at 12:30 pm #1822745Thanks. The wood is a good idea. It wouldn't be too hard to find a nice little piece and then drill a small hole in the Ti lid and attach the wood with a small screw from the underside. For storage, I could flip the lid upside down so the knob is in the pot and not protruding.
I wonder if there's a source for Ti that's a little stiffer than the foil sold by TiGoat and Suluk46. That stuff would work, but something with a smidge more rigidity would be nice.
Jan 11, 2012 at 5:39 am #1823095I imagine that if you could add a lip or ridge around the edge of the lid, either of those titanium foils would be rigid enough. The hard part is figuring out how to add a lip. A wooden press of some kind is the only thing I can think of.
Jan 11, 2012 at 10:02 am #1823200Here's a way of making a reasonably robust but lightweight lid from drinks can sidewall. The edge is pretty rough, but if you had fancy edge-rolling tools, you could do a much better job. I only have simple tools and a thumb…
I've used a 'T'-shaped piece of flue tape to make a simple handle, a bit like Nick Larsen's HS fins on this recent thread.
Jan 11, 2012 at 10:12 am #1823212I concur with James. And if you make the main area of the lid recessed relative to the rim, it will settle onto the pot instead of being prone to vibrate / boil off and fall.
For a, say, 5" pot, I'd make a 4.8" wooden disc out of 1/8" plywood and attached it to something substanial – a 2"x8" or a square of thick plywood. Then I'd router a 4.9" circle an 1/8" deep into a piece of wood or plywood.
Duct tape the Ti lid to the routered wood (female part). Duct tape the male part on top. Take it to a friend with a press or drive over it a few times.
Practice first on some aluminum flashing.
Jan 11, 2012 at 10:44 am #1823235Sorry, I think I inadvertently moved your location on the Member Map
http://maps.google.com/maps/ms?ie=UTF&msa=0&msid=217710768001213283190.0004ac9ffae6ae244e691
-Jesse
Jan 26, 2012 at 3:40 pm #1830171Yesterday I got that package from Dan (Zelph Stoveworks) with the lid and two prototype Starlyte stoves. It's super awesome stuff. I'm stoked.
The lid is amazing. It's something so simple yet effective. For 2.5g (0.1oz) I can save the unburnt fuel and no longer worry about putting the right amount of fuel in. It's brilliant….considering the fuel saved, it'll be easier and lighter than what I was doing before. It also turns one of the cons of a wicking stove (can't recover the fuel) into a pro, because saving the fuel in the stove is even better than sucking it back out. I snuff the stove with my fry pan lid.
Regarding the actual testing, it's been going well. I've got a few tests each with each prototype stove and I'm trying a few different setup configurations now. So far the prototype stoves have been roughly falling along the general relationship line (ie. slower with better fuel economy) but with some interesting results that I'll get into once I've gotten more confidence in the results.
So far I have whipped up a little graph with all the starlyte tests I've done so far (includes all three versions of the stove and a few different setups). You can easily see the relationship between time (vertical axis) and fuel economy (horizontal axis). There are a couple standout tests (bottom, left two data points), one of which I think was testing error on my part and the other was a neat idea that I'm going to explore further.
I was hesitate to show the axis's because I think comparing one persons data to another persons is a delicate thing. If you do look at the axis's to estimate the actual performance numbers, just keep in mind:
1) I'm using methanol, which is about 25% LESS energy dense than ethanol aka methylated spirits.
2) I'm using a fairly narrow pot (Evernew ECA265)
3) I'm using quite cold water (40F)
4) I'm bring it to a true boil. I stop the test when the first puff of steam comes out of the lid, which is probably 20 seconds after a light boil.
Once I get a better sense of the overall relationship line/curve between time and fuel economy, I'll look for ways to shift the curve (i.e.. more efficient overall) and once I've done that I'll decide where on the curve I want to be. I'm personally liking boil times in the 8-9 minute range, as they typically get a bit slower in the field. I think my testing is fairly realistic (ie. I'm not using 70F water) so hopefully the shift into real world conditions won't be that radical.
Jan 26, 2012 at 5:29 pm #1830225I knew the plastic lid would be the highlight of your testing so far LOL
Thanks for the update, looks like you're having fun.
-
AuthorPosts


- You must be logged in to reply to this topic.
Forum Posting
A Membership is required to post in the forums. Login or become a member to post in the member forums!
Our Community Posts are Moderated
Backpacking Light community posts are moderated and here to foster helpful and positive discussions about lightweight backpacking. Please be mindful of our values and boundaries and review our Community Guidelines prior to posting.
Get the Newsletter
Gear Research & Discovery Tools
- Browse our curated Gear Shop
- See the latest Gear Deals and Sales
- Our Recommendations
- Search for Gear on Sale with the Gear Finder
- Used Gear Swap
- Member Gear Reviews and BPL Gear Review Articles
- Browse by Gear Type or Brand.
