Topic
Ultralight DIY hammock insulation
Forum Posting
A Membership is required to post in the forums. Login or become a member to post in the member forums!
Home › Forums › General Forums › Hammock Camping › Ultralight DIY hammock insulation
- This topic is empty.
-
AuthorPosts
-
Jul 27, 2011 at 10:08 am #1277273
I have been playing around with all kinds of combinations of pads and fillers to use with an under cover. I took a space blanket and crumpled it up and stuffed it in a 45 gallon LDPE (low density polyethylene) trash can liner, and sealed the top with a rubber band. I made up a couple and put them in the bottom of my under cover, and then put another pace blanket between the bags and my hammock. You can use the cheapest space blankets in the bags, but I recommend an AMK HeatSheet for the one under your hammock — they are MUCH quieter and hold up better too
It works The bags are 1.4oz each and the space blankets are 2.5oz each, so the whole works is 7.8oz, plus my 9.7oz under cover. You get at least 2" loft, maybe a bit more. That should be fine for anything over 32F– I would want to test it for the cold limit. It doesn't take long to assemble and packs small. I would just take the rubber bands off and roll it all up in my hammock for travel. This is warm, light, cheap, and very easy to make.
You can use the lightest, cheapest trash can liners you can find. I like the clear LDPE ones as I can see what is happening inside, but any color would work.
I want some really big ones now. They make big tubes for covering stuff like carpet rolls. If you could get some really wide (48" or so), lightweight stock, you could make one big pad with several blankets stuffed inside.
Update: I have re-invented the wheel, or the Garlington Insulator in this case. Ray Garlington designed an under cover and the stuffed bag insulation idea circa 2003.
http://www.garlington.biz/Ray/HammockInsulator/Insulator.htm
http://www.garlington.biz/Ray/HammockInsulator/Original.htmI saw a reference to folding the space blanket inside the bag which I just tried and I like that. Folding gives better control over the coverage and I got four layers– that is quite a thermal sandwich I think. I added the top space blanket, which gives more dead air space and perimeter coverage. I could see making four pads for colder weather, for better side coverage. I think using two pads and the space blanket will take care of my 3-season needs. I would be varying my topside insulation to suit the weather too.
Jul 28, 2011 at 6:50 am #1763988I picked up some Coghlans #8235 space blankets yesterday to build a couple Garlington Insulator to go with my poncho undercover. They were $1.99 each in a local and the lightest space blanket I have found to date, just 1.6oz each. I wanted to try making bags from space blankets rather than using trash can liners and so the "á la NASA" title. The insulators are to be used with an under cover to support them. I have a combination poncho/undercover made from silnylon that is 9.7oz.
The space blankets are 52.5"x82.5". I used double stick tape left over from a Frost King window insulation kit. The double stick tape found in an office supply will work fine. I had some stick on Velcro dots to hook two pads together; they aren't necessary, but I had some anyway. I wanted lots of layers so I used one blanket for the bag, with two crumpled and folded inside the bag— six bags for two 50"x40" insulators. About 10oz for the works.
Here's a folded bag with a strip of double-stick tape ready to peel:

Crumple the bag to get lots of surface area (looks like a Star Trek creature):

Stretch the blanket back out lightly and fold it in half, make another and stack them. I put a 1" piece of double stick in the middle of each side to stabilize the stack, coupling the top and bottom layer together– I just pushed the middle layers out of the way.

Put the folded blankets inside the bag. I used five 1" pieces of double stick to hold the blankets to the bottom of the bag, just inside the tape line that will seal the final side. My idea was to help stabilize the layers inside. The insulator will be rolled up for travel and I expect the blankets to move around inside. They will need to be crumpled and fluffed up after storage.

The finished insulator. It will never be this smooth again!

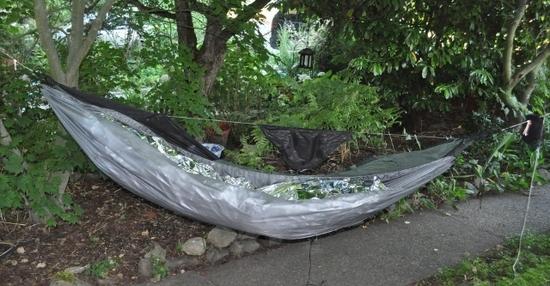
The insulators in the undercover with the HH Explorer swung to the back.

A closer view

The poncho under cover with the insulators and the rigged HH Explorer.

The coverage is good and can be shifted to suit while the sleeper is in the hammock. The tension on the undercover can be adjusted while in the hammock too— you can reach the head end toggles on the shock cords.
And it is warm, with 2" or more loft plus the reflective qualities of the space blankets and the protection of the silnylon outer covering. You can lower the undercover a bit to get more air flow and reduce the reflected heat. I have concerns with condensation, but my previous experiments with space blankets and insulation showed no real problems. I'll reserve final judgment until I test in other conditions. I tried it last night with a low of 50F and 92% humidity. I found it warm and quieter than expected. There was just a hint of moisture below the hammock, with no visible accumulation. Total weight for both insulators is 10oz.
The insulators used six Coghlans #8235 space blankets, a partial roll of double stick tape and five pairs of self-stick Velcro dots.
FYI, Coghlans makes a space blanket bivy/sack that is 36"x84 and about 3oz, model 9815. It has potential. AMK HeatSheet blankets are quieter and a little tougher. They would make better covers, but I think the Coghlans blankets crumple better.
Update:
Stowing the insulators! I found that they need more venting than I imagined to roll them up for stowing and when unpacking them and fluffing them up for good loft. I took a paper punch and made 5 holes across each end. I was able to roll them up to Nalgene size with no major crunching. Regaining the loft was just grabbing the the inner layers and pulling them out gently, drawing air back into the bag and separating the layers inside.
Jul 28, 2011 at 11:10 am #1764069I just tried making a long, narrow insulator using a Coghlans #9815 All Weather Emergency Bag with two space blankets folded in quarters. The bag is just a space blanket with taped perimeters and they actually do a nice job. It gives a 36"x84" insulator with four layers inside. You could fold one blanket in half the long way and use that too. This is super quick and easy and could be done in the field in five minutes. The bag is 4oz, plus 2x 1.6oz for the inner blankets, and 7.2oz total.
It's not bad if you can live with the 36" width. It is easy enough to position diagonally, so you get more coverage and more than long enough. You could supplement it with another space blanket between you and the insulator and get more side protection. It is good for summer use and then some. Stowing is easy– fold it in half or quarters the long way and roll up to the open end; secure with a rubber band. {{{{{SNAP}}}}}
The bag version was $3.99, so the bank is intact $8 total to build this one, five minute assembly with no tools, tape, measuring or sewing. 7.2oz!
You could fake an undercover with another double space blanket and a little cord. You could just gather the ends of the bag and make a 2/3 UQ– it would be skinny at the shoulders and feet. A small ring of shock cord would allow it to stretch and flex as you climb in and out– the suspension does not need to be all shock cord. If someone was too cold or lost their UQ in the field, you could whip this up. In the mean time, the parts can be carried with a group for emergency/first aid supplies. With a $20 hammock, some suspension goodies, a blue poly tarp and a space blanket UC/insulator, you could have someone hanging warm and dry for cheeeeap. I can see a herd of Boy Sprouts swingin' under the trees
-
AuthorPosts


- You must be logged in to reply to this topic.
Forum Posting
A Membership is required to post in the forums. Login or become a member to post in the member forums!
Our Community Posts are Moderated
Backpacking Light community posts are moderated and here to foster helpful and positive discussions about lightweight backpacking. Please be mindful of our values and boundaries and review our Community Guidelines prior to posting.
Get the Newsletter
Gear Research & Discovery Tools
- Browse our curated Gear Shop
- See the latest Gear Deals and Sales
- Our Recommendations
- Search for Gear on Sale with the Gear Finder
- Used Gear Swap
- Member Gear Reviews and BPL Gear Review Articles
- Browse by Gear Type or Brand.
