Topic
Make Your Own Gear: 5 Yards to SUL, Part 3 – Tarp
Forum Posting
A Membership is required to post in the forums. Login or become a member to post in the member forums!
Home › Forums › Campfire › Editor’s Roundtable › Make Your Own Gear: 5 Yards to SUL, Part 3 – Tarp
- This topic is empty.
-
AuthorPosts
-
Jan 9, 2009 at 11:32 am #1468953
I would not suggest using velcro as it can be fussy and annoying, at least in my opinion. check out the bug bivy from mld if you havent seen it already. There are quite a few out there and if you just follow a design you like or make up your own you should do all right. I would go with nanoseeum netting and silnylon floor. corners could connect to the two ends of the tarp and the corners. good luck.
Feb 15, 2009 at 9:25 pm #1478130Hi Lance,
Do you still have the "spread sheet for computing catenary curves" that you posted in the forum back in December, 2006? If you do, could you please email it to me at [email protected]?
Thank you,
Kendall Clement
PS – Couldn't send you a PM. No email address on your profile.
Jul 2, 2009 at 7:44 am #1511687I'm extremely happy with my tarp . . .
There are a few things that I learned, or experienced which may help someone else.I don't have a tally for the time spent on it, since it was constructed over the winter/spring and various weekends, but the time was MUCH MORE than listed in the article.
My biggest deviation from the original design was length. I added 10", based on comments by other users and a couple of scale mock ups that I constructed with paper. Some graph paper & tape makes this an easy task.

I did not change any other dimension. The finished tarp and bag weight was 7.0 oz. I have not weighed it with the guylines & tensioners yet.
I used the catenary curve .xls mentioned in this thread. I'm sure that I documented my settings, but I can't find them right now to report what I used. I think I was in the 400/500 range and I believe I used 110 for the ridgeline.
My first test of the tarp was on Santa Rosa Island. The island is known to be windy and I wanted to test how it would function in high winds. Since I had finished it days before the trip and hadn't set it up yet, I struggled in the wind. The biggest problem was getting it set up both low enough to the ground for the wind and high enough to get in.
I used Triptease coupled with a 1/8" reflective shock cord looped to create tensioners on the 6 non-pole guyline locations.
A NOTE ABOUT SET UP: I've now learned using the following method is easiest: 1. Stake the low end corners. 2. Set & stake the high end poles & then corners. 3. Return to the low end to stake the pole. 4. Adjust all the corners. 5. Stake the sides. 6. Adjust as needed.
I tried and tried to adjust the height of the "high end" so that it was high enough off the ground for me to get in. The problem was that the height of my goat poles was not enough to raise the end when placed as far away from the tarp as needed to outstretch the beak.
A friend in the group insisted that the poles should be on the inside. I disagreed, but relented mostly because I'd just read a thread about someone wanting to set it up like this.
In the end, the "high side" was too low to enter through but the "low side" had enough space to snake under, past the pole. Again, the wind played a factor in how low the tarp sat. Here's a picture of the tarp next to a Granite Gear tarp and a Sierra Designs tent during one of the wind storms:

I had expected the tarp to be loud in the winds, but with a taught pitch, it was MUCH quieter than either of the other two shelters. I was able to fit 2 people under the shelter and some gear.
PROBLEMS & RESOLUTIONS:
1. PROBLEM: During the windiest night (3rd night), the low end pole tore the re-inforcement patch.
RESOLUTION: During seam sealing, I used the mineral spirits solution to coat the tarp and the torn patch, I then cut and sewed another patch out of spinnaker and just sewed it over the other. I don't plan on putting a pole inside the low end again. I am using a clove hitch on the end of my pole tip and the pole outside the tarp.
2. PROBLEM: Not able to raise the high end high enough to enter the tarp without slithering on my belly. Also, the high end wasn't very high.
RESOLUTION: I created a patch out of a low weight denier PU fabric that I had purchased to re-inforce the storm seal of the mountain poncho. The patch has been sewn to the interior of the tarp and allows me to pitch the tarp using my trekking pole on the inside, allowing for a much higher pitch.Jul 2, 2009 at 8:24 am #1511695Excellent work, Amy. It's especially nice to see you opted to do the catenary ridge line – something I was afraid to try when I sewed my version of this tarp. I did however opt to make mine about a foot longer than Jay suggests in the article as you did.
I encountered the same problem you did with pitching mine the first time I tried wherein the front was too low to the ground. I immediately rectified this by pitching my trekking pole inside the front beak and in the two years I've been using the tarp I haven't set it up any way different yet.
Jul 2, 2009 at 9:31 am #1511703Looks great! My pole goes on the inside on the high end as well after seeing sam's tarp. I stuck with the stock dimensions and no catenary… I didn't have time to mess with it, since I had to get it and my bivy done in less than 4 days for a trip. I kind of wish I would of extended the ridge line more than the 3 inches I did, but I was having fun trying to figure out how I was going to get 2 full size beaks as well. I do now have all the fabric cutout to make the backpack as well though. So this fall if I have a possible project lined up.
Jul 2, 2009 at 11:11 pm #1511840I was pretty nervous about the cat. curve, but in the end it really was no trouble at all. The .xls gives the measurements to draw it out. I was worried that I'd choose the wrong settings; or that after it was sewed together it would not function, or line up, or would create creases in the ridgeline as I sewed. But in the end, it didn't do any of those things. It was easy to sew and I'm glad I risked it.
I definitely recommend pinning all the way around the edges of any two pieces that you're going to sew together, especially the big ones. By this I mean pin not just the edge that you're sewing, but pin the other edges too. The SpinnTex is slick & will shift while you sew, even if the side you've pinned seems secure. Pinning it all the way around minimized the effects of this. (Of course keep the pins in the seam allowances).
One of the biggest glitches that I remember was related to using the threadline grid as guides. (I don't recommend it) I caught that things were significantly off before it was too late, re-measured, adjusted, lined things back up and continued on.
Using the pole on the inside of the high side is the way to go! Allows for so much more flexibility in the pitch!
Like I said, I'm super happy about the end result and can't wait to take it back out!
Thanks for the comments, a.
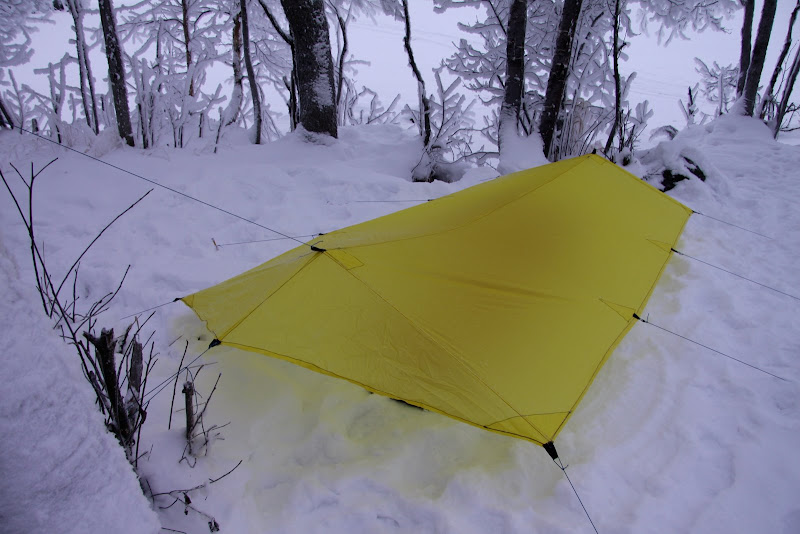
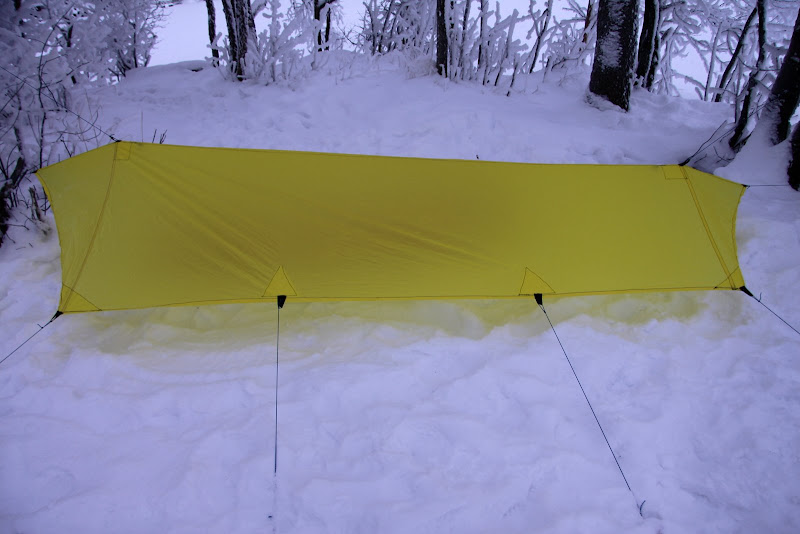
Jan 9, 2010 at 10:06 am #1561099I made a yellow silnylon version of this tarp, but made a few changes to it (270 cm long, 200 cm wide front, 160 cm wide back). It was my second MYOG project, and it was a lot of fun, the end result weighing in at 448 g. I wasn't yet able to go out and pitch the tarp (its -22°C and the ground is frozen rock solid) but I will have a try tomorrow and post then some photos of the pitched tarp. For photos of the work in progress and detail shots of the finished tarp, have a look here.
Jan 9, 2010 at 9:13 pm #1561260Hendrik, saw your tarp on your blog earlier today – looks great. I'm excited to see how well it pitches. Also, thanks for posting a little message here on this thread. Even though it's a couple years old it's still one of my favorite BPL articles.
Jan 10, 2010 at 7:33 am #1561313Sam, I usually don't like to re-animate dead threads, but this is a great article and I felt I needed to share my efforts here and let Jay & others know. I think its one of the most influential articles on BPL, and surely has animated many to try out MYOG. Anyhow. Here two photos of the tarp pitched on the snow, some more here.

*sharalds: edited photo width *
Jan 10, 2010 at 3:52 pm #1561456I was thinkin to do something like this, so i can use it also like flat tarp.
Jan 11, 2010 at 8:48 am #1561621I've always felt that if a topic is relevant than it's never "dead" so no worries in posting relevant material to a thread.
Timo, your design will certainly work well – there is some added benefit of the shaped beaks in Jay's original design though as they help keep rain out of the tarp excellently.
Jan 11, 2010 at 9:09 am #1561625Here is setup I've used to keep a shaped beak mostly taut at a variety of guyline angles. It might work with a "flat" beak if you thread the line thru five guyout loops instead of three.
Jan 12, 2010 at 7:51 am #1561952Jim, thanks for the photo. I've been looking for a way to better tension a tarp beak.
Apr 9, 2010 at 3:54 pm #1596229Hey all, sorry to reawaken this quiet thread, but this seems like the best place to post this question.
I'd like to make this tarp. But I want to make it with cuben fiber, probably from zpacks.com. And probably .6 oz/yard. Can this be done as easily as spinnaker? Follow the same instructions? Any special instructions or things of which I should be weary?
Thanks in advance!
Nov 8, 2010 at 11:54 am #1662225I downloaded the spreadsheet and added rows to compute the difference between a catenary and a circle that intersects the midpoint and the ends of the catenary. For anything you're likely to make, the difference is negligible.
For example, cantenary and circle for an 8 foot ridge line with a 4 inch bow will differ by 0.07" or about a sixteenth of an inch. You're not likely to sew to that tolerance and a circle is easy to construct. A string and sharpie marker compass, a helper and a big floor like a gym or garage and a little trial and error is all you need.
Nov 8, 2010 at 1:57 pm #1662270Ben,
Be sure to read all of Jay's articles on this project. In the introductory article he describes how he adjusted some of the measurements on the front beak. I ran into this when I made this tarp.
Also you may want to check out a
modification to this tarp that I added if you are using trekking poles. It will make entry and exit much easier.Party On,
Newton
Nov 9, 2010 at 11:47 pm #1662773If you'd like to try the circle method described above and have the space necessary, here's a table of radii for various lengths and 'bow'.

-Lance
Jun 16, 2012 at 8:55 pm #1887609Many thanks to Jay for an excellent article and to the rest of you for giving me the push to sew up this tarp. Also, a special shout out to Newton who gave me some advice in the planning stage. This afternoon–after several long days of sewing–I finished my first MYOG project.
I have yet to seam seal it, but the weight of the tarp itself without guylines or sealing is 11.05 oz (313 g). I used silnylon, and I added a foot to the length of the main body. I also think that the foot end panels are probably a little taller. If I remember correctly, I mismeasured over a few inches but when I realized my mistake, just decided to leave them instead of fixing it. I think I added three inches.
I learned a lot doing it too. The biggest thing I would do differently (besides actually knowing how to sew before I started) is add reinforcement patches to the different panels before sewing them together, or at least after doing the three main pieces (the main body and two beaks). It would have been a lot easier to work with smaller panels that laid flat (more or less, for the cat cut on the main body). Other than that, this article was fantastic. I'm looking forward to a lot of time underneath it.
Oh–and obligatory pictures:
 Jun 16, 2012 at 10:48 pm #1887633
Nice job
You are now addicted to MYOG, too bad…
Jun 17, 2012 at 6:21 am #1887657Clayton,
Nicely done!
Jerry is correct about MYOG being addictive. Welcome to the dark side. ;-)
What is your ridgeline length from trekking pole to trekking pole?
Did you sew the bivy as well? Your guylines look like Lawson's Ironwire. Is that the case?
I sold my tarp on Gear Swap a while back. Hopefully it is living a useful life somewhere in Oregon. As I get older and don't bend so well I decided to move on to a Lightheart Gear Solo tent that I have yet to spend one night in. ;-P
It has a big door and long zippers. LOL
Wishing you many enjoyable miles with your new extremely well made shelter.
Party On,
Newton
Jun 17, 2012 at 12:08 pm #1887715Many thanks! MYOG is definitely addictive. It's also time consuming (but in a good way), so I'll probably hold off on too much more until the winter (unless I can get my wife to consider sleeping in a bivy).
The ridgeline length is 90" with a 3" deflection on the catenary curve. The curve turned out really nicely, with almost no folding along the seam. I believe the rear panel tapers to 35" (instead of 33"–I mismeasured and just figured it was fine). Other than that, all of the dimensions should be true to Jay's article.
Nice spot on the Ironwire too. I used 3/8" webbing with Line Loc 3s for the tie-outs (also picked up from Lawson). Originally, I was going to use ZPacks' thinnest Z-Line, but after working with it, it was just a little more difficult to use than the Ironwire. So, for the tenth of an ounce or so, I decided the thicker (2mm) line was worth it. For the same reasons, I ended up using the Line Locs too.
I hope you get to use the LH Solo soon. It looks like a great tent. My wife and I almost bought a SoLong 6, and Judy was great to work with. Right before we pulled the trigger, we ended up moving to Montana and I realized we would need something that could handle snow loading better. We weren't too far from you though, just across the border in East Texas.
Jun 17, 2012 at 5:45 pm #1887765Clayton,
+1 on working with Judy at Lightheart Gear.
…"unless I can get my wife to consider sleeping in a bivy".
Good Luck! I haven't been able to convince my wife to sleep in a fully enclosed tent with a bathtub floor. LOL
I just finished a new smaller pack. I'm getting together a gear "kit" for it that may include a poncho tarp and bivy style bag for a few quick solo overnighters. ;-)
You are really going to enjoy Montana!
Party On,
Newton
Jun 17, 2012 at 7:10 pm #1887795I forgot to mention above that my wife actually made the bivy (I posted about it over here) as a belated Valentine's Day gift (I wasn't going to use it until this spring anyway–so I didn't mind the delay). I had her sit under the tarp with me yesterday, and she said that she actually might consider trying out a bivy under it.
Normally we use a Rainbow for the two of us–the tight quarters make it nice and warm. But I would love to see if I could get her tarp camping with me!
Jun 18, 2012 at 4:55 am #1887883Clayton,
"Normally we use a Rainbow for the two of us–the tight quarters make it nice and warm".
A Bivy Built for Two could be your next MYOG project. ;-)
Party On,
Newton
Apr 4, 2013 at 12:08 am #1972668Very nice article! It has been a great help as I get started making gear.
A general note to the newbies (like me): make sure the fabric you get is, in fact, 54+ inches wide! I got mine and it was too short :( It's going to end up a regular 8 x 10 tarp.
A few helpful hints for future articles. 1. Please make the pics larger (or clickable). 2. please use contrasting thread so it's easier for the reader to see exactly what's going on. 3. Please give hints on how make long straight pattern marks on a really slippery material (my ripstop has a lot smaller grid that is almost impossible to follow).
Again, thanks a bunch. This article has already made my membership worth it and I'm looking forward to more!
-
AuthorPosts


- You must be logged in to reply to this topic.
Forum Posting
A Membership is required to post in the forums. Login or become a member to post in the member forums!
Our Community Posts are Moderated
Backpacking Light community posts are moderated and here to foster helpful and positive discussions about lightweight backpacking. Please be mindful of our values and boundaries and review our Community Guidelines prior to posting.
Get the Newsletter
Gear Research & Discovery Tools
- Browse our curated Gear Shop
- See the latest Gear Deals and Sales
- Our Recommendations
- Search for Gear on Sale with the Gear Finder
- Used Gear Swap
- Member Gear Reviews and BPL Gear Review Articles
- Browse by Gear Type or Brand.
