Topic
my new silnylon tent project….
Forum Posting
A Membership is required to post in the forums. Login or become a member to post in the member forums!
Home › Forums › Gear Forums › Make Your Own Gear › my new silnylon tent project….
- This topic is empty.
-
AuthorPosts
-
Feb 20, 2011 at 8:44 pm #1269479
First off, how do I upload a sketchup document so you all can pull it up and view it? I will post it in the next post as soon as I figure it out so this will all make sense..
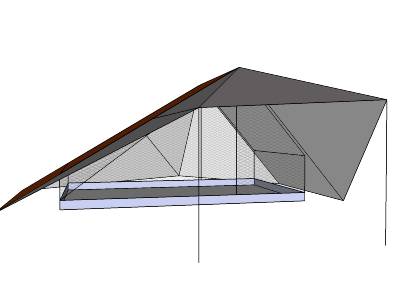
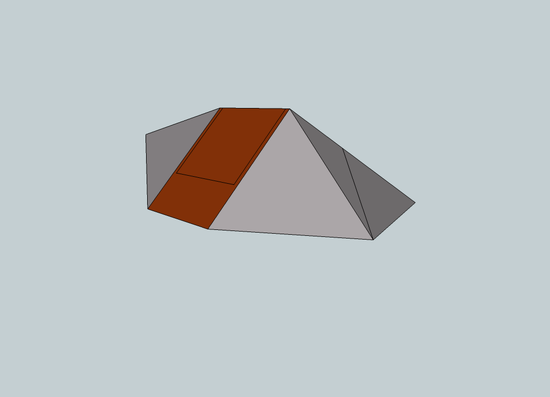
Ok, I'm getting ready to undertake my first serious tent making project. I have it all drawn up in sketchup, but I would love to get some input on what you guys all think and get some suggestiong that you think might improve the concept. It is drawn in skethup to exact scale of where I want it to be and will allow me to use the 65" width of the silnylon I'm utilizing. I am not experienced enough with sketchup to be able to illustate zippers and such, so here is a basic explanation while you are looking at it. I chose to have one side of the tent longer, thereby decreasing the angle that the wind would hit it, making it more stable, it also utilized increase head room in the area where you would naturally be sitting up in bed. The design shows one door fully closed, and the other door fully opened with trekking poles holding up the "awning." The awning side also illustrate the porch that would be sewed on one side and likely velcroed (?? best option) on the other, thereby closing the gap between the two awnings, allowing you to cook under it in rainy conditions. This awning closure would be rolled up behind the zipper when not in use. Also on this side is the L shaped zipper for the door. There are obviously two doors on this tent, but I just have the one side showing opened for illustration purposes. There would be elastic going out to the four tie out points to make the bathtub floor, similar to the lunar series (six moons designs). I have tried to incorporate the positives of the best ultralight tents and combine them. A couple questions I still need to figure out: What is the best way to reinforce the pole area to be sure I don't poke a hole through the silnylon when I pitch it? What other improvements can you see, or possible weak points that need to be addressed.
It would be awesome to see this with a textile app to see where the stress points are and how the drape would look.. Anyway, if this is in the wrong place please feel free to move wherever you think is appropriate.
As a side note: everybody in this community is great. I have been reading on this forum for over 2 years now and I think this is my first post, so I will be sure to include more of my insights as time goes on! Thanks for all of the motivation and great ideas you all have!
Feb 20, 2011 at 8:55 pm #1699357"What is the best way to reinforce the pole area to be sure I don't poke a hole through the silnylon when I pitch it?"
One way to do it is in the article – MYOG – Silnylon floorless 2 person tent
Feb 20, 2011 at 9:36 pm #1699378ok, so in the 3d warehouse search on google, type in "silnylon ultralight tent model" it should pull up my tent model. it is dark orange and grey right now… . let me know if anybody tries this and it works. Thanks again!
Feb 20, 2011 at 9:37 pm #1699379Thanks for the info Jerry, that is a very informative thread and one I will use alot during my project!!
Feb 20, 2011 at 10:09 pm #1699395So, does it have an URL?
Feb 21, 2011 at 12:00 am #1699421this one ?

Just save it on your desktop , then use the "insert Image At cursor" button (above the your commentary box , on the right) and that is it.
FrancoFeb 21, 2011 at 6:16 am #1699450Is there an image of it rotated 90 degrees?
Feb 21, 2011 at 9:03 pm #1699818yes, thats the one… Let me know what you guys think..
Feb 21, 2011 at 9:22 pm #1699823This is the view of the tent with the awning open and the insert velcroed across.

This is the view of the door closed.
This the view of the top of the tent. The lines on the orange are to illustrate where the netting will be sewn in (underneath). and the line on the two doors illustrate where I would need to sew together because the width of the fabric will not accomodate the door without sewing together
Feb 21, 2011 at 9:24 pm #1699824jerry, I can't find any url, is just in the google sketchup 3d warehouse under "silnylon ultralight tent model"
Feb 21, 2011 at 9:40 pm #1699828as you can see, six moons designs has been a huge inspiration in this tent with their lunar duo. I own one and love it, but wanted to try and make my own with several changes. One of the major problems I'm having is how to incorporate a vent system to reduce condensation. as stated earlier, I also still need to find out how to reinforce the area where the trekking pole creates the apex…
Feb 21, 2011 at 10:03 pm #1699841To reinforce the apex I have found very effective to laminate a piece of 70D silnylon. It is more resistant to abrasion and, more important, distributes loads better.

To complete the work, sew the edge of the laminated piece.
Cheers
Feb 22, 2011 at 7:41 am #1699918My article shows one way to put in that reinforcement.
Take a circular piece of fabric, set up the tent, put the reinforcement piece on the tent with hand stitches, folding it to conform to the conic tent shape.
I've tried getting a section of a circle to fit, but it's more difficult to get it even.
One other thing
The open front is susceptible to wind.
The one tent I've made that catostrophically failed had an open front (only higher) and got blown away. Tent pole punched through the fabric. But there were several problems going on so it doesn't mean yours will fail.
Better if it's lower to the ground.
But in a low wind, high condensation environment the open front is great.
I like to have a zipper, so that you can unzip to minimize condensation, or zip for better wind protection.
If you do make it like that you might want to leave it set up in your yard until a windstorm blows through to see how it handles it.
Feb 22, 2011 at 8:16 am #1699934marco, that is a great illustration. I think I will sew the entire exterior together, then put in the laminates reinforcement, sew around the edges and then sew in the netting, this way I will also have reinforced material for the netting apex as well where the zipper will pull..
jerry, the open side will have the ability to close. The illustration just shows it open as an option. Its simialr to the Tarptent double rainbow "porch." in that the extra material that covers the gap between the two doors can be unzipped/unvelcroed from one side and rolled back. The two doors will then be zipped together and brought tought to the ground (it will look symetric with the closed side in the illustration. I agree with you in that without being able to bring these doors close to the ground, it could make a kite out of my tent.
Thanks again for the input! Any ideas on a vent? I have thought of trying to incorporate something like the lunar duo, having a vent come off of each apex, but that may be a little above my skill level on the sewing machine. Do you all think this is a necessity or should I just live with the condensation?
Feb 22, 2011 at 8:54 am #1699948I have had a vent at the peak – 4 openings that are about 4 inches square each
It didn't seem like it made much difference
I think to be effective, a vent has to be like several feet square, like a door opening, or like your porch opening.
But I think this opinion is probably not shared by most people
Feb 22, 2011 at 9:52 am #1699977I would recommend laminating before sewing:
* Laminating flat layers of silnylon is easier -> better results -> stronger.
* The critical seams go through four layers of material -> much stronger.Make sure the sealant has dried before you do sew ;-)
Cheers.
-
AuthorPosts


- You must be logged in to reply to this topic.
Forum Posting
A Membership is required to post in the forums. Login or become a member to post in the member forums!
Our Community Posts are Moderated
Backpacking Light community posts are moderated and here to foster helpful and positive discussions about lightweight backpacking. Please be mindful of our values and boundaries and review our Community Guidelines prior to posting.
Get the Newsletter
Gear Research & Discovery Tools
- Browse our curated Gear Shop
- See the latest Gear Deals and Sales
- Our Recommendations
- Search for Gear on Sale with the Gear Finder
- Used Gear Swap
- Member Gear Reviews and BPL Gear Review Articles
- Browse by Gear Type or Brand.
