Topic
Pyramid peak seams
Forum Posting
A Membership is required to post in the forums. Login or become a member to post in the member forums!
Home › Forums › Gear Forums › Make Your Own Gear › Pyramid peak seams
- This topic is empty.
-
AuthorPosts
-
Feb 3, 2011 at 9:40 am #1268623
I sew a lot of stuff, but I dont really know proper sewing techniques.
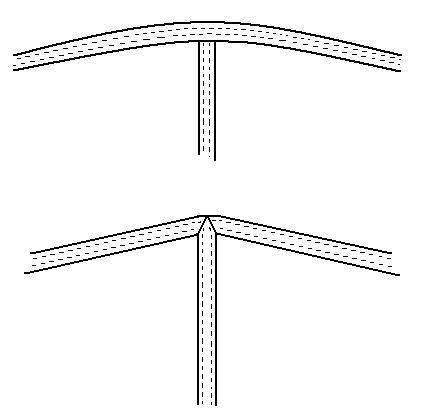
Anyway, Ive got a pyramid tarp planned out, but was curious which of these two would be stronger. The tarp will be 3 panels of silnylon (1 main body, 2 for the beak).
I've never seen a 'Hexamid' in person but looking at the photos online, the overall concept is pretty similar.
There will only be the three seams that will meet at the peak.
The vertical seam is for the beak, and will probably have the most tension.
The bottom drawing is supposed to be three seperate flat-felled seams that meet at the peak.
Sorry about the crappy paint drawing.Thanks in advance.
Feb 3, 2011 at 10:29 am #1691905You probably want to use a piece of heavier fabric to reinforce the peak of your pyramid. If you do that it probably doesn't matter much which seams you use.
Feb 3, 2011 at 10:38 am #1691908I too sew a lot of stuff, but dont really know proper sewing techniques.
It seems like in the top picture, the verticle seam would be totally captured by the horizontal seam.
In the bottom picture there's nothing the keep a hole forming right at that top point and maybe a rip to develop in the main body fabric.
Seperate but related – don't you need a piece of heavy weight fabric reinforcement right at the top? Is there going to be a pole(s) poking up right at the peak? Don't you need heavier fabric to keep the pole(s) from poking through?
Then, the first question is moot, the stress of the main body and beak fabric will be carried through the reinforcement fabric so what happens at the peak is unimportant.
edit: Walter beat me too it – didn't require as many words
Feb 3, 2011 at 12:27 pm #1691950Thanks for the quick responses.
I should have mentioned in the first post that I'll be reinforcing the peak with Dyneema X. I use a Luxurylite pole and it has a cushy rubber cap on the top so it's not too rough on the fabric anyway.
Feb 3, 2011 at 12:34 pm #1691958Then, will you be covering the junction of the three seams with one piece of fabric?
Feb 3, 2011 at 3:19 pm #1692025Actually, I was planning on gluing (silnet) a piece of dyneema to the top 6" or so of each piece. That may not make sense….
Anyways, the Dyneema would be sewn through and would be part of those flat-felled seams.Feb 3, 2011 at 3:32 pm #1692040That makes sense
I would do the top method – beak seam would be totally captured by the horizontal seam. Load transferred better to main body fabric.
Just one person's opinion : )
Feb 3, 2011 at 6:30 pm #1692135Jerry, that's what I was thinking, just wasn't sure I'd seen something like that before. That way also seems like it'll be easier to line things up and not have the peak all crooked or something.
Thanks again
Feb 3, 2011 at 8:35 pm #1692200I would not use a single piece of heavier fabric, because this just moves the same stress from the seam and spreads it across the same fabric, same thickness, different spot.
What I would do is grade the material up. You need to spread the stress across the body with multiple layers of additional sil nylon. Since this is a corner? I would use circle shaped patches, cut away where they do not overlap any material. The first patch is the biggest, and against the body material. The second patch goes on top of the first patch but is about 25% smaller radius, so on and so forth.
This method will give you several rows of stitches, the material stretching slightly less and getting a bit stronger with each row and subsequent patch. A zig zag type stitch should be used around the arc part of the patches. This also gives you several rows of stitches spread over several inches of sil nylon. It would be quite a bit stronger doing this than relying on a single point of sil nylon to hold together.
Look at how grommets are sewn into the corners of sails. Similar concept. It will prevent flapping from destroying the seam too.
-
AuthorPosts
- You must be logged in to reply to this topic.
Forum Posting
A Membership is required to post in the forums. Login or become a member to post in the member forums!
Our Community Posts are Moderated
Backpacking Light community posts are moderated and here to foster helpful and positive discussions about lightweight backpacking. Please be mindful of our values and boundaries and review our Community Guidelines prior to posting.
Get the Newsletter
Gear Research & Discovery Tools
- Browse our curated Gear Shop
- See the latest Gear Deals and Sales
- Our Recommendations
- Search for Gear on Sale with the Gear Finder
- Used Gear Swap
- Member Gear Reviews and BPL Gear Review Articles
- Browse by Gear Type or Brand.
