Topic
Colin Ibbotson’s ‘Skins’ pack
Forum Posting
A Membership is required to post in the forums. Login or become a member to post in the member forums!
Home › Forums › Gear Forums › Make Your Own Gear › Colin Ibbotson’s ‘Skins’ pack
- This topic is empty.
-
AuthorPosts
-
Apr 20, 2010 at 11:17 am #1257941
Has anyone seen Colin Ibbotson's 'Skins' pack?
It looks to be an interesting idea for making a lightweight pack, although as it stands, a little too minimalist for my liking; it doesn't look like it allows easy access during the day.
I think I'd probably use roll-top closures at the top of the external and internal bags, and would keep my shelter outside the inner bag, but strapped down with the inner bag.
Any thoughts?
Apr 20, 2010 at 11:35 am #1600065I think that thing is awesome.
Apr 20, 2010 at 11:47 am #1600067It's definitely awesome. I would probably add 1 rear mesh pocket for rain jacket and snacks but it's kind of a shame to do that when the beauty is the simplicity.
Apr 20, 2010 at 2:13 pm #1600127i would never trust that back in the woods, at least not where theres thorns. I do like the homemade ul water system though, very nice.
Apr 20, 2010 at 3:30 pm #1600153i would never trust that back in the woods, at least not where theres thorns.
The name "skins" refers to the ability to slip any kind of cover that you want, from the lightest cuben to the heaviest dyneema fabric, even cotton duck if you so fancy. If you put on a heavy-duty skin there should be no reason at all that you can't use it in thorn country.
Apr 20, 2010 at 6:36 pm #1600208If you used light (.33, .48, .51) cuben you could make a large stuff sack for the inside stuff if you were worried about stuff falling out or whatever and use the same stuff as the skin you'd still come in under silnylon.
water bottles on the straps or a bladder inside and keep the skin cleaner since you can put wet stuff between the skin and the pad or use bungees on the skin to eliminate the need for any pockets, could be very light (based on multiuse weight of pad)
-Tim
Apr 20, 2010 at 7:04 pm #1600227A very neat idea, well outside the box. I do find thinkering like this to be outside my tastes as far as function and longevity are concerned, but I'm psyched that people are doing it. (That I do lots of equipment intensive stuff beyond mere walking has a lot to do with this.)
Apr 21, 2010 at 5:02 am #1600339> you could make a large stuff sack for the inside stuff if you were worried about stuff falling out
There's already an inner sack; that's what does the load carrying. The inner sack is held in place by a strap running between the lower and upper carbon fibre rods.
I'd probably go for a more conventional, top-opening bag, and have the skin similar, both with roll-top closures. The outer bag would thus provide some additional support for the bottom of the load.
From my understanding of the concept, the outer skin must have four slots to allow the straps to emerge, so it's not going to be waterproof (and therefore, no need to go mad adding waterproofing features to the skin). I'm not quite sure how the skin is put on: there's no handy photo of the back side of the pack.
Colin mentions that the straps don't need to be adjustable, which is almost fair, although, if you're wearing thicker insulation, you might need a longer strap. So I thought of adding a daisy chain-type end to the strap, so that the carbon rod could be slipped into one of strap loops to select the length.
Given that I prefer a full-length mat (getting old…), I played with rolling a mat up double layer, and this gives about a 35l internal volume. Since you don't want the straps to have to cut through both layers, you could put the strap cutouts at one end (leg end), and have the overlap at the side of the pack, with the double-layer mat rolled inside the cylinder.
I'd be interested to see how it works in practice; I'm still trying to get my brain around how the thing is 'assembled' and packed. I suspect it will be a "d'oh!" moment…
Apr 21, 2010 at 5:04 am #1600340Sorry, Tim; I now realise you were talking about the weight of the inner bag, not the fact that you could add an inner bag. Colin mentions Cuben and other fabrics as lighter weight options.
Apr 21, 2010 at 8:43 am #1600404from what i saw it looked like he used a small inner sack (like a stuff sack) for his small items and just stuffed his bag and shelter like in a gear skins pack. I didn't realize the guts were all in a liner bag, that's what i was thinking of.
-Tim
Apr 21, 2010 at 10:45 am #1600460Reading it again, it looks like I misunderstood the following:
"Packing is important. Very small loose items could potentially fall out of the pack bottom, so I pack those items in a stuff sack and store them in the middle of the pack. The tent or tarp should be the last item in, as it is large and will plug the foam mat nicely."
That, combined with the 'open pad' shot on page 4 seemed to suggest he had a large internal bag for storage. I couldn't see why he'd stuff everything inside such a bag. Makes more sense now, and tallies with what I thought I'd do: dry bag for dry & small kit, and just pack wet kit outside that.
Apr 22, 2010 at 1:17 am #1600810I'm diggin'
I thought of doing something similar, but having a compression sleeping bag sack type design using bottom and top panels only and guy-line between.
Apr 22, 2010 at 2:40 am #1600815I've seen the various incarnations of the Skins pack in the flesh, and Steven pretty much sums it up!
Colin's on the Arizona Trail at the moment using a beefed up version of the pack to facilitate carrying the necessary water. My favourite aspect is the weight-transfer system used on the larger packs – Colin uses carbon tent pegs to transfer load from the internal frame to an independant (ie. not attached to the pack) belt. It's so simple but so effective.
The bottom entry element really isn't an issue, later Dyneema models DO have pockets, and you can see a prototype rain cover here.
The basic idea, as Miguel has said, is that you can customise the pack to your needs. Dyneema skin for rough country and bigger loads, silnylon, cuben or whatever for SUL trips. It's really really difficult to try and explain in words how it all fits together, it just does, and there are some really nice "why didn't I think of that" touches integrated.
I'll see if Colin can offer some more explanation when he's back from Arizona in a month or so. Incidentally, you can read more about the kit he's packing for the hike(including the uber-Skin pack) on Andy Howell's Blog.
Apr 22, 2010 at 4:55 am #1600822I wish there were pictures of the back side of the pack (the side that goes against your back). I can't figure out how the straps are attached to the internal frame through the skin. Are there four little holes in the "skin" for the straps to go through? If so, how would it come off to access your stuff and wouldn't that allow water in?
This may be obvious, but I am missing it. Very interesting though,and good looking too.Apr 22, 2010 at 11:49 am #1600941> I'll see if Colin can offer some more explanation when he's back from Arizona in a month or so.
Thanks, Phil; I'll look forward to that.
Otherwise, I'll just have to try building one myself, and see how it works (and I have enough projects on the go at the moment…)
A sequence of photos showing the thing being assembled and filled from scratch would be useful; like Peter, I'm not quite sure of the way the straps reach the carbon rods, or what the assembly sequence is; I'm pretty sure there must be four slots in the skin.
I hope no-one takes my reserved commenting style as being negative; that's certainly not the case. But I just can't bring myself to be as effusive as our American friends; it's just not British, you know…
[tries hard]
I posted the thread because I think it's an awesome idea.
[there: it wasn't so hard after all…]Apr 26, 2010 at 10:46 am #1602220I got home on Friday night and, rather than blob in front of the TV, I decided to have a play with the Skins idea. So I rummaged in my pile of recycled plastic bags, and pulled out a large, sturdy shipping (not shopping) bag, and retrieved a cheap foam mat from the attic; conveniently, already chopped to just over half length.
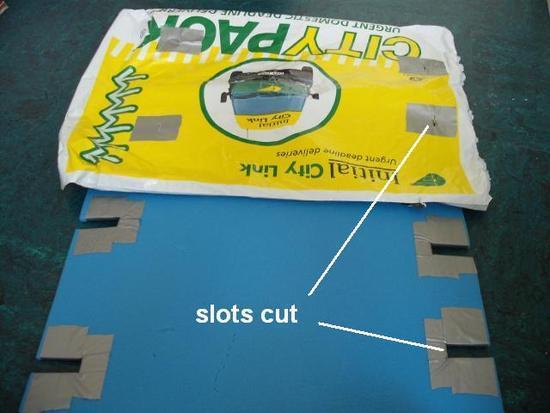
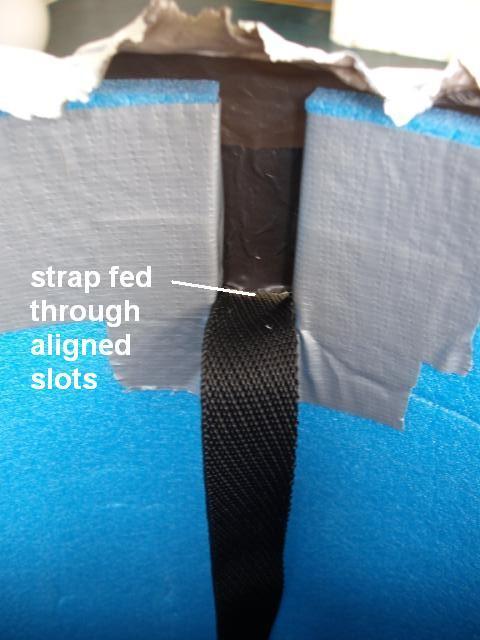
I rolled up the mat and slid it into the bag, and allowed the mat to expand until the bag was tight. I then marked what looked like suitable strap points at top and bottom of the mat (14cm apart at the top, 20cm apart at the bottom). Slots were simply cut with kitchen scissors, and I reinforced the edges with duck tape.
I put the mat back in the bag, and cut simple horizontal slot holes in the bag, that aligned with the inner edge of the slots in the mat.
I dug out some webbing and buckles, and threaded the webbing through the slot in the bag, through the foam slot, up the mat, and out of the other slots. I tied a buckle to the top end of the webbing, and fed the lower end into ladderlock part of the buckle. This is a reasonable approximation to Colin's system, only I didn't use the CF rods.
I then put the pack on, and, although it had no load in it, it seemed to sit quite comfortably on my back, with the mat width (50cm) being about the right length for a padded back.
I didn't load it up because it had no load suspension system, and I was simply experimenting with how the Skin and webbing worked.
I think I have the pack assembly figured out:
– Slide the CF rods into the fabric retaining loops, with the load suspension strap in the middle of the top.
– Roll up the mat and slide it into the Skin.
– Allow the mat to expand into the Skin, ensuring that the Skin and mat slots are aligned.
– Slide the CF rod away from one slot, and feed the end of the strap through the Skin and mat slots, and then slide the CF rod through the loop in the end of the strap (far enough to free the slot at the other end.
– Repeat this for the other three strap ends, and ensure the CF rods end up in the centre, so all strap ends are locked.
– Fill your pack as normal, ensuring the suspension strap goes around the load. Fasten & tighten the suspension strap, and close the pack.
– Job done.
I'm now certain that the Skin has four slots in it to allow the straps to reach the CF rods.
The lower end of the strap could use a bandolier-style stitching to create multiple length settings, either for bigger sacks, or to accommodate thicker clothing.
I'm also confident that a top-loading version would work. It might need drain holes…
I don't see why the foam slots need to be cut up to the edge; as far as I can see, they need only be a small slot within the body of the mat, big enough to allow the strap to be threaded through (and be angled to the body suspension points). I think this might ease the problems of mat tearing that Colin encountered.
I thought about reinforcing the mat with a sheet of PET, cut from a large soda bottle. Either permanently fastened to the mat, or as a 'floating element' held in place by the CF rods. This is intended to act as a load spreader.
A cheap polythene bag (e.g. rubble sack) could just about be pressed into service as a Skin, if suitably reinforced with duck tape at the slots. I can envisage making a roll-top closure using a piece of duck tape folded over each side of the bag opening, and a snaplock buckle half attached to each end. Some duck tape could be carried for repairs (but thick polythene bags are pretty robust, and ripstop).
Anyone seen Tyvek bags…?
Apr 26, 2010 at 3:07 pm #1602368Kevin – any pictures? Thanks.
Apr 27, 2010 at 4:32 am #1602644Not yet…
I'll see if I can get some uploaded tomorrow. Whilst it's all a bit gash, it does at least demonstrate the idea, and I'll try to take a set of shots that show how I think the thing is intended to be put together (barring the CF rods I haven't used).
Apr 27, 2010 at 7:14 am #1602680Nice one Kevin,
The light has finally gone on in my head! Well, I think so anyway….Apr 27, 2010 at 4:23 pm #1602902Ran across something called a Bridgeskin II pack in hammock forums. A little different design but very cool.
Apr 27, 2010 at 4:49 pm #1602912Thanks Kevin.
Apr 30, 2010 at 7:35 am #1603998Been away on business the last couple of days, but here are some photos at last.
First, here's the mat with the skin before we start to assemble:

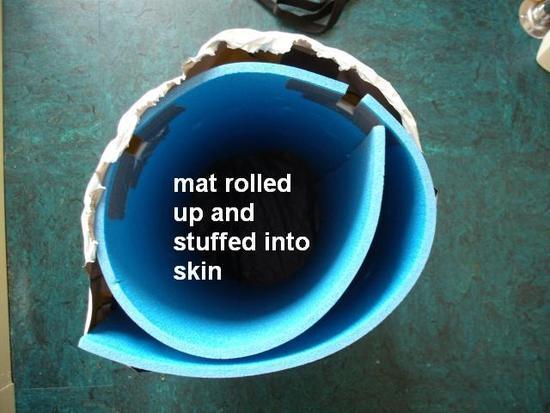
Roll up the mat and stuff loosely inside the skin:
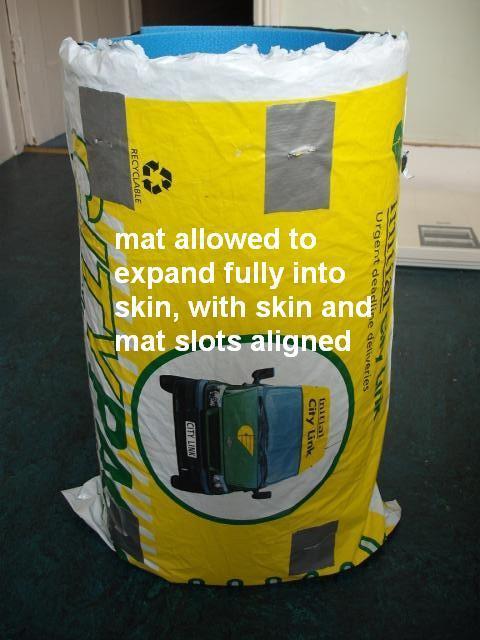
Allow the mat to expand fully inside the skin, and align the slots:

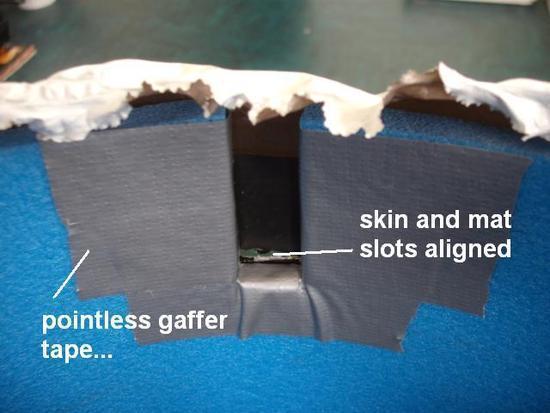
Skin slot aligned with mat slot:
Strap fed through skin slot and mat slot:
How you'd attach the strap using a carbon fibre rod fastened to the mat with U-shaped loops on mat:
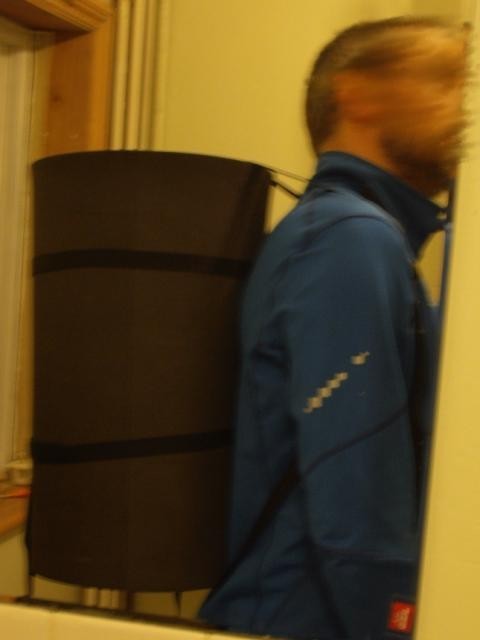
And finally, a rather poor shot of the first experiment with a rolled full length mat (with straps to hold it rolled), showing how the support straps work:
Aug 2, 2010 at 10:06 am #1634220Finally got back to thinking about this a bit more seriously, having just ordered some ripstop Cordura to make a Skin.
Thinking about re-using straps from a 65l duffle I've got, which has ladderlocks at both ends. Which then prompted the thought 'Hey, why not use ladderlocks at each end on the Skins pack? Then I can swap the straps back and forth as I need them, and also provide adjustment on the Skins pack.' Basically, the straps will have re-threaded ladderlocks at each end to form the attachment loops for the Skins pack, rather than simple sewn loops.
Okay, so it'll add a few grammes for four ladderlock buckles, but I think I can justify that.
Also thinking about an optional hipbelt. The idea being to add ladderlocks to attach the shoulder straps to the belt, and webbing loop tags on the belt to attach the pack to the belt. Then the belt can be removed and the straps threaded into the pack as per Colin's original, when the belt isn't needed.
Wondering if a foam yoke & shoulder strap padding might be beneficial (if yet more weight…). Becoming rather like a tactical vest (well, back section only) with attachment loops for the Skins pack…
Aug 3, 2010 at 10:18 am #1634546One thing I was thinking about was adding something to spread the load of the carbon fibre rod across the surface of the mat, in order to stop it cutting in to the mat. Colin sewed webbing to his mat.
I toyed with the idea of a strip of PET cut from a soda bottle, also using loops of this material for the retaining loops for the CF rod.
However, I've thought of a modification to Colin's webbing, where, rather than sew the webbing to the mat, we use a strip of 50mm webbing across the back, between the slots, and sew loops of 20mm webbing to act as CF rod retainers, and the load suspension loops; Colin used just one, but I think I'd prefer two, with maybe a piece of fabric sewn between the two at the bottom.
Slots would be hot-cut in the 50mm webbing to allow the shoulder straps through to the CF rod. The load suspension loops are sewn directly to the webbing, and the top end has either a ladderlock buckle, or a snaplock fastener, and the lower end drops into the bag, round the load, back up, and threads into the ladderlock, or has a mating snaplock fastener.
I'm not sure yet whether the load suspension straps would be sewn to the lower webbing; I currently think it will (otherwise it will tend to pull up and thus load the mat).
Anyway, here's a rough SketchUp picture of what I'm thinking of. The mat and skin are left off for clarity.
 Aug 3, 2010 at 8:58 pm #1634703
Lovin' the model you made in sketchup – looks great.
Just so I am understanding, you would thread the end (top) of the shoulder strap around the carbon rod and then double it over into the ladderlock? Or would the ladderlock hold both ends of the webbing which is wrapped around the carbon rod, and then an additional piece of webbing from the top of the shoulder strap would also thread into the ladderlock?
Re-reading what I wrote above, I am not sure anyone, including myself will understand what I am asking. :)
-
AuthorPosts


- You must be logged in to reply to this topic.
Forum Posting
A Membership is required to post in the forums. Login or become a member to post in the member forums!
Our Community Posts are Moderated
Backpacking Light community posts are moderated and here to foster helpful and positive discussions about lightweight backpacking. Please be mindful of our values and boundaries and review our Community Guidelines prior to posting.
Get the Newsletter
Gear Research & Discovery Tools
- Browse our curated Gear Shop
- See the latest Gear Deals and Sales
- Our Recommendations
- Search for Gear on Sale with the Gear Finder
- Used Gear Swap
- Member Gear Reviews and BPL Gear Review Articles
- Browse by Gear Type or Brand.
