Topic
New models of ultralight Bushcooker wood stoves
Forum Posting
A Membership is required to post in the forums. Login or become a member to post in the member forums!
Home › Forums › Gear Forums › Gear (General) › New models of ultralight Bushcooker wood stoves
- This topic is empty.
-
AuthorPosts
-
Jun 27, 2009 at 7:19 am #1237373

I got a UPS package from Don Kivilus at Four Dog Stoves at 6 PM last night, just as I was ready to go out. The box had two brand new ultralight backpacking titanium wood stoves that were sent for me to test.
I checked out the Bushcooker Lt I.
The stove is tiny, only 3.5 inches wide and 4 inches high. It weighs 2.5 OZ. I was so worked up about the stove that I was out there last night at 9PM and actually burned up just 1.2 ounces of wood to successfully boil up 2 cups of water in my MSR titanium pot. The stove can also burn alcohol, solid fuel tablets, charcoal.
I was so worked up about the stoves that after I came home, I went outside and started a fire in the tiny cooker. I actually did not think the stove was capable of carrying out the task, as the firebox appeared to be too small to even hold enough wood to boil 2 cups of water. Wrong, hit a rolling boil. Weighing the stove indicated that I consumed only 1.2 OZ. of wood I can't wait to work with the stoves on my canoe trip this upcoming week. Full review later.For those of you who need to know more about this stove, I'm posting the new page to Don's catalogue, which does not even appear to be on his website yet, but should be up around the 4th of July.
The page was sent to me as a scan, so it is fuzzy, but here is a better picture of the new lineup.
New Light series of the all-titanium Bushbookers
Jun 27, 2009 at 7:58 am #1510756Interesting. Can you provide a photo from the top, and tell what they cost? How is it in comparison with the BushBuddy Ultra?
Jun 27, 2009 at 10:51 am #1510791The stove is double wall, has fins on bottom, which are supposed to greatly improve turbulance, thus combustion.
Pricing is $80, $90, and $105 for the three sizes " Solo,2 people +,and 3 people +."Jun 27, 2009 at 12:33 pm #1510796The top view photo doesn't appear to show the double wall feature or the grate for fuel, which I assume is in the missing inner wall.
This stove looks good but for one thing – the permenant pot rests, which present a packing problem and a durability problem if they constantly get bent. I'd like to see flip-up or slide-up potholders even if that means using something like a captive bolt and wing nut to secure them. The bolt head (inside the stove) could be spot welded or double nutted and the threads on the end of the bolt (outside) could be peened to keep the wing nut on.
Back to the drawing board.
Eric
Jun 27, 2009 at 1:03 pm #1510799Looking at the lead photo, it appears as though each stove is designed to fit fully within a specific pot, so the pot supports would be protected…
Jun 27, 2009 at 1:30 pm #1510804Actually the double wall is visible, if you look closer you will notice that the vents on the inner wall are close to the top while the outer wall vents are farther down. To me it appears the outer wall is a caldera cone like shape while the inner wall/firebox is a straight cylinder shape and the 2 walls meet at the top edge. The fire grate I am assuming is the fins at the bottom. What I am curious about is how far from the ground is the grate/fins? In looking at the mid size and large size it looks like the fire boxes are similar depth but the larger one has a wider diameter possibly?
Jun 27, 2009 at 4:33 pm #1510829Here are some answers. At this point the stoves completely fit inside Snow Peak pots.I do know that the little one is specifically sized to fit completely inside the 700 cc Snow Peak titanium mug. Four Dog sells these mugs, and I assume it is hoped that the consumer will also buy the mug with a stove purchase. I am not concerned about the durability of the pot stands. They are spot-welded to the unit with multiple welds. If they are protected in transport in should be more than adeuqate protection. I think the four point support addresses the pot stablility issue that small stoves often struggle with.
The outer wall is a caldera cone-like shape while the inner wall/firebox is a straight cylinder shape and the 2 walls meet at the top edge. The fire grate is the finned strucuture at the bottom.Q: What I am curious about is how far from the ground is the grate/fins?
A: There is space enough between the ground and the bottom of the fin disk to fit the cover of a shoe polish can, without anything touching. This is how you switch to alcohol, where the gassing of the alcohol also provides some secondary burn.My first experiment: I engaged the alcohol burn function, where 1 oz. of alcohol put a close-to-full, .85 liter MSR Titan Tea Kettle with 1 lb. 10 oz. of water into a rolling boil in 5 minutes, 10 seconds. The bent fins appear to do to something, as I saw a clear flame swirl pattern immediately after igniting the alcohol inside the firebox before I put the pot on.
Using 1 OZ. alcohol, same amount of water, and same pot in a standard cat can type alcohol stove ( Etowah), took 7 minutes. So, the conclusion is that placing the stove over a passive open can allows it to boil water quicker.Q: In looking at the mid size and large size it looks like the fire boxes are similar depth but the larger one has a wider diameter possibly?
A: I don't have the big one, just the small and medium. The middle size firebox is 1" deeper, and a half-inch wider at the base than the little one.This is fun!
Jun 27, 2009 at 10:23 pm #1510871Thomas, thanks for the update on the bushcookers they look amazing. so the small fits a snowpeak 700 or mini solo cookset the medium I would hazard to guess would be a 900 cookset and the 1400 for the large bushcooker. To bad you dont have the large as I use a 1400 for solo(I know it is overkill)and family trips as I am the designated packmule. I wonder if you could tease us with some more pics showing it in use burning each type of fuel. I like the boil times your getting on your initial test burns. So far this unit sounds very promising.
Jun 28, 2009 at 3:37 am #1510884I pan to take some video clips this week, and will have a full report. I plan to experiment with charcoal as well, the lumps you find around every fire ring up here in Maine. I will be posting them to my blog at http://tjamrog.wordpress.com as well . Later.
Jun 30, 2009 at 6:12 am #1511310The weight of these things is just amazing. At 2.5 oz, the small one is lighter than my pocket rocket… Wow!
So, I put together this list of pots that look like they would fit the LT1 and LT2 models…. Feel free to add any others that apply.
LT 1 $80 4.0”h x 3.5”w 2.5oz
LT 2 $90 5.0”h x 4.0”w 3.5 ozFor LT1
Snow Peak Trek 700ml $35 4.4”h x 4.13”w 4.25 oz
Tibetan Titanium 700ml $30 4.13”h x 3.7”w 3.7 oz
Evernew 640ml $42 4.25”h x 3.7”w 3.4 oz
Evernew Pasta Pot Small $? 4.36”h x 3.9”w 3.35 ozFor LT2
Snow Peak Trek 900ml $45 5.5”h x 4.75”w 5.6 oz
MLD 850ml $65 5.1”h x 3.8”w 3.15 ozSo the best combos I could come up with were:
LT1 + Evernew Pasta Pot Small = 5.85oz
LT2 + MLD 850ml = 6.65ozHas anyone seen pricing on the new Evernew pasta pots yet?
Jul 1, 2009 at 12:21 am #1511457Nice, simple robust design. I checked out the bushcooker website using the wayback machine a while ago when there was a big Hoo-Flung-Dung going on about the bushbuddy, the caldera cone and copies of the designs.
The Bushcooker predates both of them.
I agree with a poster above that a variable height potstand would be nice for wind variance and packability, however, it's not easy to accomplish, and would detract from the simplicity.
I think a variable height windshield around the upper section which doubled as an air intake control would be better.
Jul 1, 2009 at 3:53 am #1511467Well, it is already done.
Here is photo of a titanium windscreen/cozy in use. The windscreen option is obvious. The cozy function allows one to fold the stove handles in, then " close" the windscreen and slip it over the base of the stove, allowing you to hold the hot meal, or insulate it for any reason. I sent back the cozy to get an exact fit on my newer model of the MSR itianium pot.Jul 1, 2009 at 4:31 am #1511469Baking with this stove is best accomplished using charcoal. In this experiment, I used three commercial charcoal briquettes. I felt it would be easier and more standardized to use them here. In the Northeast, there is ample charcoal left in the numerous fire rings that are omnipresent on backpacking trails. Those lumps of fuel are real charcoal, and can serve as an excellent alternative fuel source if they are primed with alcohol, as noted below. It is difficult to control a burn with alcohol, which is either 100 % full on or nothing. Several items are needed to allow for convection baking:
I feel that my MSR .8 liter pot is not wide enough to be an effective baker, but I plan to try it out in later tests. I used a Walmart grease pan that I found in my camping bin. I shaped an aluminum foil container ( muffin tin) to fit into the grease pan. Taking a tip from Tinny, of Minibull Designs, I put a few rocks on the bottom of the pan, which raised the bottom of the "muffin tin" from direct heat, setting up the convection situation. I lined the tin with parchment paper, which makes cleanup nonexistent, spooned in the add-water-only muffin mix, and put the lid on.
The next step requires wrapping a "cozy" around the pot. I was out at my camp for the baking, where material options were limited. I found an old “cozy” made out of double faced bubble wrap that wasn't a perfect fit, but it passed for adequate with the addition of a short piece of electrical wire to tie it shut and a block of firewood wood lid on top to seal it down.
Next, I fired up the small titanium Bushcooker Lt1, filling a shoe polish tin cover with 1 oz. of alcohol , igniting it, and then placing the BK1 (with 3 charcoal briquettes inside) on top of the tin. This step is necessary to preheat , ignite and glow the charcoal briquettes.Why waste the heat? I put a pot of water on the stove to boil up a cup of tea, while I was waiting the 10 minutes for the charcoal to ignite.
When the flame died down and the charcoal was starting to glow, I put the assembled baker on top of the stove,
and after I waited a half hour or so, my giant muffin was cooked to perfection. Jul 2, 2009 at 12:01 am #1511656
Thomas, stop it.
You're making me feel hungry.:-)
Jul 7, 2009 at 11:49 am #1512492For what it is worth (replying to my own question and all). Antigravitygear now has the evernew pasta pot for sale at their site.
Evernew Pasta Pot Small – 700ml – 4.36"h x 3.9"w – 3.35 oz – $51.30
http://www.antigravitygear.com/proddetail.php?prod=ECA521&cat=99Evernew Pasta Pot Med – 1000ml – 4.36"h x 4.65"w – 4.1oz – $64.55
http://www.antigravitygear.com/proddetail.php?prod=ECA522&cat=99It is worth noting that there is some discrepancy in volumes and weights between evernew's website and AGG's.
I just ordered the small pot. Next on my order list is the bushcooker LT1. As for the bushcooker, it is now up on four dog stove's website.
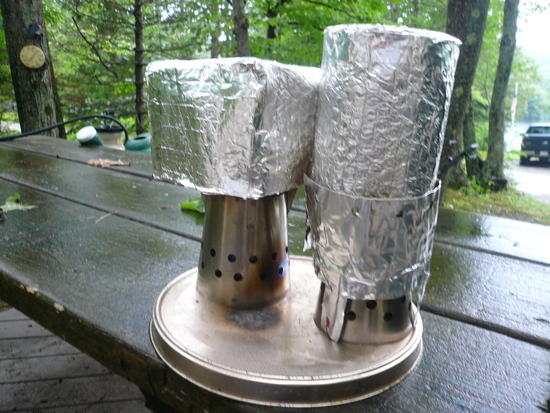
http://www.fourdog.com/index_files/bushcooker.htmJul 7, 2009 at 1:58 pm #1512524I have been playing with the stoves even more, and have been baking with two different set ups. Here is the photo of them both.
I have had the best results from the can setup rather than the pan set up, and have cooked biscuits to perfection with just three charcoal briquettes in the smallest Bushcooker.Jul 7, 2009 at 3:41 pm #1512542Jul 8, 2009 at 12:54 pm #1512698I have posted a video on Youtube of the middle size of the stove in alcohol mode. A lid of shoe polish container holds 1 OZ alcohol. You light it and then put the stove over it, where the mix encounters the finned burner, which spins the flames around. http://www.youtube.com/watch?v=9MepbkeGEiI
Jul 29, 2009 at 12:27 pm #1517395I've just completed a full review of the Bushcooker LT 1 , posted on my blog at http://tjamrog.wordpress.com/2009/07/29/backpacking-stove-review-bushcooker-titanium-lt-1/ .
Here it is with the SnowPeak 700 ti mug on top with custom titanium windacreen.
-
AuthorPosts


 and after I waited a half hour or so, my giant muffin was cooked to perfection.
 I have had the best results from the can setup rather than the pan set up, and have cooked biscuits to perfection with just three charcoal briquettes in the smallest Bushcooker.
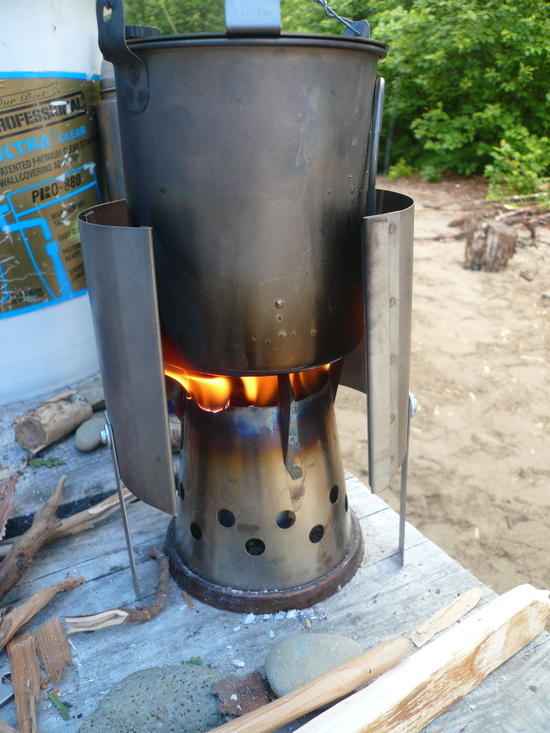
- You must be logged in to reply to this topic.
Forum Posting
A Membership is required to post in the forums. Login or become a member to post in the member forums!
Our Community Posts are Moderated
Backpacking Light community posts are moderated and here to foster helpful and positive discussions about lightweight backpacking. Please be mindful of our values and boundaries and review our Community Guidelines prior to posting.
Get the Newsletter
Gear Research & Discovery Tools
- Browse our curated Gear Shop
- See the latest Gear Deals and Sales
- Our Recommendations
- Search for Gear on Sale with the Gear Finder
- Used Gear Swap
- Member Gear Reviews and BPL Gear Review Articles
- Browse by Gear Type or Brand.
