Topic
MYOG Guyline Tensioners
Forum Posting
A Membership is required to post in the forums. Login or become a member to post in the member forums!
Home › Forums › Gear Forums › Make Your Own Gear › MYOG Guyline Tensioners
- This topic is empty.
-
AuthorPosts
-
Mar 13, 2009 at 4:36 pm #1234789
If your shelter is silnylon, and you don't want to worry when it sags in the cool, damp of the night, here is an easy MYOG solution.
Stop at your local medical supply store and pick up some surgical tubing. It ought to be about 1/4" inside diameter. I use about 9" of tubing for each tensioner.
For the guyline I used GG EZC line. This has been discontinued, but any lightweight guyline will work. I use about 27" of line for each tensioner.

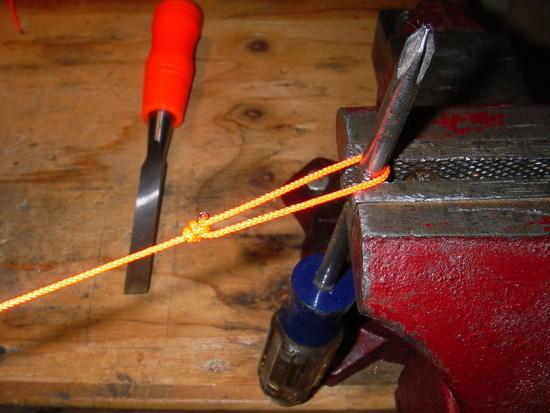
Tools I use for this project.
First, tie a bowline in one end of the 27" guyline, and hook it over the screwdriver. The first loop should be about 1-1/2" to 2" long.
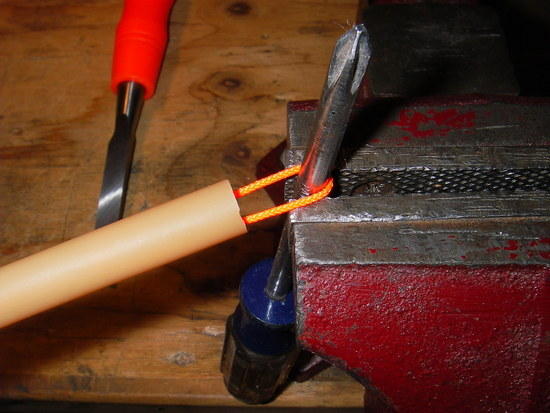
Second, thread a 9" length of surgical tubing over the guyline to cover the bowline knot, leaving about an inch of the loop exposed.
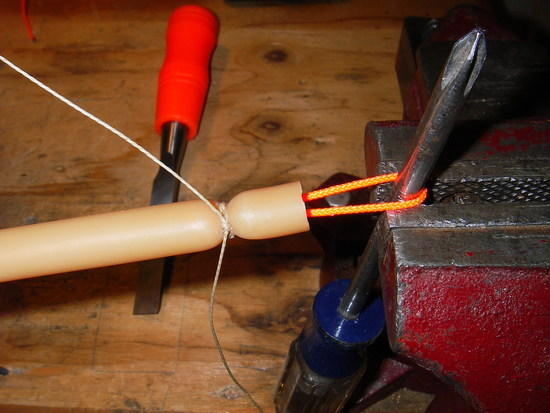
Third, tie whipping snugly around the tubing, just above the bowline knot. Leave at least an half inch of tubing above the whipping. This whipping must be well made, as there will be a considerable amount of tension on the knot.
Fourth, fold the tubing end back over the whipping and bowline knot.
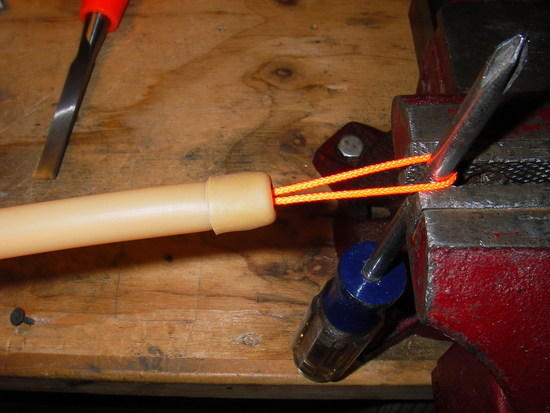
Fifth, tie a bowline in the other end of the guyline. This loop may be the same, or smaller. I keep it the same size as the first loop. Hook the new loop over the screwdriver.
Sixth, Drive a screw to hold the finished end of the guyline taut, for the next process.
Seventh, stretch the tubing until it covers the new bowline, leaving the same inch of loop exposed. Clamp the tubing inplace, below the bowline knot.
Eighth, tie whipping above knot, as with the first end.
Ninth, remove the clamp and fold the tubing back over the whipping and bowline knot, as with the first end.You have now completed an MYOG Automatic Guyline Tensioner.
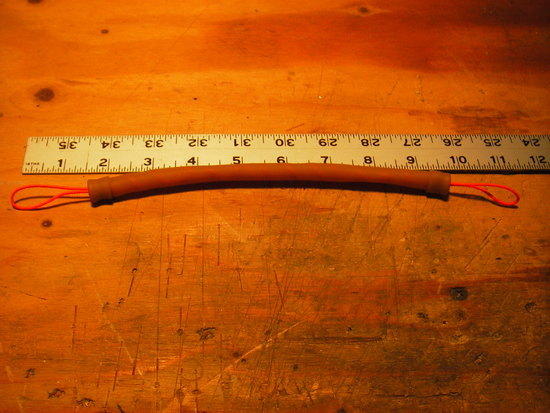
The tensioner I just made weighs 10.3 grams and has a relaxed lenght of 11". The fully stretched length is 20", and the weight required to fully extend the tensioner is about 3Kg.
Relaxed Length 11".
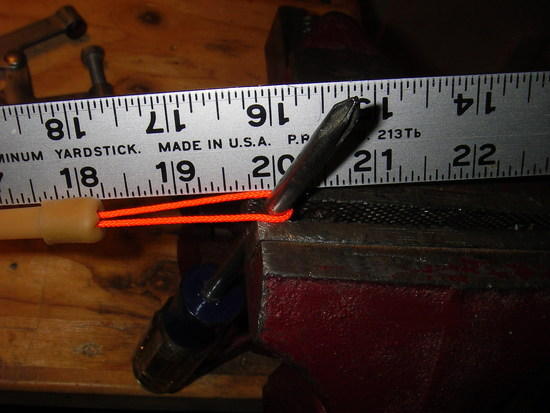
Fully Extended Length 20".
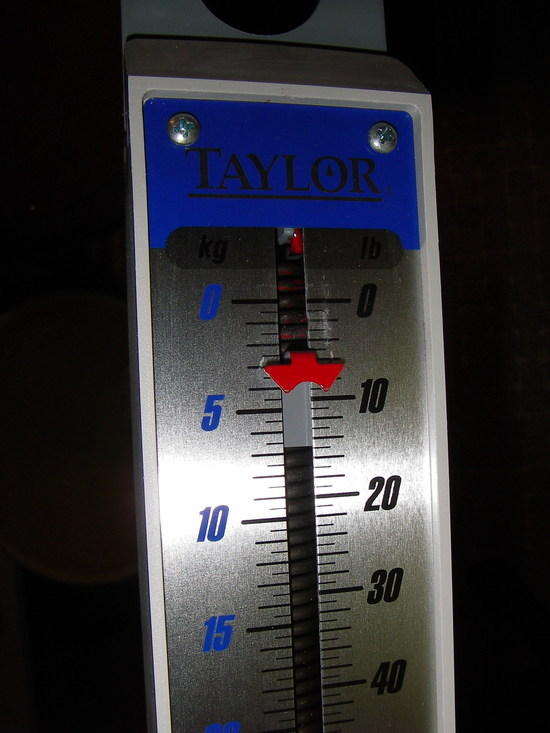
Tension At Full Extension, 3Kg.
Tensioner weight 10.3 grams.With this device on your silnylon shelter you can sleep through the night, never worrying about a sagging shelter. It also provides some protection from gusty wind damage.
Difficulty (1-5) = 2
Cool Factor (1-5) = 4, though it could be more if you use colored Pilates Tubing.Edited to correct original length of guyline from 21" to 27".
Mar 14, 2009 at 10:58 am #1485536Wow! Denis- very nice tutorial and great small project for the DIY crowd.
Thanks,
-MarkP.S. – Wouldn't it be nice to have a section on BPL with complete DIY projects like this all in one place so you wouldn't have to search all over for them? Kind of like the reviews section. Just a thought. Anyway, Denis- great job.
Mar 14, 2009 at 11:50 am #1485543I second that!
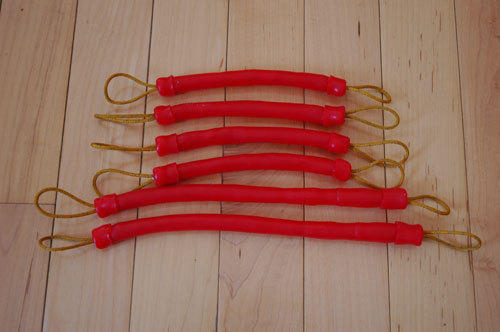
Mar 14, 2009 at 12:20 pm #1485549Cool! I've seen similar writeups on these in the past, but you did a fantastic job. It was enough that I finally made some. I purchased a piece of 54" long workout tube with handles on the end for $7 at Walmart. That's about $.13 per inch, and it's bright red. This is enough to make 9 tensioners where each length of tubing is 6" long, making them $.78 each.
I originally made two sizes for my Lunar Duo. I made longer ones for the main arch poles. They were 11" relaxed, and 26" fully extended (in the pic below), but upon further inspection I realized I wanted all 6 to be shorter.
I now have 6 shorter ones that are 8" relaxed and 16" fully extended (measured end of loop to end of loop). At full extension they have about 8 pounds of pressure. The weigh the same as yours. Total for all 6 is around 2.25 ounces.
For the whipping, I was lazy and used small plastic zip ties (see pic). It was fast, easy, and I used 2 on each end in case one fails. Thanks for getting me motivated!
 Mar 14, 2009 at 1:40 pm #1485570
zip ties look like an easy, durable solution. my latex tensioners like Denis' actually froze in place last w/e @ 22°!
the Red workout bands are likely theraband, which are more durable and as a result will last longer and hold up to more abuse. (or so i hear, i dont/cant get them locally) I believe they are stronger also, which would allow more tension over the same amount of stretch?
that is a nice tutorial and i thankee sai for sharing. fwiw, do you think two nails placed in a 2×4 would work in place of a vice/screwdriver?
Mar 14, 2009 at 1:42 pm #1485572Good work, Dennis. Could you post some pics of your sweet tensoiners in action with a tarp/tarptent?
thx
Mar 14, 2009 at 1:48 pm #1485575Dan'
It's rewarding to see that you were inspired to pop out a few of these goodies. I really like the red tubing;(they don't call me Red Leader for nothing). Also, your WM (not WM) tubing is lots cheaper than the stuff I used.I've got the tensioners on all my silnylon flys and two older Sierra Designs tents.
The down side is that my TT Sublite doesn't need them.
Itoo would like to see a forum on BPL for MYOG tutorials. Or at least a better search engine. Let's get up a petition.
Mar 14, 2009 at 2:01 pm #1485579Michael,
I believe nails in a 2×4 would work fine. To set the bowline I really romp on the loop around the screw driver though. One would need to restrain the 2×4.I like the mini zip ties much better than my waxed linen sail repair thread.
Mar 14, 2009 at 2:06 pm #1485585also, Denis and all – i have found the surgical latex in the plumbing department of Lowe's Home Improvement store.
it is sold by the foot.Mar 14, 2009 at 2:17 pm #1485587I don't think normal zip ties would work well since the head is bulky. I used a low profile model that allows them to zip down to a very small circle. They are quite handy!
Mar 14, 2009 at 2:33 pm #1485590Dan,
Where did you get the low profile zip ties? (I'm headed to WM tomorrow for the tubing to follow your example!)
Mar 14, 2009 at 2:45 pm #1485592Bill – my first guess is Home Depot. If that's not it, then it would be either my local Ace Hardware or Acme Electronics in Golden Valley.
The exact tubing I got was the Athletic Works Long Resistance Tube in the workout equipment area of WM. It has two black handles connected by the red tubing.
Mar 16, 2009 at 3:46 pm #1486062I had just enough surgical tubing left to make one more tensioner, and wanted to try the low profile zip-ties, described above. I found some at Radio Shack.
In order to test the strength of the zip-tie tensioner I looped one end around the phillips screwdriver, shown in my original posts. I then hooked my scale through the free end loop and repeatedly pulled the tensioner to full length. Each time a zip-tie failed I replaced it and retested.
I gave up testing after five zip-ties had snapped. Of all the zip-ties I used, three broke while I was "zipping" them in place. Five more slipped over the bowline and released the tubing tension. I finally cut the remaining zip-tie off and used the linen thread.
I think the waxed, linen sail repair thread works better than the zip-ties. None of the tensioners I have made, using the originally posted method, have failed.
Anyone want sixteen 3-7/8", low profile zip-ties? Send me the $3.00 postage and they're yours.
Mar 16, 2009 at 4:22 pm #1486077as a past cable installer for a large electrical contractor… i can tell you the mistake was using Radio Shack zip-ties.
go get some by Ideal, or at the very least Gardner-Bender and try again before you give up. You should be pleased with "real" zip ties.
Mar 16, 2009 at 4:22 pm #1486078Thanks for the update – looks like my laziness may not be the best method for you. I stretched mine out a bunch to full length, but was going to do a more sustained load test. My red tubing is quite sticky on the inside, and is probably less slippery than latex, so I don't know what the result will be of my test. None of my zip ties broke when I tightened them. Are your zips the same as mine?
Either way, I'll may redo mine. I'd rather not have an issue on the trail.
Mar 16, 2009 at 4:40 pm #1486088Do either of those brands come in "lo-head" versions? If so, where do I find them?
Mar 16, 2009 at 5:53 pm #1486117Panduit is a great one and can be found at electrical supply stores. Ideal and other top brands may be found there as well. Peace, Mike
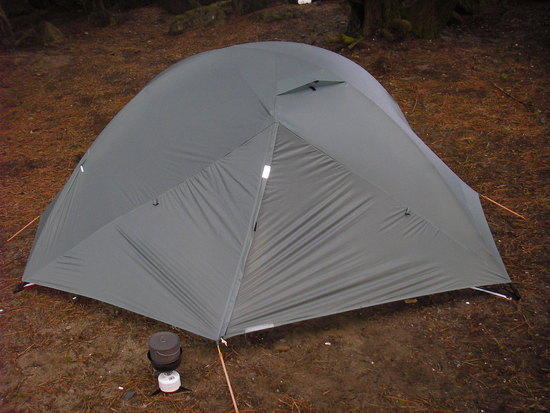
Mar 18, 2009 at 12:37 pm #1486752In order to give the tensioners a preliminary trial I went out to Bodega Bay yesterday afternoon. The weather was cool and clear with a 15 mph wind from the northwest.
I used my Evolution 2P tent with the new Porch Fly. I set up perpendicular to the wind to give the rig a real test. It was a bugger getting the fly on the tent, and pegging it down. I used four tensioners: one on each vestibule and one at each end of the fly. I pulled all the slack out of all tensioners. The wind deflected the fly quite a bit on the windward side but not so much to be a problem.
The fog began to come in about 8:30 pm, and the wind held steady until about 3:00 am, when it dropped to a gentle breeze. The tensioners held the fly taut throughout the night. There was no sagging in the morning, even though the fly was wet inside and out.
Evolution 2P with MYOG Automatic Tensioners. End View
Evolution 2P with MYOG Automatic Tensioners. Lee Side
Evolution 2P with MYOG Automatic Tensioners. early morning with wet fly.
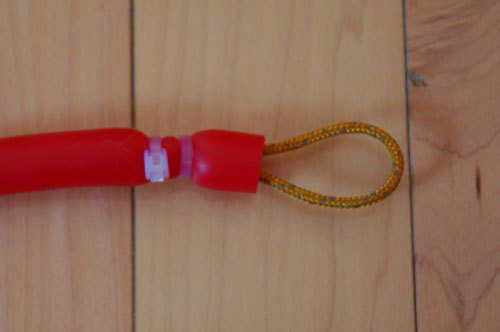
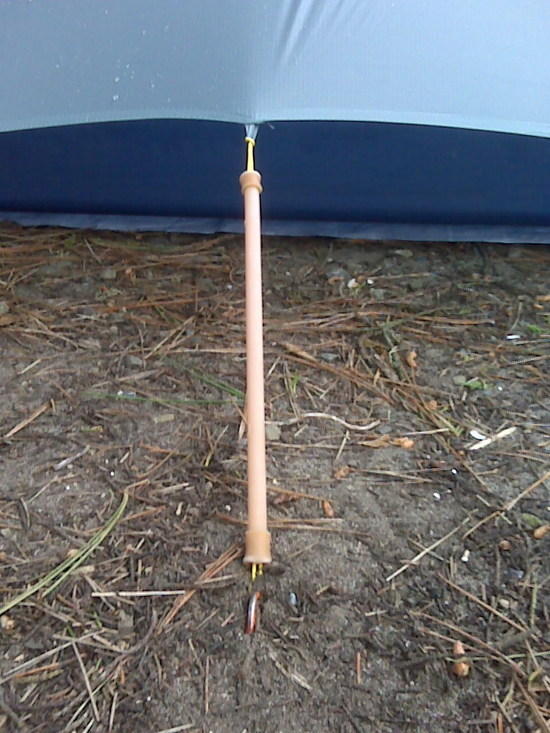
MYOG Automatic Tensioner DetailThey're easy, they're light weight, they're MYOG
Mar 18, 2009 at 1:24 pm #1486774Do the tensioners really need to stretch to twice their length? Seems like that would be a pretty furious windstorm. I was wondering if a guy could make 4" long.
I also wonder how Thera-band tubing would work, and which strength to get.
Mar 18, 2009 at 1:29 pm #1486778Joe,
Well you figure the more stretch you have (assuming they keep the same tension regardless of length) then the more the shelter can correct itself.
Personally, i bought some from JRB and they're about 6" unstretched. They work great on my SpinnTwinn. I think 9-10" is just a bit excessive, but depends on if you want to avoid adding extra guyline.
Long answer short: 4" finished length of tube would be fine i'm sure.
– Dana
Mar 18, 2009 at 1:30 pm #1486779Joe – it seemed, with mine at least, that most of the tension was toward the second half of the stretch. I made a short 3" tensioner and it it didn't seem practical to me. It might work though. 4" would be better, but I don't have any sections 4" left over, so I can't test that.
Mar 18, 2009 at 1:33 pm #1486781Joe,
If you make them short you don't have as much flexibility to move the peg around to find a place it will go in. You'd save some weight, though mine weigh less than 0.4 ounces.Dana,
I don't use any extra guy line. Fasten the buggers to the tent guy out loops.Mar 18, 2009 at 1:38 pm #1486788"but depends on if you want to avoid adding extra guyline."
Yep, i saw that from your pictures. Nice shelter by the way!
Mar 18, 2009 at 1:45 pm #1486794Dana,
Thanks, I really like this tent. I haven't added guy lines at the shoulder points on the fly. When I do I probably wouldn't use tensioners for these lines. The stress on the shoulder points is transferred directly to the poles and I prefer that connection to allow no slack.Mar 18, 2009 at 2:03 pm #1486806Denis,
Conversation diverged a bit from where i was originally headed.
What i meant by my comment to Joe, was that if you make the tensioner long enough, you won't have to tie more guyline to it in order to use it.
Another alternative is to not make the second bowline, but just make a knot instead and leave the guyline free. You can have x number of feet free to hang for tying out.
– Dana
-
AuthorPosts


- You must be logged in to reply to this topic.
Forum Posting
A Membership is required to post in the forums. Login or become a member to post in the member forums!
Our Community Posts are Moderated
Backpacking Light community posts are moderated and here to foster helpful and positive discussions about lightweight backpacking. Please be mindful of our values and boundaries and review our Community Guidelines prior to posting.
Get the Newsletter
Gear Research & Discovery Tools
- Browse our curated Gear Shop
- See the latest Gear Deals and Sales
- Our Recommendations
- Search for Gear on Sale with the Gear Finder
- Used Gear Swap
- Member Gear Reviews and BPL Gear Review Articles
- Browse by Gear Type or Brand.
