Topic
Remote Fueled Alcohol Stove
Forum Posting
A Membership is required to post in the forums. Login or become a member to post in the member forums!
Home › Forums › Gear Forums › Make Your Own Gear › Remote Fueled Alcohol Stove
- This topic is empty.
-
AuthorPosts
-
Mar 12, 2009 at 9:25 am #1234751
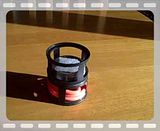
I used the "StarLyte" stove burner as the basis of this remote fueled stove. The burner is 1/2 the height of the original StarLyte.
You can pour in 1/2 ounce of fuel directly into the stove and heat 2 cups of water for a quick heating.
For longer uninterupted heating of water or simmering of large quantities of food for groups you would connect the remote fuel source and the fuel would be fed to the underside of the burner via the fuel tube. The fuel tube remains attached to the stove to prevent wear on the tubes connection. For storage just coil up the tube as shown in the photos.
This is just a prototype just to show you whats in the works.
I'll show the fuel container soon. It has a micro adjustment to regulate the fuel. The adjustment is made inline at the fuel container for easy access during cooking. Regulating the flame remotely will be easy.
Weight of stove without tubing is 1.4 ounces. It's made of steel to withstand the heat as the flames pass the support legs. The support legs will easily support 2 gallons of water if needed.
The stove is vesatile, boil two cups or 2 gallons. 2 cups without the fuel line hook-up, just dump in the fuel and light. The stove has the same fuel absorbing material as the original StarLyte for even distribution of flame to pot.
I'll show fire under the stove as photos and video are taken.
Stove dimensions are:
2.75 inches tall and 2.5 inches in diameter. The base is such that it will have minimum sinking into soft soil. Has a very nice footprint for support.
Parts are readily available for all DIY'ers. Just by looking at the photos you can see how easy it is to make at home. Those of you that have made the StarLyte are close to having a remote fueled unit.
When I have time I'll make a list of materials and where to obtain them.
<center>

</center>I do not have a vested interest in this stove
Mar 12, 2009 at 9:55 am #1484925Uh, if you invented, built, and took video of the stove how can you not have a vested interests in it?
Mar 12, 2009 at 7:13 pm #1485128hahaha.
Chad, you're right on!!!
Mar 12, 2009 at 7:58 pm #1485142Regarding "vested insterest": I think he means that he's not trying to sell his wares on here.
Mar 13, 2009 at 8:43 pm #1485459A quick video of the flame patern under a kmart grease pot:
<center>
</center>Mar 14, 2009 at 1:52 am #1485492was the silicone hose starting to melt? – I noticed the fiberglass tape covering the top of it…
Mar 14, 2009 at 4:30 am #1485493Dan, this is a great idea. I like using alcohol but the problem has always been that for doing more than heating water I would have to re-fuel the stove. This could be the answer for me as far as being able to actually cook and simmer instead of just boil.
I can't wait to see your next installment. I'm doing a 175 mile section of the AT in late April. Do you think you will have the rest of your instuctions up by then? It would nice to have a couple of weeks to play with the stove so I will know what to expect under different conditions.
Mar 14, 2009 at 10:17 am #1485526Joseph:
What kind of pot are you planning on using?
Mar 14, 2009 at 1:49 pm #1485576I will be using either a 1.5 liter REI Ti-ware or an MSR Titan Kettle.
Mar 14, 2009 at 1:54 pm #1485577Excellent job! How does it all work?
What does the fuel botle look like?cheers
Mar 14, 2009 at 6:40 pm #1485622Thanks for the comments. I'll give the info as fast as I can get photos and time. You can go light weight by using aliuminum cans fronm the Fancy Feast and "Armour" brand tiny hot dogs. The cans are shown. The steel cans come from the snack chicken or tuna packs as shown.
<center>
</center>Mar 27, 2009 at 1:13 pm #1489246I made a different style burner head for this stove. Works good but still need adjustments.
<center>
</center>Mar 29, 2009 at 11:03 pm #1489708Dan! This is really developing nicely.
Is that carbon fiber covering the top? what did you use as a circular base to wrap the wick around?
GREAT WORK! I like this design quite a bit more.
Mar 31, 2009 at 2:00 pm #1490123Hi Matthew, I used a button form available at Joanne Fabrics. It's covered with fiberglass cloth. I used a permanent marker to blacken the fabric to make it look "tacticle" looks like carbon fiber doesn't it. I just need to do some water boiling with it to show some results. I'm backed up with other stove designs. Too many on the back burner. :=)
Mar 31, 2009 at 2:10 pm #1490126Will we ever get to see the remote fuel source? Or you just like to tease?
Mar 31, 2009 at 6:43 pm #1490195"button form available at Joanne Fabrics"
…You have some creative ideas.

here's the closest I could find as I imagine it – how close am I actually to what you used?
Mar 31, 2009 at 6:56 pm #1490202It's a button making device/form/ thats used to make a button that has matching fabric of the coat or what ever your making or replacing. I'll see if I can find a link to one tomorrow.
I did post a video of the IV bag that's used for a fuel source in the other thread. It shows the drip/flow control device also.
I'm working on a new way to fuel the remote stoves and will post when photos and results are ready.
Not teasing, just behind schedule.
Mar 31, 2009 at 10:53 pm #1490272"Not teasing, just behind schedule."
Oh, OK then. Good work. Carry on! :)
Apr 1, 2009 at 12:23 pm #1490454Here is a link to a site that will give a good description of the button hardware used in creating the burner head.
http://www.coverbuttons.com/?gclid=CJu3xcCz0JkCFQoMDQodm2pmuA
-
AuthorPosts


- You must be logged in to reply to this topic.
Forum Posting
A Membership is required to post in the forums. Login or become a member to post in the member forums!
Our Community Posts are Moderated
Backpacking Light community posts are moderated and here to foster helpful and positive discussions about lightweight backpacking. Please be mindful of our values and boundaries and review our Community Guidelines prior to posting.
Get the Newsletter
Gear Research & Discovery Tools
- Browse our curated Gear Shop
- See the latest Gear Deals and Sales
- Our Recommendations
- Search for Gear on Sale with the Gear Finder
- Used Gear Swap
- Member Gear Reviews and BPL Gear Review Articles
- Browse by Gear Type or Brand.
