Topic
1.2oz Wood Stove
Forum Posting
A Membership is required to post in the forums. Login or become a member to post in the member forums!
Home › Forums › Gear Forums › Make Your Own Gear › 1.2oz Wood Stove
- This topic is empty.
-
AuthorPosts
-
Nov 19, 2005 at 7:36 pm #1217191
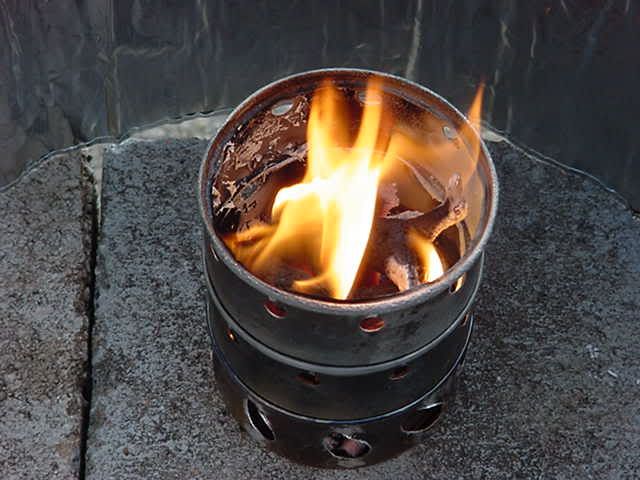
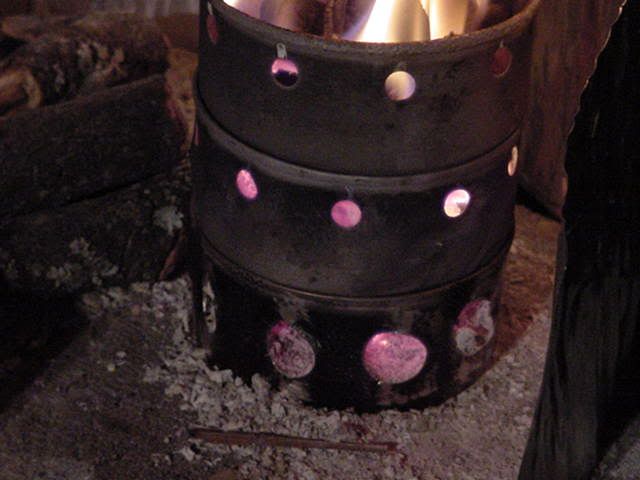
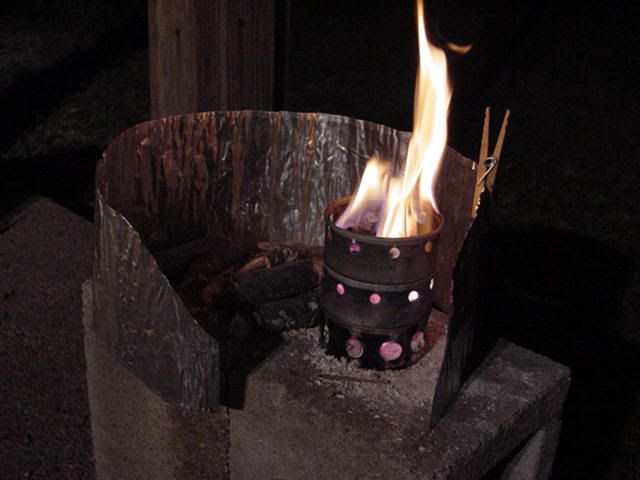
This is the Aluminum Can Wood Stove I mentioned on Ryan’s SUL Winter Challenge thread.
Aluminum Can Wood Stove w/SS grate:
3″ lid opening by 4.5″ tall – weight 33.5gr/1.2ozThe Stainless Steel grate pushes the weight over the 1oz mark I was shooting for. Maybe version 2 will be lighter.
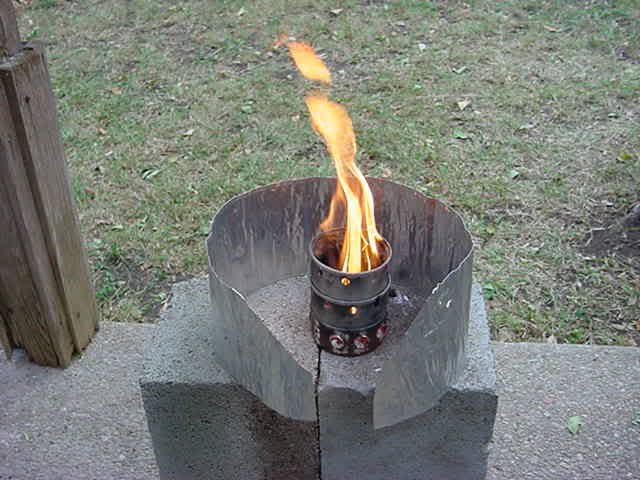
For Joshua: I kept a fire in the Aluminum Can Wood Stove from about 1:00pm this afternoon until about 7:00pm this evening. The bottom section is fine, The center section is OK and the top section should do it again. I don’t think I would use this stove for 6 hours straight many times. If that was required I would go back to my Steel Can Wood Stove at about 3oz total weight.
Finding enough small pieces of wood everyday might be more trouble for Ryan than it is worth. I would take a wood stove like this on an AT hike. I would have a lot of time each day walking along to find the small pieces of wood necessary for what ever fire I needed.

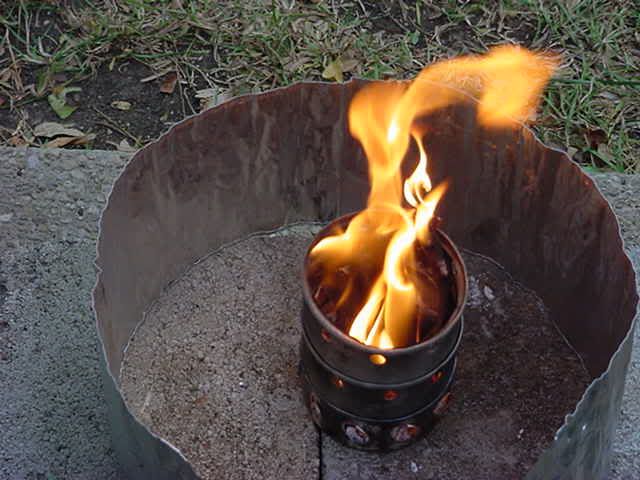
Time to clean the ash out of the air holes.
Letting the fire burn out after 6 hours straight.
Nov 19, 2005 at 8:24 pm #1345497Bill,
is this three tuna cans put together with a floor between the bottom and middle?do you need a seperate pot stand or just put a pot on top?
how did you connect the three cans, if this is what they are?
JB weld, or real welding, or what?
I am interested, how did you make it?
Nov 19, 2005 at 9:42 pm #1345502Hi Ryan,
Q-1 is this three tuna cans put together with a floor between the bottom and middle?
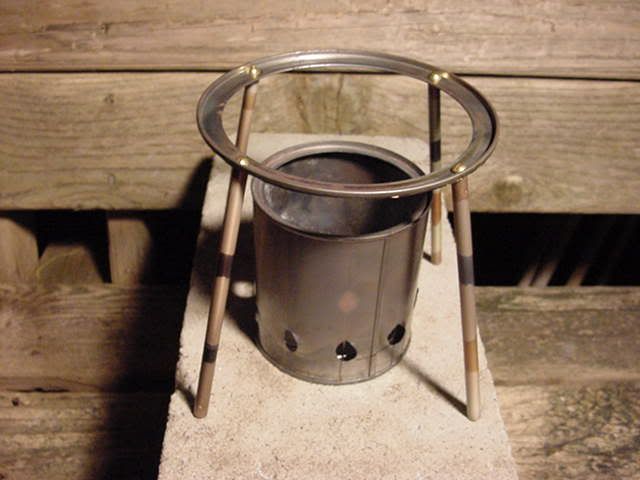
A-1 I used 3 cat food cans. I have several or a dozen or so cats that I take care of. So I generated about 4 cans a day.Q-2 do you need a seperate pot stand or just put a pot on top?
A-2 I use a seperate pot stand made for the size of the pot I will use. The pot stand is a ring with four legs made out of arrow shafts attached to the ring. The legs can be unscrewed and longer or shorter legs can be used.
Q-3 how did you connect the three cans, if this is what they are?
A-3 The cans I use have a foot of sorts and the top of the cans have a small depression around the lid that the foot sits in. I was going to wire them together but don’t think that is necessay.Q-4 JB weld, or real welding, or what?
A-4 JB Weld will burn if it comers in contact with an open flame.I am interested, how did you make it?
Ryan, remember that for most people a SUL hike will only last a few days. So, some gear only has to last that long. Some things can be expendable if they are cheap and easy to make. Use it once and make a new one for the next time. You also could make this stove on your hike if you had a few cans. The tuna cans should work as well. Eat the tuna and turn the can into your stove or repair the one you are using if you have to.
Nov 20, 2005 at 7:35 am #1345518So the cans just sit on top of each other correct?
how do you light it?
put fluid on top or bottom of the wood?
or tinder under grate?Nov 20, 2005 at 7:51 am #1345524It’s good to see my thought on aluminum put to the test (and in this case proved wrong).
How much does the potstand weigh?
The think I like about this is if a piece gets too beat up / burned up, you can replace that particular piece.
are you finding that vortexing the bottom vents is helping enough to make it worth the effort?
Nov 21, 2005 at 4:51 am #1345582Bill,
The other night, I was wondering… if you wanted to lighten up version two…Have you tried punching holes in the bottom of can #2 (the middle one) in leiu of using a SS grate?
I know the hole-punch method works for some of the steel hobo / wood-gas stoves I make.
Nov 21, 2005 at 12:03 pm #1345614Joshua,
I was thinking the same thing. I dont have any of the SS grate, so I have been using the hole punch method. I dont know how much weight it will save, but once I get my family to eat some tuna I was planning on making a stove with a similar design.
Nov 30, 2005 at 11:01 pm #1346273Bill,
Did you angle the holes in the bottom tin as in the cyclone-flame stove series. It looks like you might have.
Dec 1, 2005 at 1:26 am #1346275Alex asked?
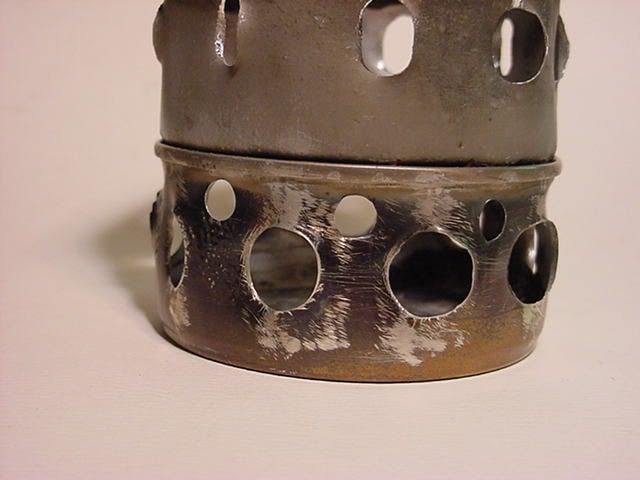
“Did you angle the holes in the bottom tin as in the cyclone-flame stove series. It looks like you might have.”Hi Alex, yes the holes are beveled as in the “cyclone-series”. As an improvement I have made the holes in the middle section larger and beveled them also. If you heat the aluminum first it is easier to bevel the material. After you cut out the holes burn some alcohol in the cans. When you have the holes beveled burn somemore alcohol and notice the flame difference before and after.
I think I was the first to bevel the holes and this allowed me to get the “cyclone” flame effect without bending out the side of the can. The beveled holes are a throw back to my old “Hot Rod” days and reminded me of the many “louvers” punched into the bodies of some of the cars.
Dec 11, 2005 at 7:03 am #1346812I was just surfing around and found this wood stove that might be if interest. It’s pretty heavy… but you may get design ideas from it.
Dec 11, 2005 at 8:23 am #1346814I’ve been following the threads about wood stoves and getting more and more confused about design criteria. Many people seem to have followed the Garlington Wood Stove idea, which itself is based on the ideas of the inverted downdraft gasifier wood stove ( http://www.repp.org/discussiongroups/resources/stoves/Reed/Turbo2.htm ). As Ray Garlington indicated in his site ( http://www.garlington.biz/Ray/WoodGasStove/ ), one of his goals was to achieve a blue flame, which is indicative of the burning wood having reached wood gas output, which burns hotter, longer, and cleaner, with very little waste left over, than yellow flames (I think… I don’t really understand these concepts yet).
Yet the stoves being promoted here are simply cylindrical metal containers with holes in the sides, that don’t seem all that much different from a circle of rocks (which would retain a lot of heat a lot longer). I’m curious as to what advantage there might be with these simple stoves… Is there something about the diameter of the cans or the materials or the height that makes them different from any alleyway homeless person’s oil can wood stove?
I’ve also been following the idea for the cyclone holes and think maybe there is something to it, especially in an alcohol stove. It must work pretty well in a Brasslite. I just wonder how the beveled holes would work in a can filled with wood, where there is no space for the free circling of air. Somehow if there was a way to keep the area where the wood gas burns free of solid fuel perhaps the cyclone effect might work.
There are some ideas here that might be of use to people looking around for ways to improve and use wood stove technology: http://journeytoforever.org/at_woodfire.html
I’ve been looking at inverted downdraft wood stoves for a long time and perhaps because the idea is counter-intuitive have still not quite grasped how to go about implementing it in a lightweight camping stove. My home-made stoves work, but all produce a lot of smoke before properly igniting. There was a stove made several years ago, designed by a guy named John Hall, called the BushBuddy ( http://web.archive.org/web/20001025101657/www.bushbuddy.com/about.html ), now unfortunately no longer manufactured (and the stove was reputedly very heavy) which comes the closest to what I am looking to achieve with an inverted downdraft gasifier camping wood stove.
I’m also considering the possibility of using a material other than metal for the outside of the stove, something that is porous, retains heat, and is very light. Perhaps ceramic tile or so?
Anyone have any ideas?
Dec 11, 2005 at 9:29 am #1346815 AnonymousInactive
Miguel,
Good Posting, Good reference sources.
Your 3 links take an Intelligent look at wood stoves.Regards
Dec 11, 2005 at 11:24 am #1346816Hi Miguel, Have you gotten any snow over there yet?
My concept for all my backpacking gear is “Keep it simple – keep it light”. I have talked to Ray about other backpacking gear as we both use a hammock for backpacking. I have read everything on his web site. When I decided to finally make a soda can alcohol stove it was one of his YACC stoves because it fit my “Keep it simple” concept.
For a backpacking wood stove that is light enough for me to carry “keep it light” most designs are just to heavy. So it comes down to something that will hold the wood
1 – a very light can or several stacked or used together.
2 – a grate ( I have been using Stainless Steel Mesh) to keep the wood up and out of the bottom of the stove so air coming into that area isn’t blocked.
3 – Beveled holes just because I believe it really helps.
4 – and enough holes in the stove so the square inches of air intake opening is the same or greater than the square inches of the hole in the top of the can where the flame goes out.At this level of “keep it simple – keep it light” technology a wood stove just over 1 ounce in weight seems good. It burns very well and boils water fast.
I burned wood as in “wood fired pottery kilns” for a number of years. I have a good understanding of combustion at the pottery kiln level. I have also made and fired with wood mud bread ovens and little mud stoves. It would be possible to make a mud wood stove every night along the trail if you had dirt and a few other material from the area.
I keep looking for aluminum cans in new shapes that might be used for a more technically advanced wood stove.
The “keep it simple – keep it light” concept still remains and I think I would draw the weight line at 6 to 8 ounces.
Maybe I will just have to buy one of those machines used to spin aluminum shapes – that is a joke – Roger. I will not buy it I will write a grant for it.
Dec 11, 2005 at 3:15 pm #1346820Hi Bill… no snow yet here in Tokyo. In the last ten years snow has rarely fallen here any more. Tokyo is perhaps the world’s biggest heat island and it creates its own weather now (which means unbearably sweltering temperatures in the summer). The mountains however already started dumping snow last month, which is very early. And some areas to the Japan Sea side, getting snows directly from Siberia and having some of the deepest drifts in the world (the Tateyama area routinely gets 10 meters or more… in Spring tourists drive through in buses… http://www.museumofhoaxes.com/hoax/weblog/comments/2988/ ) look to have a very severe winter. Can’t wait to get out there with my snowshoes!
I was pondering how one might put together a really simply wood stove: how about simply standing a cylinder of metal sheeting with holes punched in at the base and the top upon an aluminum tray (to protect the ground from the burning wood), placing a grate in the bottom, and then surrounding the whole thing with rocks? This way the open flame would be contained, no windscreen is necessary, and a inverted downdraft gasifier effect might be achieved. I have to try the idea out sometime, but its not possible in my neighborhood (no open flames allowed, whatsoever).
Thoush Bill’s ideas certainly would be more versatile, like on bare rock, for instance.
Dec 11, 2005 at 3:50 pm #1346822Hi Bill… no snow yet here in Tokyo. In the last ten years snow has rarely fallen here any more. Tokyo is perhaps the world’s biggest heat island and it creates its own weather now (which means unbearably sweltering temperatures in the summer). The mountains however already started dumping snow last month, which is very early. And some areas to the Japan Sea side, getting snows directly from Siberia and having some of the deepest drifts in the world (the Tateyama area routinely gets 10 meters or more… in Spring tourists drive through in buses… http://www.museumofhoaxes.com/hoax/weblog/comments/2988/ ) look to have a very severe winter. Can’t wait to get out there with my snowshoes!
I was pondering how one might put together a really simply wood stove: how about simply standing a cylinder of metal sheeting with holes punched in at the base and the top upon an aluminum tray (to protect the ground from the burning wood), placing a grate in the bottom, and then surrounding the whole thing with rocks? This way the open flame would be contained, no windscreen is necessary, and a inverted downdraft gasifier effect might be achieved. I have to try the idea out sometime, but its not possible in my neighborhood (no open flames allowed, whatsoever).
Thoush Bill’s ideas certainly would be more versatile, like on bare rock, for instance.
Dec 11, 2005 at 4:51 pm #1346823Hi Miguel, I looked at the picture of the Bus driving on the road where the snow had been plowed taller than the Bus. I think they showed that road during the Winter Olmpic’s a few years ago.
I think a wood stove such as you discribe could be made. One advantage you have burning wood is the metal part of the stove does not have to be made tight enough to hold a liquid such as an alcohol stove. Aluminum cans could be taken apart and the small pieces turned into a “patch work” of sorts – large sheet of aluminum. This then could be the main part of your stove. A simple system to connect the stove sides to the bottom pan if necessary should be do-able.
Putting some folds in the metal should make it strong enough to hold a cook pot. Making a few paper models to get a pattern would help see how much metal and maybe an idea of how heavy a finished stove might be. I may play with some cat food cans and see if I can come up with a large enough piece to build a stove. I can get thin sheet aluminum sheets but it might be more of a challenge to make it out of a recycled material.
-
AuthorPosts

- You must be logged in to reply to this topic.
Forum Posting
A Membership is required to post in the forums. Login or become a member to post in the member forums!
Our Community Posts are Moderated
Backpacking Light community posts are moderated and here to foster helpful and positive discussions about lightweight backpacking. Please be mindful of our values and boundaries and review our Community Guidelines prior to posting.
Get the Newsletter
Gear Research & Discovery Tools
- Browse our curated Gear Shop
- See the latest Gear Deals and Sales
- Our Recommendations
- Search for Gear on Sale with the Gear Finder
- Used Gear Swap
- Member Gear Reviews and BPL Gear Review Articles
- Browse by Gear Type or Brand.
