Topic
Driducks bivy
Forum Posting
A Membership is required to post in the forums. Login or become a member to post in the member forums!
Home › Forums › Gear Forums › Make Your Own Gear › Driducks bivy
- This topic is empty.
-
AuthorPosts
-
Oct 30, 2008 at 11:11 am #1231805
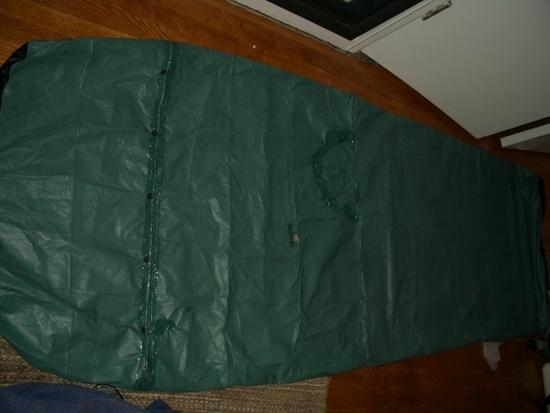
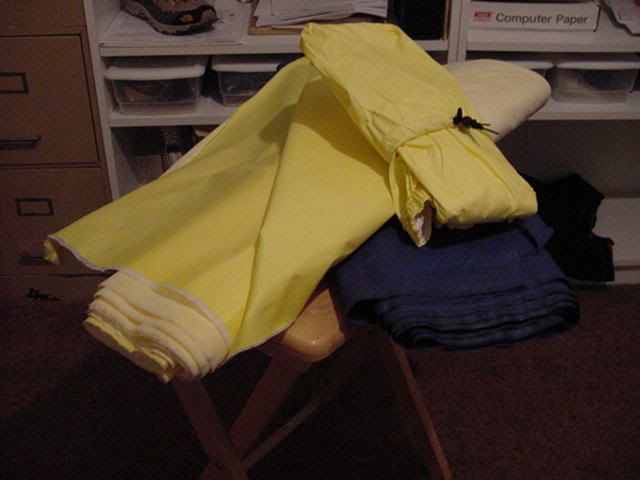
Thought this deserved its own thread… I just finished a Driducks/silnylon bivy, using "yardage" from a Driducks poncho. The total weight is 8.1 ounces. For the sake of comparison, the dimensions are 84" length x 68" @chest/62" @waist/54" @feet.
I made this bivy after being "inspired" one night when my DWR-topped bivy wetted out. Albeit it was a less than ideal campsite: a cold, humid creek valley, fairly close the the water, on a night that briefly got down to freezing. However it was a long, cold night to have wet fabric draping over my down sleeping bag and it prompted me to look for more waterproof solutions.
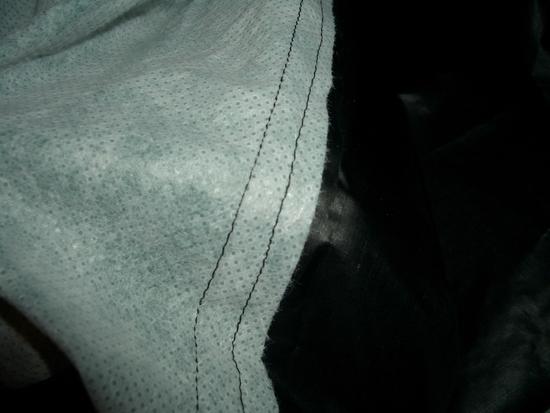
The two drawbacks of this fabric will be durability and breathability. The top fabric probably won't see much abrasion if I'm careful (though of course real world situations tend to be a little different than imagined), but I wonder about seam strength. Single stitched, simple seams were unacceptable (I could see the needle holes extending when I pulled on the fabric), so I double stitched everything. It seems pretty strong, but time will tell how they hold up. Obviously this will not be quite as breathable as DWR nylon, and even that isn't really good enough to vent condensation from my nose and mouth. What I will probably do is find some fabric that's a little more breathable than ripstop nylon and a little more windproof than bug netting, and install a patch of that in the face area of the bivy for venting.
I'll try to update this thread when I get a chance to test it out in a few different sets of conditions.

The D shaped seam in the middle of the bivy is where the hood (of the poncho) was. The black patches along the zipper are re-inforcements for a series of internal loops that hold a wire (basically a straightened clothes hanger) to keep the top fabric off my face. The zipper was also double stitched.
Oct 30, 2008 at 11:43 am #1456881Very cool, Art!
I'm still not sure how much I like the DriDucks material. I've only used my jacket a handful of times, including a very rainy week in Colorado, but it doesn't take much abrasion to put holes in it. Granted none of them are large enough to worry me, but it didn't take a whole lot of use to create them.
I'd be curious to see how well it holds up as a bivy top. Obviously it isn't going to get nearly as much abuse as a jacket but I'm still curious.
Adam
Oct 30, 2008 at 12:25 pm #1456889Me too. Luckily the total cost to me was pretty low for this project. I already had the silnylon as scrap from a previous bivy project and the zipper was also a leftover. So really the only cost to me was the $14 for the poncho. If it turns out to be junk, then at least I'll have a properly sized bivy bottom to re-use. One thing I'm not counting on is using this bivy as a stand-alone waterproof shelter except maybe for very rare occasions when I know conditions will permit it (I'll definitely use it with a tarp the majority of the time). When I was pinning it, I could see each individual pin hole in the fabric. Unlike with silnylon, pinholes don't "heal" themselves with Driducks fabric. Even so, if it holds up over time, it could facilitate the use of a very small tarp, or a regular sized tarp but just in very humid conditions. At 8.1 ounces, it is incredibly light for a "mostly-waterproof" bivy.
Oct 30, 2008 at 3:33 pm #1456926I rigged up my dri ducks poncho to use as a sleeping bag cover simply by installing a draw cord in the end channels. It works the same way a flat quilt works (JRB style) by simply cinching one end closed and creating a foot box. To improve on this you could install removable under straps much like a sleeping quilt to keep it in place. I did not do this since my primary use was for a additional protection to my hammock under quilt. The advantage to this set up is that it can be used as a sleeping bag cover and still be used as a poncho in wet weather.
Oct 30, 2008 at 3:53 pm #1456932That is awesome!, first one sighted, congrats.
Would rolling the seams before sewing make it any stronger?
Possibly a rip resistant tyvek tape in the seam?
Lets see some pics of the poncho as a hammock cover too!
Oct 30, 2008 at 5:16 pm #1456941> Would rolling the seams make it any stronger?
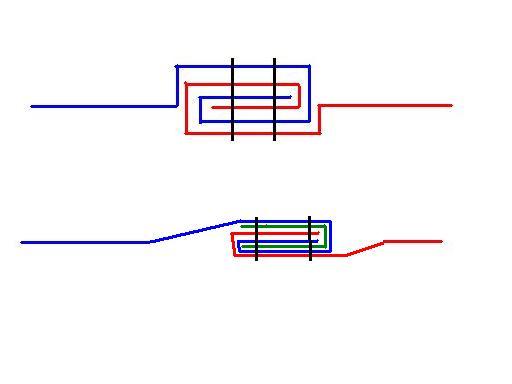
No. Have a look at the modified version of your diagram here:

The top version shows what happens when you put the rolled seam under tension. All the load goes on single layers of fabric at the two lines of stitching.
A rolled seam may be less prone to leaking, due solely to the bulk of material, but it is not stronger.Now look at the lower diagram. Here you can see that the line of stitching has been reinforced by the flaps of fabric on the outside. This seam will stay much more in line and be stronger. The hassle is it looks less 'professional' and more untidy.
There are of course ways of making this look better, but you have to decide whether you want style OR function, at least to some degree. If you want both the seam gets a shade more complex – but it is possible.Cheers
Oct 30, 2008 at 7:54 pm #1456965Thanks for the feedback and diagrams.
Randall, somebody pointed out your project in another thread and I was pretty impressed that your idea was both simpler and more functional than what I had planned, but ultimately I decided that I like the enclosed design of a bivy more for the camping I tend to do the most. I'm not really a poncho-lover anyway.
Below is a diagram of what I did. After I sewed the first seam, I folded the edges of the fabric (don't know the term for it, the "tag edge"?) over, pressed it flat, and sewed another line down this, using the tag ends of both pieces of fabric as the outer re-inforcement layer. This was mainly done to prevent the first seam from being pulled apart (because when you pull on a simple seam with Driducks laminate, all the little needle holes stretch out and it looks like the thread will cut right into the fabric). Overall it does seem like the seam is stronger than it was before I re-inforced, though the reason why this should be is not immediately apparent from the diagram. Perhaps the reason is because the Driducks laminate is stretchy. So that second seam is essentially decreasing the tension on the needle holes in the first seam by allowing the fabric to pull on the needle holes in 2 seams, rather than just 1. So the tension each needle hole experiences is perhaps as much as 50% decreased by adding the second seam, or at least it could be under ideal conditions.

This is all just my own speculation. I may be misjudging seam strength since I'm only eyeballing it, and maybe the only difference in seam strength from what I did is all in my head. I have not done any quantifiable tests as yet, although I do have plenty of scrap I could play around with….Oct 30, 2008 at 9:57 pm #1456978Paul, sorry, I don’t have any poncho photos. Just imagine an under quilt on the bottom of a hammock for insulation and the rectangular poncho with draw cords at each end attached to the outside of that for additional weather/wind/splash protection for the under quilt.
Art, your project looks great. Homemade gear can be addictive. The main reason I mentioned the poncho that I altered was because of the obvious advantage of multi tasking a piece of gear of that size and weight. But it’s still no bivy sack. I hear ya on the poncho love. Most of the time I just prefer a rain jacket and pack cover. But like all of us, I’m always playing with the gear chemistry.
Best,
RandallOct 30, 2008 at 10:21 pm #1456979Art, you did say not expecting much force on it. Thanks for the update, and thanks for the clarification on that Roger.
Know how well the membrane performs in sub-freezing temps?
Oct 30, 2008 at 10:24 pm #1456981Hi Art
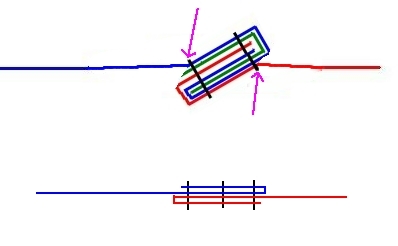
Yep, that is actually what I use on silnylon and pack-cloth. Where I think I need extra strength I sometimes add another line of stitching.
If you want to be elegant, make the green flap longer and tuck it under before you sew the outer line. This extra step is good for uncoated woven fabrics – but takes extra work and care.

Then to proof the seam, you either tape at the blue line or coat with sealant there. Taping the seam does add extra strength.
Cheers
Oct 31, 2008 at 3:18 pm #1457073> I made this bivy after being "inspired" one night when my DWR-topped bivy wetted out. Albeit it was a less than ideal campsite: a cold, humid creek valley, fairly close the the water, on a night that briefly got down to freezing. However it was a long, cold night to have wet fabric draping over my down sleeping bag and it prompted me to look for more waterproof solutions.
in this sort of conditions, it helps a lot to have some loop over the head area, rigging a line over a vertical support and staking it down together with a couple more stakes at ground level on the foot area to create tension so the bivy top is not in direct contact with the bag for most of its length. If the bivy top is reasonably water resistant, it wont drip on the bag.
Ever since I got my first Rainshield jacket a few years back I thought it'd made for a great bivy top but never got to find a source for the fabric. Seam strengh should be no problem in an item that's not supposed to be under big tension. If it works for jackets, it should work for bivies. It won't be as packable as Quantum or the like but the waterproofness may make it a killer item and this fabric breathes well.
Be sure to keep us posted on how it works.
Oct 31, 2008 at 5:36 pm #1457091This is called top stitching and what you have done is most
commonly used on raincoats etc. that are afterwards
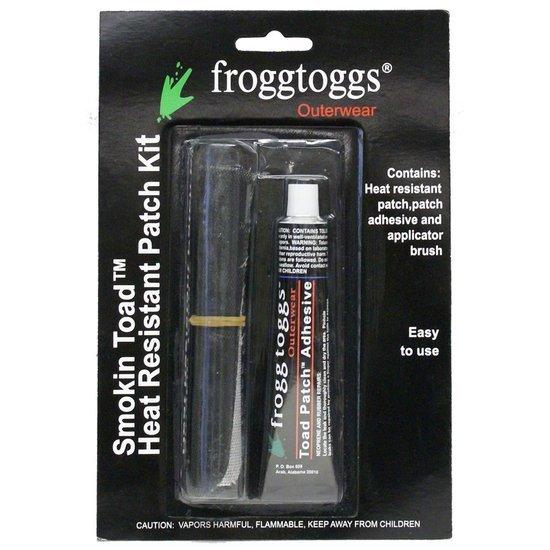
seam taped to cover the raw edge.Nov 1, 2008 at 10:49 am #1457188This glue from the repair kit. Looking around the village here, if there is something comparable. Bigger Pic. Contains Tolulene..
 Nov 1, 2008 at 6:01 pm #1457222
This is from an old thread here:
Source for 3M propore and make your one bivy questions
I have 5 yards of the Yellow Propore and it weighs 2.37 ounces per sq yard. What I have came from 3M in June of 2004 when they were still making it.
 Nov 3, 2008 at 11:01 pm #1457508
just tested a bivy on the back deck in the snow and under the roof drip, it works GREAT. Very breathable, made it with clear plastic bottom and electrical tape. Reused the snaps off one edge to make a 1/2 side closure. If using tape, trim off the sewn edges because they have the needle holes through it. Duct tape would be great too, you could do it inside and out for more durability.
Watch for small defects in the material, bring spare tape.
 Nov 4, 2008 at 5:59 am #1457515
Randall, what is the weight of your sleeping bag cover setup with this poncho?
Nov 4, 2008 at 10:16 am #1457546I just got back from an overnighter with my Driducks bivy. Unfortunately, the conditions weren't very challenging to testing the fabric–or so I thought at first. Lows in the upper 40s, moderate to light breeze the whole night, dry air. There wasn't any dew on top of the tarp, bivy, or anywhere around the campsite in the morning.
I went to sleep expecting lows in the mid-upper 30s, so I was wearing an insulated jacket, and a 20 degree down quilt. Unfortunately, the lows stayed above 45 degrees the whole night, so I was plenty toasty. This is important to note, though. Actually, I was too hot to the point that I started sweating several times during the night because of my laziness which kept me from just de-layering (I just hate waking up at 2am shivering, so it wasn't so much laziness, just wanting to prevent that from happening…). Anyway, come 2am in the morning, I woke up and realized that the dip down to 35 degrees had never happened. Instead, I was simply covered in sweat. The inside of the bivy top (which my skin was not in contact with) was also slightly moist. It turned out that all the sweat that was evaporating off my body was trying to get out of the bivy, but the top fabric wasn't able to keep up. Using my camp towel, I dried off the fabric, and de-layered to properly cool down. The rest of the night I was perfectly dry, and the condensation did not re-appear.
I wish I had a Goretex or eVENT bivy to compare it to. The only other waterproof bivy I have experience with is the Montbell Breeze-dry Tech bag cover, and the extent of my experience with that is that in highly humid conditions, there was internal condensation, but in highly dry conditions there was no internal condensation. Further testing is required with the Driducks bivy to see how much of a factor my sweating played in the internal condensation I saw. I think it was the single, direct cause, but would like to confirm it on a night when I layer a little more appropriately for the actual conditions.
Paul,
Clear plastic bottom and duct tape. I'm envious I didn't think of that. With such a simple and inexpensive construction, a bivy like this should be within the buying power of just about any UL backpacker out there.Nov 4, 2008 at 12:27 pm #1457560yeah, this is so nice for kids that cant spend buzzillion bucks. They'd learn alot from this project too.
I have the ID eVent South Col and it does seem about the same, but I purposely left it draftier, with snaps. At least for the moment, kept the hood for a vent shroud and tie-up point.
It was also pretty cold and quite windy, so even breathing completely inside the bivy may not have been enough to test it. This is with regular clothes on, WM Versalite, hat for just a couple hours. I was toasty, not sweating and there was zero condensation noticeable even though I could see patches of snow and snowmelt through the material. The plastic did have some condensation.
Wondering about putting a balloon or blown-up pack liner between my sleeping bag and the bivy for better angle. Seemed like it might be worth investigating. A higher volume may help you with condensation too?
My original concept for a winter bivy for my friend was to use no clear plastic, instead replace it with a nice 25" wide RidgeRest. Less condensation and less redundancy of gear since now no groundsheet, but the pad is huge by itself, a huge package over 2 feet by 7.5 inch cylinder = 1100 cubic inches = 18 liters! Still might do it…
Nov 5, 2008 at 12:03 pm #1457689John,
Weight of the DD poncho is 9 oz's. $14 with free shipping at the site below. I think I added a few grams of weight with the addition of the drawcord at each end, but still right around 9 oz.Randall
http://us.st12.yimg.com/us.st.yimg.com/I/yhst-11770478610819_2026_29187863
Nov 5, 2008 at 3:33 pm #1457714You should compare it to your DWR bivy.
The dew point in outer layers sometimes has little to do
with breathability.Nov 5, 2008 at 8:43 pm #1457770This should be part of a curriculum, it's so affordable and basic, educational, and rewarding.
-
AuthorPosts


- You must be logged in to reply to this topic.
Forum Posting
A Membership is required to post in the forums. Login or become a member to post in the member forums!
Our Community Posts are Moderated
Backpacking Light community posts are moderated and here to foster helpful and positive discussions about lightweight backpacking. Please be mindful of our values and boundaries and review our Community Guidelines prior to posting.
Get the Newsletter
Gear Research & Discovery Tools
- Browse our curated Gear Shop
- See the latest Gear Deals and Sales
- Our Recommendations
- Search for Gear on Sale with the Gear Finder
- Used Gear Swap
- Member Gear Reviews and BPL Gear Review Articles
- Browse by Gear Type or Brand.
