Topic
Sub-four oz. carbon fiber tripod
Forum Posting
A Membership is required to post in the forums. Login or become a member to post in the member forums!
Home › Forums › Off Piste › Photography › Sub-four oz. carbon fiber tripod
- This topic is empty.
-
AuthorPosts
-
Jul 16, 2008 at 10:39 am #1230192
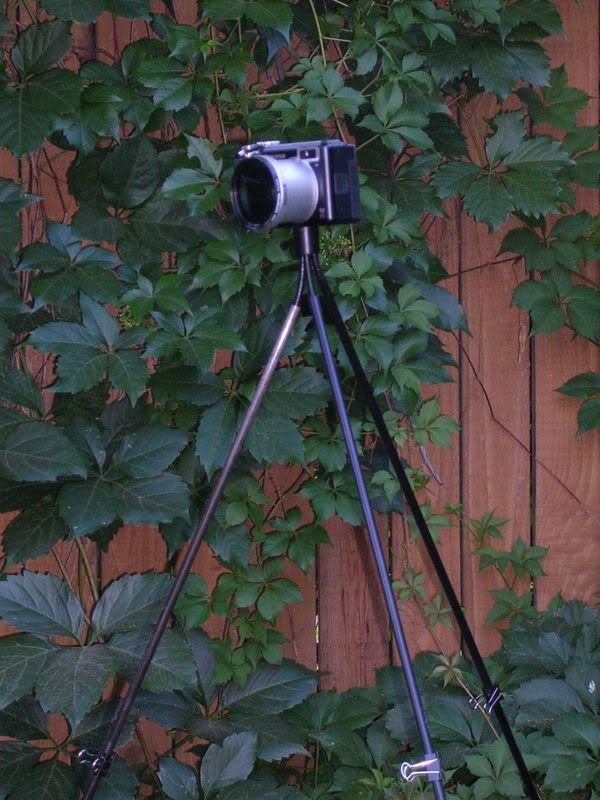
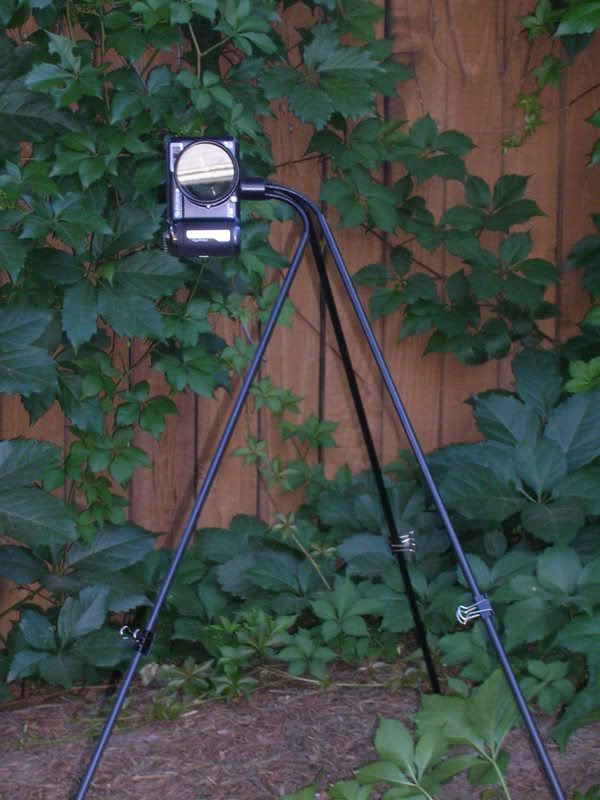
Also works in portrait orientation.
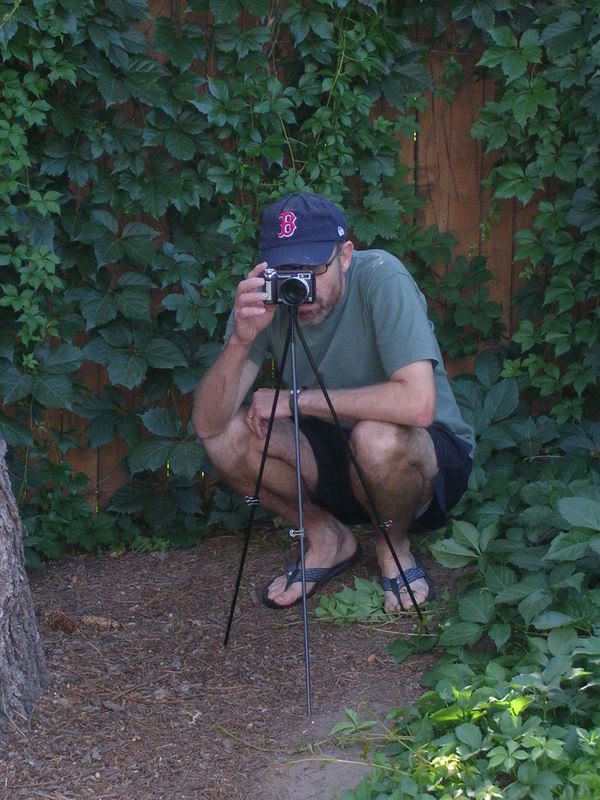
Usable height is about 1" to 30". Of course, with more pole sections you can go higher.
The tripod was put together from items found in my gear closet. Construction is simple. Get one of these and gently pull off the rubber feet. The legs are just the right size to fit inside standard Fibraplex poles without falling out. I used pole sections from two tarp poles. The lower sections are held on with binder clips. You can save 9 grams if you can find a way to build up the ferrules slightly so that the sections come on and off easily while still holding while moving the tripod. Fit the rubber feet on the bottom of the poles.
Jul 16, 2008 at 12:44 pm #1443207Nicely done!
Jul 17, 2008 at 5:33 pm #1443385Well done Dondo ! Great idea. This is looks to me like a good candidate for the multi-use section.
For anyone considering this project, select the mini tripod carefully. Some are really very flimsy and brake off where they attach to the head.
( a piece of "fire blanket" around the base could make a good three-sided windscreen)
FrancoJul 17, 2008 at 7:19 pm #1443395Dondo,
This is great. It makes my Gitzo 1530 look heavy! Have you pushed the limits of weight capacity? I'd like to suggest hanging a stuff sack or mesh bag around the neck before mounting the camera on top. The stuff sack can hold rocks or dirt to add mass for stability in windy conditions.
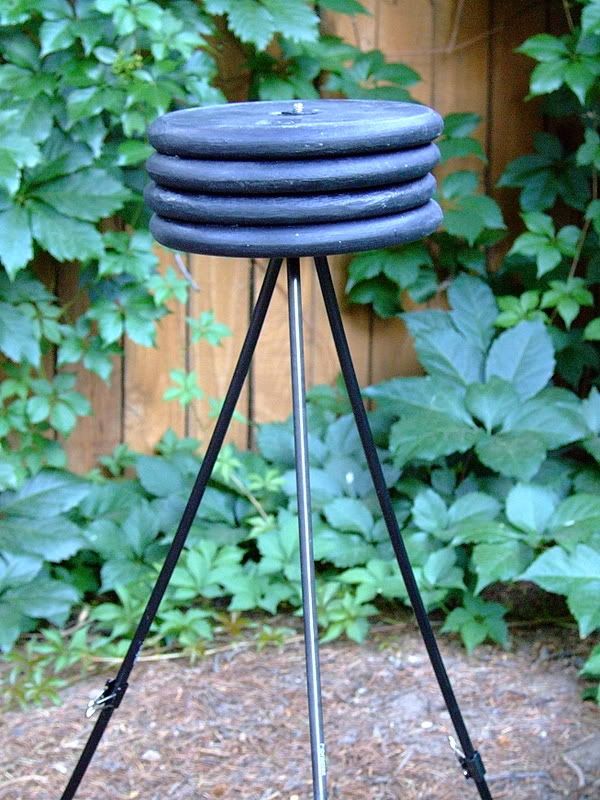
ChrisJul 20, 2008 at 6:09 am #1443634Thanks, guys. Great suggestions. Up to recently, I've only supported about 13 oz. on the tripod, but based on your posts, I decided to test the sturdiness. First, I piled weights on the tripod. As you can see, with 20 lbs. the carbon fiber legs bow in slightly but otherwise hold firm.
Next, I tested the mini tripod. Using a twisting motion and considerable force, I was able to pull one of the legs out of it's socket. Since this is unlikely to happen in normal field conditions, I'm confident that the mini tripod will not break. Of course, YMMV. If your D3 goes tumbling into a ravine, don't come crying to me. ;-)
Jul 20, 2008 at 6:47 am #1443639Nice! I'd only have 2-3 pounds mounted at any given time. This would be a nice reduction in pack weight from my 3.6 pound tripod/head combo (Gitzo 1530 & Giottos MH1301).
I keep going back and reading your post on sourcing materials. Are all of your sections part of the Fibraplex poles or do you have Fibraplex and some other tarp pole? I'd love to try this out. It looks like it would work well with my 6×6 TLR and 6×9 folders. I think I'll keep LF on my existing tripod for now.Jul 20, 2008 at 8:05 am #1443642Hi Christopher,
I used sections from two standard 48" Fibraplex tarp poles. The first time it came in three sections; the second time, four. It looks like four is standard now. You can custom order any length you'd like. The legs of the mini tripod fit into the ends of the sections without the ferrule. Point tips could be useful in certain conditions.
Jul 20, 2008 at 8:54 am #1443648I was just thinking… call TiGoat for a third AGP.
Multi-use application could make it a spare hiking/tent/tarp pole, or as a tripod with the other two poles.Jul 20, 2008 at 12:02 pm #1443672Sounds like a good idea. Let me know what you come up with to attach the hiking pole to the tripod. I've made tripod contraptions using two treking poles with one Fibraplex pole using a Ultrapod or Gorillapod head. To attach them I used velcro straps or plastic pipe. Nothing I came up with was very stable or elegant and I sometimes missed the shot while setting up. Since you'll already be starting with two legs of the tripod in place, it should be quicker to assemble.
Aug 3, 2008 at 8:10 am #1445550I got a chance to test the tripod on a recent trip to the James Peak Wilderness in Colorado. The tripod was designed to be very light, so there would be no temptation to leave it behind and very easy to use, so I wouldn't be tempted to just hand hold the camera after a long day of hiking. It weighs in at 3.8 oz., so it was an easy decision to pack it. Ease of use was good but it could be better. The little rubber feet tended to come off; if I continue to use the feet, they'll be glued to the fibraplex pole extensions. More likely, I'll skip the feet and use shock-cord to make the tripod a single unit rather than a collection of parts. The ability to using the mini tripod by itself will be lost but I'm finding that I rarely want to use it that way. Right now, I'm working on a way to attach shock cork to the mini tripod.
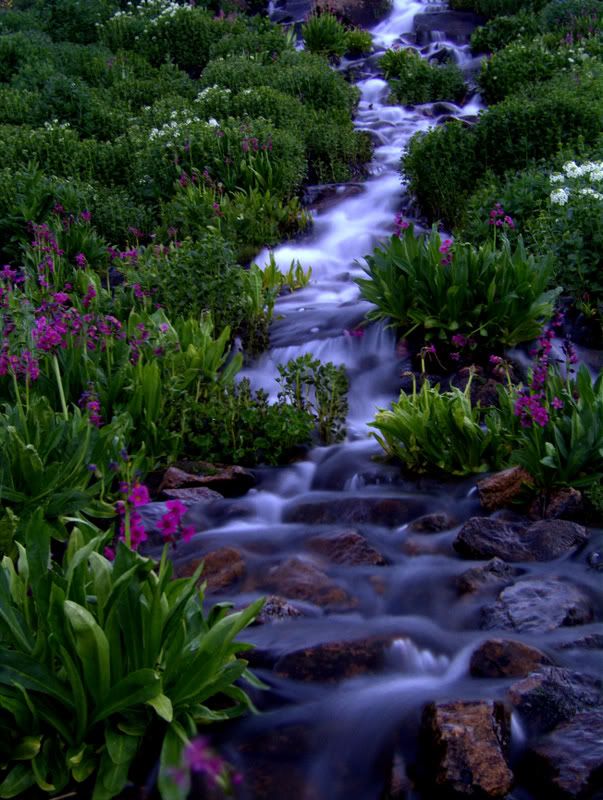
On the whole, I'm happy with the tripod. It's allowed me to get some shots that would not have been possible with hand holding or using the Ultrapod or Gorillapod. Here's a three-second exposure taken with the tripod legs set into a small stream:
Edit: It's possible to work thin shock cord into the hollow legs of the mini tripod a millimeter at a time. Using needle-nose pliers helps a lot. A few drops of superglue squeezed into each joint will hold the shock cord securely. By subtracting the binder clips and adding shock cord and tips, you get to a total weight of 3.9 oz., including a velcro strap. The convenience is greatly increased as the tripod can be deployed in just a few seconds. Folded up, the tripod measures about 18"x3/4".
Sep 7, 2008 at 1:56 pm #1450335Hello,
Perhaps I missed something here, but I'm curious as to the brand/model of mini-tripod that is being used as the head for this tripod. I'm quite interested in building one of these for myself.
Thanks for the help.
GordonSep 7, 2008 at 5:45 pm #1450366sweeet. I need one.
I have an unrelated question. I'm really new to non-point and shoot photography. How did you get a 3 second exposure w/o having a completely overexposed photo.
Again. Nice work on both!
Sep 8, 2008 at 2:46 am #1450406
Gordon
I don't know the brand Dondo used, but there are many "generic" versions of it , usually 4" or 6" long.Jay
In photography the exposure is measured in F stops. From one stop to another you double or halve the amount of light that hits the film/sensor.
The three variables are ISO, aperture and shutter speed.
ISO : 50/100/200/400/800 ……( ISO is the "sensitivity" of the film or sensor . The higher the number the less light you need but the more grain/noise you get)
Aperture ( an iris will control this) F1/2/4/8 (but more commonly 1.4,2.8,5.6…) note that from F1 to F2 you have 2 full stops , so there are in between steps, IE F1.4/1.8/2/2.8/3.5……. with in lens apertures (DSLR) , or even more with in shutter (compact cameras) aperture blades.
F1 is the existing light, F2 is 1/4 of that.
Shutter speed 30/15/8…sec then 2/4/8/15/30/60/125…. fractions of a sec (125th) from 1/60th to 1/125th there is one stop (twice the shutter speed/half the light)Digital compact camera usually have an Auto ISO setting , most will let you set that manually.
So……… to get a 3 sec exposure, drop the ISO to your lowest setting (usually 50 ) then select 3 sec( shutter priority) if you have that or just select a small aperture (Aperture priority , F11/16/22…) till the camera gives you the desired shutter speed .
If this does not make sense, please ask again
FrancoSep 8, 2008 at 7:27 am #1450424Franco. I've read 3 books on "photography" and none of them have so concisely explained what you just did or even gotten close. Thank you for that!
Sep 8, 2008 at 7:53 am #1450427Jay,
If you get some time, read through here: http://www.fredparker.com/ultexp1.htm
Hopefully it will add a bit of clarity to the subject if you still have questions. The link above is mainly to help ditch the exposure meter for use with manual controls.
ChrisSep 8, 2008 at 7:55 am #1450428Not only is the tripod a great design, but the stream photo is fantastic. Whilst Franco's info on ISO, Aperture, shutter speed is succinct, useful and timely
Thanks
Sep 8, 2008 at 4:14 pm #1450510Thank you for the comments. My usual "retail" analogy was the faucet and the bucket.
To get the correct exposure you need to fill the bucket.
The size of the faucet is the aperture, the amount of time you leave it turned on is the shutter speed; the size of the bucket is the ISO.
(beat that for concise explanation….) My previous version was to make sense of the numbers.

BTW, lightweight tripods tend to be wobbly. Dondo has demonstrated that his can take the weight, so here is a way to stabilize this type of tripod for long exposures and or windy days and how to make use of it as a windscreen holder….
FrancoSep 8, 2008 at 5:08 pm #1450522Thanks for the comments, guys. And Franco, I really like your bucket analogy.
To make the above stream photo, I scouted out the exact location after I arrived in camp. If I had made the long exposure at that time,though, the "bucket" would have quickly overfilled and I'd have a very overexposed result. So I waited until well after sundown and set the shutter speed at three seconds to get the silky effect. In addition, I used a polarizing filter to further cut down the light.
Sep 8, 2008 at 5:38 pm #1450529Gordon, this is the mini-tripod that I used. As Franco mentioned, there are many versions of this but I'm not sure if the legs all have the same diameter. If you're shopping locally bring your poles along to make sure you have the right size. The legs of the mini-tripod should be snug inside the poles while still being able to move. If you make the shock-corded version(which I much prefer to my original design), the shock cord should fit snugly inside the legs of the mini-tripod.
Sep 8, 2008 at 6:28 pm #1450534Usually the problem is not having enough light, hence the use of "faster" (wider aperture) lenses and higher ISO. The former is more expensive and heavier, the latter causes more grain/noise.
In some cases we have too much light for the desired effect. This is where a Neutral Density filter (ND2/4/8= 2/4/8 stops) comes handy. The polarizer will vary from about 1.5 stops (when not aligned to polarize) to 2 stops when fully polarized. Whilst you can somewhat simulate an ND filter in Photoshop you cannot polarize in post production. Keep in mind that if you use a DSLR , you need a Circular Polarizer to get the correct exposure.
FrancoSep 9, 2008 at 4:57 am #1450584Franco, would it be possible to get the "silky water" effect in daylight using a neutral density filter? If so, which filter (2,4,8) would be most useful? Thanks.
Sep 9, 2008 at 8:06 am #1450597might have to look at getting a lightweight tripod myself. so many great shots i can take with one.
my buddy, a photographer, will bring his gear on short day excursions, but for longer trip it's not feasible. mind you he also uses a canon eos – 1d mark III.
Sep 9, 2008 at 4:50 pm #1450672Dondo
I would get an ND 8. With your PL on top that gives you a 4-5 stops decrease of light. Set your ISO at 50 and play with the aperture setting till you get what you want.You can also use "exposure bracketing" on top of that, if you have -2/standard/+2. Since with digital it costs nothing to take another shot, try also high shutter speeds to freeze water in the air.
Franco
BTW ND2 = 1 stop (IE 1/2 reduction )
ND4 = 2 stops (1/4)
ND8 = 3 stops (1/8)Sep 10, 2008 at 5:06 am #1450720Thanks for that, Franco. I can't wait to try it out.
Sep 26, 2008 at 7:37 pm #1452383I'm trying to figure out what lengths of poles to order from
http://www.fibraplex.com/tentpoles2B.asp . I like the shock cord idea, it sounds like it makes for a much easier set up and take down.
What length poles do you use, and have you ever wished it was taller?I'm thinking about going with 2 18" poles for each leg, using the shock cord configuration you described.
Thanks for sharing, i love the simplicity! For less than $50 you get a tripod lighter than even my gorrillapod. :-o
-
AuthorPosts
- You must be logged in to reply to this topic.
Forum Posting
A Membership is required to post in the forums. Login or become a member to post in the member forums!
Our Community Posts are Moderated
Backpacking Light community posts are moderated and here to foster helpful and positive discussions about lightweight backpacking. Please be mindful of our values and boundaries and review our Community Guidelines prior to posting.
Get the Newsletter
Gear Research & Discovery Tools
- Browse our curated Gear Shop
- See the latest Gear Deals and Sales
- Our Recommendations
- Search for Gear on Sale with the Gear Finder
- Used Gear Swap
- Member Gear Reviews and BPL Gear Review Articles
- Browse by Gear Type or Brand.

