Topic
Heineken Cone
Forum Posting
A Membership is required to post in the forums. Login or become a member to post in the member forums!
Home › Forums › Gear Forums › Make Your Own Gear › Heineken Cone
- This topic is empty.
-
AuthorPosts
-
Nov 17, 2007 at 8:06 am #1225861
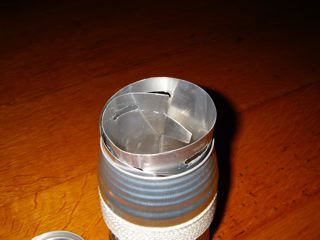
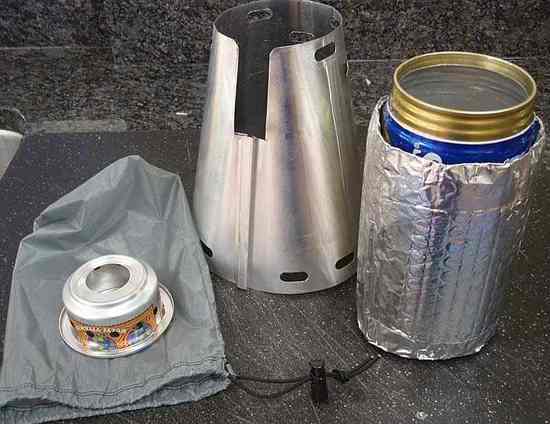
Here are some pics of a cone I made for my Heineken pot. It is made out of aluminum flashing (slightly heavier than what I would like, but all that was available at Home Depot.) Patterned after the Caldera Cone by Trail Designs.

Design criteria:
1. Supports the can
2. Effective windscreen
3. Improves boil times
4. Fits COMPLETELY inside pot
5. Easy to assemble and disassemble
6. As light as possible (Duh!)I own the great Trail Designs cone for my Evernew 1.3 pot and love it, but I wanted something smaller and lighter for solo camping. Since they tune each cone to specific pots and Heineken Beer can is not on the list, I decided to make one myself.
I used a large sheet of paper, aluminum flashing, scissors, Heineken Beer can (empty), and 1/16th inch fiberglass wick. First, I wrapped the can with the wick down about 1 inch from the upper shoulder.
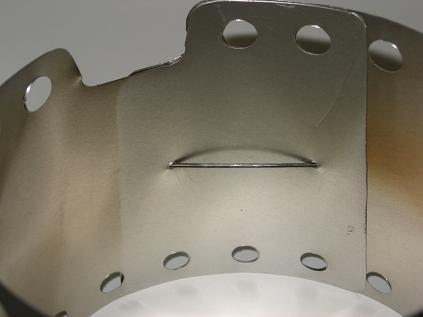
Tinny's instructionsThen I made a paper cone, This was a lot of hit and miss. Since I wanted it to fit in the can, the height of the cone was constrained. This limitation gives a steeper angle to the cone, but it seem to work. After I got the paper template made I traced it out on the flashing, decided that I could connect the two ends with a slightly overlapping slot and tab join, and cut it out. The slot and tab worked, sort of, but kept slipping so I happened upon making a Z bend in the upper tab and that worked perfectly.
The bottom tab was left straight. Then using my Caldera cone as a template, I marked in a number of air slots at the top and bottom edge. Using a 1/4 inch drill and Dremel tool I incrementally added slots and then checked boil times and stove function. Frankly, I was getting tired after a while and sort of ended up with 7 air slots on top and six on the bottom.
Specs:
Weights:
Cone–30 gm
Pot with wick insulator–42 gm
Stove–13 gm
Lid — 7 gm
Total–92 gm (3.25 oz)Boil Time (16 oz of 60 F water to 212 F using thermometer) = 9:45
Fuel Use : 16 ml to get to boilOther Stuff. I used my own version of the Trail Designs 12-10 stove as well as an official version. with same results. Other stoves I tried didn't work as well or didn't work at all. The cone DOES fit in the pot.
This is because I use the bottom wrap of the wick insulator as the "rim" that the cone supports. I know- a wire pot stand and a foil wind screen weigh half of what my cone weighs, but the flashing I have is heavier than the Trail Designs stuff. I have not done enough experimenting to tell if this is optimized or not.
Hey! Bottom line is that it was fun to do. So, I'm headed out for an overnight to test it out. Back tomorrow.
-Mark
Nov 17, 2007 at 8:27 am #1409362Mark,
This is very slick. In fact, you have inspired me – I'm putting this on my list of "things to make". Be sure to let us know what the field test results are.
A little of topic, but I have been through many can openers, and while they do work, none of them open the heiny very nicely. Which opener did you use for those results?
Thanks,
SteveNov 17, 2007 at 10:02 am #1409365 AnonymousInactive
Mark,
Could include a copy of your template for the Heineken Cone
Thanks
Nov 17, 2007 at 12:01 pm #1409369I have used the Good Cook brand safe cut can opener as seen here:
 Nov 17, 2007 at 2:23 pm #1409376
That may be the ultimate Heineken answer, maybe in titanium. I doubt that oven liner would survive. Gotta make one. Anxiously awaiting your template.
Nov 18, 2007 at 7:49 am #1409424Ok, back from my overnight. Temps were mild in the 60's and 70's. Altitude: 1200 ft. The cone worked great. Boil times were around 7min on a little less than 1/2 oz methanol. This is because my starting water temp was more like 72 F . (My test temp is 60 F.).
I found an added benefit of the cone. It works as a pretty good insulator. I boiled enough water for my freezer bag meal with about a cup extra for tea after dinner. I poured the water into my meal for rehydration leaving a cup in the pot. Seventeen minutes later I was ready for tea and the water in the pot was still hot enough to brew a good cup. I left the cone on the can the whole time and I think the cone and air space between it and the pot act as an insulator.
Steve: The can opener I used is the Good Cook brand Safe Cut can opener. The one Ryn has pictured above. It is a side cut can opener. It splits the seam around the top of the can along the side not the top. Works great, no sharp edges, and I've seen it or knock-offs at our local supermarket for about $5-$7. Also, available on the web.
Template coming up later – but I've gotta get a shower first.
-Mark
Nov 18, 2007 at 9:12 am #1409430I found an added benefit of the cone. It works as a pretty good insulator.
I respectfully submit that in Mark's locale (southern Texas) the primary need for insulation is to keep the can's original contents cold until it has been properly disposed according to the brewmaster's intent! (burp)
Mark, where in TX are you? I lived in the "Golden Triangle" for a few years as a youth.
Nov 18, 2007 at 9:23 am #1409431Jim,
Ok, so this cone thing can potentially insulate both ways. I will obviously have to do further extensive testing:-)
I live in San Antonio. Not quite as hot and humid as your old haunt, but still warmer than MN. Having lived in Northfield, MN for a couple years I feel your pain. Where in MN do you live.
-Mark
Nov 18, 2007 at 9:41 am #1409433Mark,
What type of material did you use to wrap the can pot? The video didn't mention what the wrapping was made of.
Nov 18, 2007 at 10:12 am #1409436Mark, Awesome design!
For what it's worth, here's the spreadsheet I used for designing some cones. Once you have the dimensions it's pretty easy to create a template with a straight edge, square and tape measure. Add some length for overlapping the ends. Swing additional arcs to line up air holes.

Here's the method I used to 'stitch' the ends together using a piece of wire or a tent stake:

 Nov 18, 2007 at 10:14 am #1409437
I'm in the Twin Cities.
Having lived in Northfield, MN for a couple years I feel your pain
On the contrary, I prefer the MN climate to that in S.E. TX. But having heard rumors that water has actually been observed evaporating in San Antonio (unlike Port Arthur), I'll admit that your experience is likely different from mine:-)
Nov 18, 2007 at 10:32 am #1409439Richard,
The material is 1/16 inch round fiberglass wick for oil lamps. Available Here .
Nice because it doesn't burn, insulates well enough to let you pick up a can of boiling water without getting burned, and is relatively light. I've had no problem with the fiberglass "itch" one gets from handling fiberglass insulation. The fact that it is braided may help. Also, it gives you about 6 or 7 feet of cord you could use if needed, although I don't know how strong it is.
-Mark
Nov 18, 2007 at 10:42 am #1409440Jim,
(Truth be told- I prefer the MN climate also, but job and spouse keep me here- Oh Well.)
-MarkNov 18, 2007 at 10:53 am #1409441Lance,
Thanks, but the design credit should go to the Trail Designs folks. I just modified it to my needs.
Wow! Nice work yourself. Do you make these commercially?
-Mark
Nov 18, 2007 at 12:51 pm #1409448Mark,
I see that you have the fiberglass wick around you Heiney Pot. I was wondering where you got the wick from (internet, local store, etc)? I have been searching for something like that, but have been unsuccessful locally, and haven't found an internet site that I'm pleased with yet. Sorry, I know this isn't the center focus of this thread, but I've been wondering this for awhile. Thanks for the help!
P.S. Awesome cone. Thanks for the info on where to get the aluminum. I think I will get some and give this project a go.
Nov 18, 2007 at 1:21 pm #1409453Nov 18, 2007 at 7:17 pm #1409491All:
Mark sent me a private mail on this subject. I thought that rather than responding privately, I would cover the salient points here for everybody.
Mark:
It was very thoughtful of you to consider whether or not you
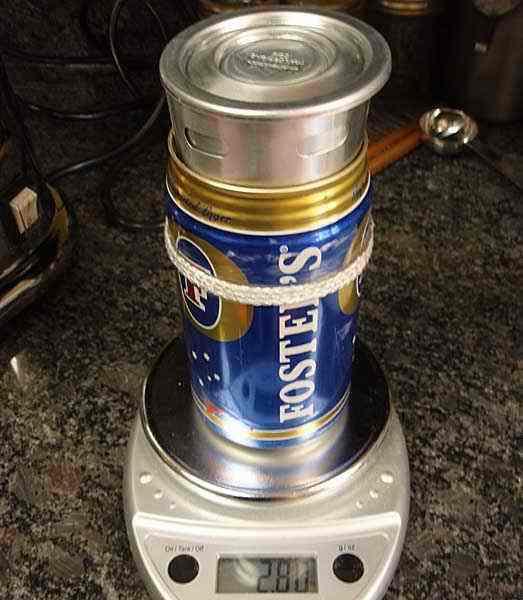
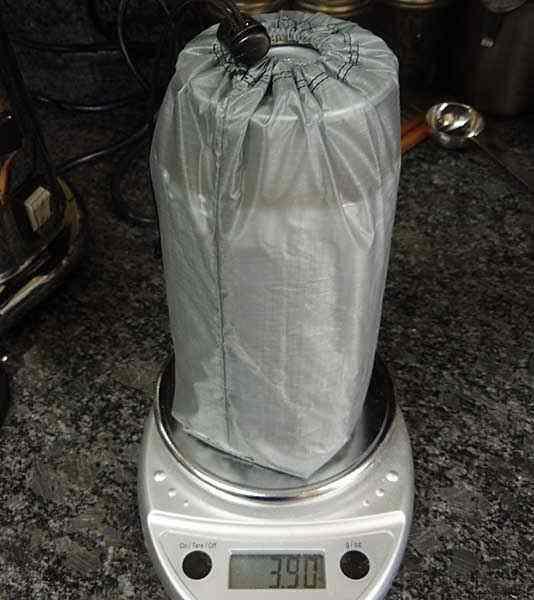
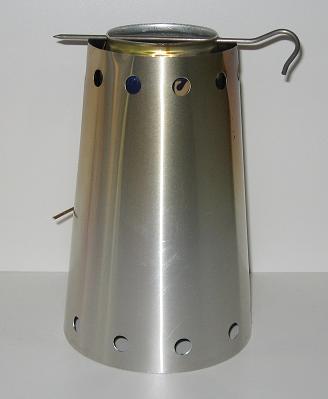
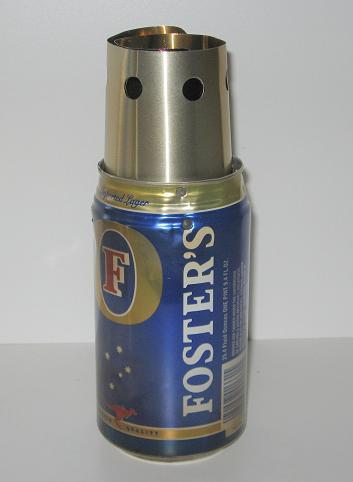
were infringing on our intellectual property and contact us to make sure. Yes, we applied for the patent for our Caldera Cone over 2 years ago and expect it to be approved soon-ish. Patent Pending comments are sprinkled around the website and are now being stamped into the cone itself. Let me know where on the website you were looking and I can add it to that area as well. We have devoted a lot of time, money, tooling, and design expense to develop the Caldera system. While we would prefer people respect our efforts and not publish plans to copy our system, we also come from the same community as you and expect a certain amount of curiosity. So long as DIY efforts are directed toward personal curiosity….and not general or commercial gain….I doubt we will have many issues.Now, to the beer can Caldera. So you know, we have been developing this for a while and prototypes are currently in the field being tested. I am including pictures of an early version below….our current model has evolved from this a bit. As you can see, on this prototype we chose a slightly different design parameter over Mark…..that is for more of the Fosters can to be inside the cone while cooking, at the expense of the cone sticking up a little taller in the packed state. Also, the dovetail closure has a larger "handle cutout" than normal because of the geometry issues dictated by needing to feed one dovetail into the other. As I mentioned, these variables have been tweeked somewhat and our latest design packs more into the can and the dovetail cutout is less severe.
Our ultimate plan is to have a kit not dissimilar to what you see here that includes the Fosters can, Caldera Cone, lid, stove, and fuel bottle. Still playing around with the cozy and packaging options….and how best to source large quantities of Fosters cans. In the mean time, we would be happy to make our latest version of the cone and stove available to BPL readers in support of your DIY projects….you work up how best to build the can, lid, wicking, packaging etc…..and we can work a deal on the cone and stove.
Let me know if there is any interest in that, and I'll work up some sort of deal with my partners and let you know!
Rand :-)


 Nov 18, 2007 at 7:44 pm #1409496
I want one!
Nov 19, 2007 at 4:27 pm #1409574Rand,
Thanks for the reply. And of course nice work on the beer can Caldera Cone, I guess I should have waited. Anyway, I would like to ask 2 questions and give one comment.1. Why Foster's and not Heineken? I know the Foster's has slightly more volume, but with the ridges I think the Heineken can is stronger and in my limited experience more readily available (like all the grocery stores and convenience marts around here carry Heineken. Foster's is much rarer. Maybe the cone will fit both?
2. Is there any reason not to cut off the bottom rim of the pan of the 12-10 stove; at least flush with the edge of the stove so that the stove fits completely inside the can?
3. I assume the cone is taller than the can for reasons of thermodynamic efficiency, but it sure is nice to be able to stow everything in the can.
Once again thanks for your generous input.
-Mark
P.S. I would be interested in helping you with this latest cone if I can.
Nov 19, 2007 at 5:20 pm #1409581Rand, I too would be interested in a cone/stove! Brian
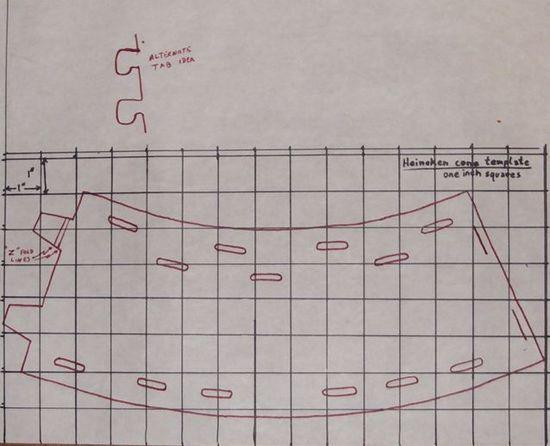
Nov 19, 2007 at 5:33 pm #1409583Ok here is the template, rough though it may be. I seem to have some problem with parallax and my camera so note that the horizontal lines, especially in the upper left part of the grid curve down slightly toward the edge. The red outline is a tracing of my cone. I would highly recommend that you make one out of paper and tweak it so it works for you before you commit to metal.

-Mark
Nov 20, 2007 at 2:25 pm #1409692In honor of the Thanksgiving Holiday here in the US, I was able to make a cone out of a "disposable" heavy duty aluminum turkey roasting pan. Probably a heavy duty oven liner would work, too. It shaved about 9 grams from the cone (30%) which brings the total for pot, lid, cone, and stove to 83 gms (2.93 oz). I don't know if it will hold up to heavy use, but it is lighter.
Hmm, I wonder what my wife will say when she finds the roasting pan has disappeared?
-Mark
Nov 20, 2007 at 2:25 pm #1409693Mark, Sorry for the delayed reply:
"Do you make these commercially?"
No, all the cones in the picture above were prototypes for a K-Mart grease pot/pepsi can stove combo for my personal use. One in particular worked best. Pot height above the stove seemed to have the greatest affect on efficiency. Base diameter and varying the air holes had much less affect.
Here are pics of a Foster can cone I tried out. It still needs work. Stove and 8 ounce fuel bottle are stored inside the pot at right.


I found that temperature control is more difficult with a tall, narrow pot than a short, wide pot. Stove design becomes more critical. Again, pot height above the stove made a big difference.
The cone gurus (does that make them cone-heads?) at Trail Designs seem to have all this dialed to perfection!
-Lance
Nov 20, 2007 at 2:49 pm #1409700Sorry for not getting back to you all prior to now….and can't spend too much time now (sorry…tgiving and remodel and filling cone orders swamping me at the moment :)
0) Looks like there is some interest "brewing"…..let me caucus with the team here and I'll get a can-cone deal out to you all probably right after tgiving.
1) Why Fosters? Well….the pure cylinder of the can….while technically less robust (we still think it is robust enough) provides more flexibility for placement of the wick. ….and no….the Henie can is too big….the cone will only fit one at a time.
2) Primer pan. Yep…you can trim and file that off….and it will save 4 grams. We like it there because it is a handy primer pan for freezing temps and in this case, the edge of the primer pan protects the top of the screen sticking out of the can!
3) Cone height. Yes…it is for thermodynamic reasons. Specifically, we want 2 cups of water INSIDE the cone during the cooking process. That plus the desired stove offset led us to the height you see. We might be able to get it a little lower as I implied earlier by pushing the envelope on those two dimensions. Would like to differ with you on one point. You actually DON'T want the cone inside the can. The cone can catch on the lip of the can and make it hard to extract and possibly increase the chance of cutting yourself as you try.
Thanks for the note….but gotta run….will post some sort of deal here in the next few days.
Rand :)
Nov 20, 2007 at 6:11 pm #1409731Roasting pan? What roasting pan?
Shouldn't you be barbecuing that turkey for her this year?
-
AuthorPosts


- You must be logged in to reply to this topic.
Forum Posting
A Membership is required to post in the forums. Login or become a member to post in the member forums!
Our Community Posts are Moderated
Backpacking Light community posts are moderated and here to foster helpful and positive discussions about lightweight backpacking. Please be mindful of our values and boundaries and review our Community Guidelines prior to posting.
Get the Newsletter
Gear Research & Discovery Tools
- Browse our curated Gear Shop
- See the latest Gear Deals and Sales
- Our Recommendations
- Search for Gear on Sale with the Gear Finder
- Used Gear Swap
- Member Gear Reviews and BPL Gear Review Articles
- Browse by Gear Type or Brand.
